|
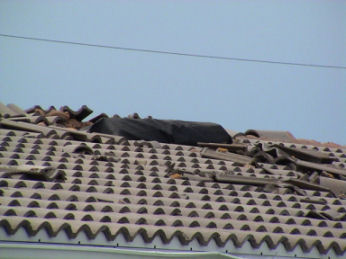
Your House Lost Some Roof Covering
What you need to do is quickly evaluate the vulnerability of your home to leaks and if you find sources of real or potential leaks do something about it. The following will help you determine if the building is vulnerable to leaks after the wind has blown and if so what you might be able to do about it to reduce water entry.
When you lose weather roofing, the raincoat of your building, you need to evaluate within a very few days the vulnerability/susceptibility of your house to having water leaks so that you can decide what to do and get it done. Some roof coverings can be lost without making the house very vulnerable. For example if you lose shingles or roof tiles only over the eaves, any leaks that occur will likely be outside the living area of the building. Also, if roof tiles are lost but the waterproof underlayment remains intact, you may not experience water leaks.
|
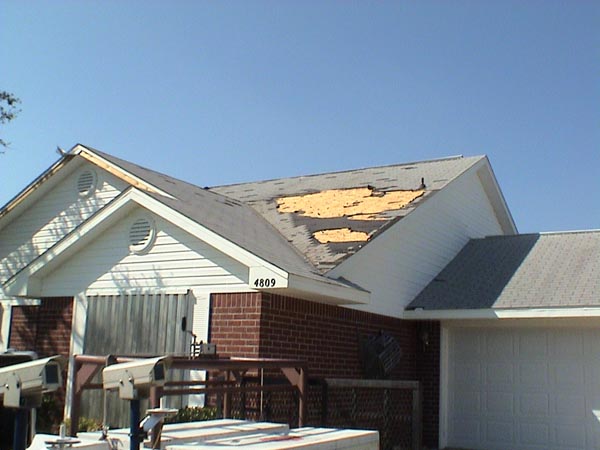
When the roof deck is exposed, you are certain to have leaks and will need to cover the area as quickly as possible.
(click image for larger version) |
|
Evaluating the Damage: Just because you have or find water in your house does not necessarily mean that it came from your roof or if it came from the roof that it will leak during subsequent rains. The water may have entered not because roofing material has been lost but from some other entry routes. Alternate water entry routes include wind driven water (WDR) through soffits at eaves even if they are still in place and seemingly protected by the roof, soffits at gable ends (frequently a more important but and somewhat hidden risk as compared to eave soffits), chimneys, flashing, gable end vents, roof vents that have blown off, roof vents still in place, WDR through sidewalls, WDR from inadequate flashing (inadequate because it was not really designed to deal with extremely high winds). Some of these points of entry may not be important unless there is another strong wind event.
It may be obvious that roofing material has been lost. On the other hand it may be hard to see parts of the roof from the ground or you may not be able to get close enough to a roof area to evaluate the significance of missing roofing. You might try binoculars to get a better look. You might also need to go across the street or way out in the yard to get a good enough view. Again, you will need to use binoculars if you have to get very far away. If you don't have binoculars, maybe a friend or neighbor does. You may also be able to set a ladder against the roof to get a better view. As a last resort, if it is safe for you to do this, you may be able to get up on the roof. Don't go up there if you are not physically up to the task, if it is slippery or wet, or if it is a concrete or clay tile roof. Roofs can leak even if all the roof covering is in place because leaks, especially in heavy or rains of extended duration, can and frequently do occur around, over, and under flashings. These sorts of leaks are difficult to detect.
What to look for on almost any roof?
If black felt paper is exposed, it is likely that water will slip under it to cause leaks. If you can see plywood, then almost assuredly there will be roof leaks.
The following are some more things to look for and temporary corrective actions you can take until you are able to get a professional licensed roofer.
Shingle roofs: Determine if shingles are lost only over unimportant areas such as eaves, the garage, and overhangs. Also determine what part of the shingle is damaged. Is it just the tab or have whole shingles been torn off in an area? If it is just the tab, you may not develop a leak for some time unless the top edge of the shingle below is also exposed. If you can locate some of the tabs in your yard, you may be able to glue them back in place with asphalt roofing cement to help keep the weather roof in place until you can get a roofer.
Tile roofs: Even if roof tiles got blown off over part of your living area your roof probably won't leak much if the roof tiles were secured to the roof with nails or screws that did not get pulled out and the waterproof membrane stayed intact. Missing nails or screws would leave little holes through which rain could enter. Tile roofs can also be held down by concrete or adhesive foam paddies. If this is your case, leaks are less likely unless the waterproof membrane is torn around those paddies.
Don't be misled into thinking your tiles are held down by concrete if you see concrete on or between roof tiles because; frequently, concrete may have been used this way to make roof tile look nice and it may have been added at the eaves to seal openings under the tile edges where birds might nest (bird stops). If this is the case, the concrete is not essential to holding tiles down (except perhaps on ridges and hips, the upper most tiles). When concrete or adhesive foam is used to hold down roof tiles is applied between the waterproof membrane and the bottom of tiles.
Also, don’t be misled into thinking that concrete is needed to hold tile on a roof. Concrete is brittle and does not adhere well to most materials. Ideally, concrete forms a bond with the tile to hold it in place. Because concrete is brittle, subject to aging, and daily expansion and contraction because of temperature changes, it is quite apt to crack or break the bond with the tile, thus becoming ineffective at holding tile in place.
Experience has shown that the first roof tiles to get blown off are those at the peaks and ridges or those around the outside perimeter of a roof. The good news is that these may not be the most important tiles. This is not to say that damage to them should be thought to be harmless because at the ridge, the roof sheathing is sometimes left open to provide a way to let hot air out the attic and sometimes the felt underlayment is not properly lapped over the ridge. Ordinary rain can certainly fall into the areas where tiles are missing and may find its way into the attic through the vent gaps or by seeping under the underlayment. You can check for obvious openings or holes by going into the attic on a bright day and looking to see daylight through the areas where tiles were damaged.
Common problems and solutions:
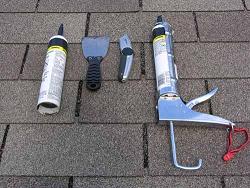
Plugging Small Holes with Roofing Cement: Roofing cement is a black tar like substance that is not water soluble and is used as a weatherproof material paste or sealant. Some types of roofing cement will not adhere properly unless they are applied on a surface that is dry. In contrast, wet-dry mastics can be applied to wet or dry roof surfaces and it will usually be easier to get them to adhere to the surface. Check the type before you buy so you will know the limitations. This material is available at home supply stores or at roofing supply places in a variety of packages include 10 oz. caulk tube size, gallon cans, and five gallon buckets. Because only a small amount is needed for each hole a small amount can cover a lot of holes. In the event of a storm there will likely be a run on this material so you may want to stock up on a small container of it. It is inexpensive and can be stored a long time. Care has to be exercised when applying roof mastics because it is easy to think it is being effectively applied when in fact it is not adhering to the surfaces. It may well have to be forcefully smeared against the surfaces. And even then you should attempt to scrape it off. You may be quite surprised to learn that it did not adhere even though you took the care to forcefully smear it on. Try again. This is especially true if the roof surface is rough because of roof granules or gravel. It takes more diligence than you might think until you try it. To be sure it adheres to the roof use an inch wide scraper, putty knife, back of a spoon, or some other smearing tool. Press the cement firmly into the surface multiple times in several directions so that it works in and sticks to the surface. Another option is to buy a small roll of self adhesive patching tape that can be applied over the top of holes or cuts. If your roof covering makes you apprehensive, you may be well advised to stock up on several tubes of the cement especially given how inexpensive it is.
|
|
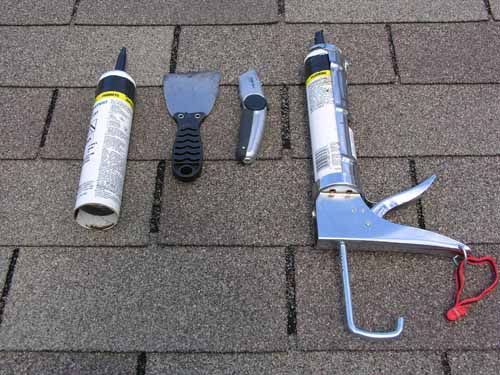
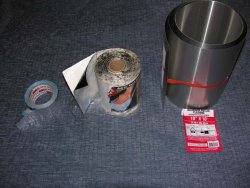
Tools and supplies needed for temporary patching of holes or to re place torn tabs
(click image for larger version) |
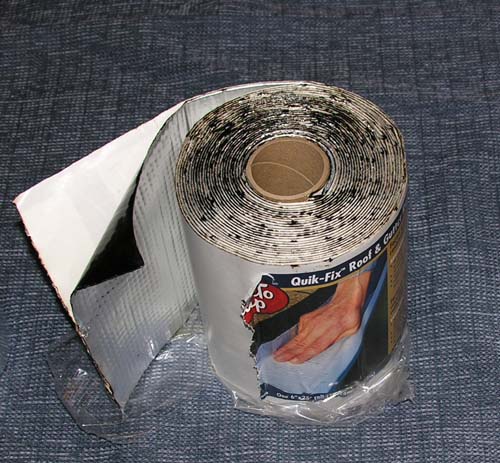
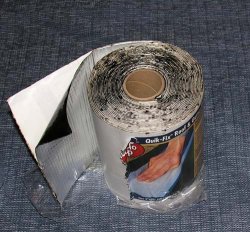
One example of self adhesive patching tape
(click image for larger version) |
|
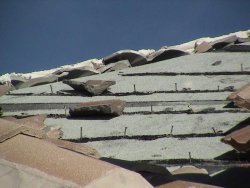
Where the nails remained, they would plug the holes through the waterproof membrane under this tile roof - if any pulled out, they could leave small holes for minor leaks that are more likely to damage the roof sheathing than the attic or the ceilings.
(click image for larger version) |
|
Plugging/Capping Small Holes: If you cannot buy or borrow roofing cement from a neighbor, then you could very temporarily plug the open holes by inserting nails of the same or slightly larger diameter than the nails or screws originally in place or you could insert screws of the same or larger size in the holes.
If you are apt to run out of nails or screws to fill nail holes be sure to start at the lowest part of the roof that is over areas where you don't want water leaks because there will be more water flowing over the lower part of the roof than the higher part.
Another obvious way to protect a roof is with tarps or plastic sheeting. This may sound easy; but, in practice it is not. In fact unless you have experience applying tarps or plastic you will likely find that repairs to the tarp or plastic will be needed. This is said to encourage you to do a thoughtful and thorough job of securing them.
|
Where the nails remained, they would plug the holes through the waterproof membrane under this tile roof - if any pulled out, they could leave small holes for minor leaks that are more likely to damage the roof sheathing than the attic or the ceilings.
(click image for larger version) |
|
Tarps and Plastic Sheeting: (visqueen) can be very effective ways to protect a large part of a roof. However, they have the problems of being difficult to tie down to withstand even ordinary winds and the sun quickly deteriorates them. Wind can tear them rather quickly so be sure to check them regularly. They need to be held down really well because they can act like sails on a sailboat creating a lot of force to pull them off the roof. Be very careful when putting tarps or plastic on the roof because they tend to very slippery (in fact slick as ice, very dangerous) and they hide protrusions on the roof over which you can trip. In addition they hide openings, like skylights, through which you can fall. Installing tarps or plastic sheeting can be very dangerous. Visqueen becomes brittle rather quickly resulting in tearing and just plain breaking apart. Some `blue’ or any color tarps may not last more than a few months. So if you use tarps, check them once a month for brittleness. If they become brittle they will tear away from fasteners holding them down. As stated earlier the forces on roofs in even very moderate winds can very easily tear them from the roof.
|
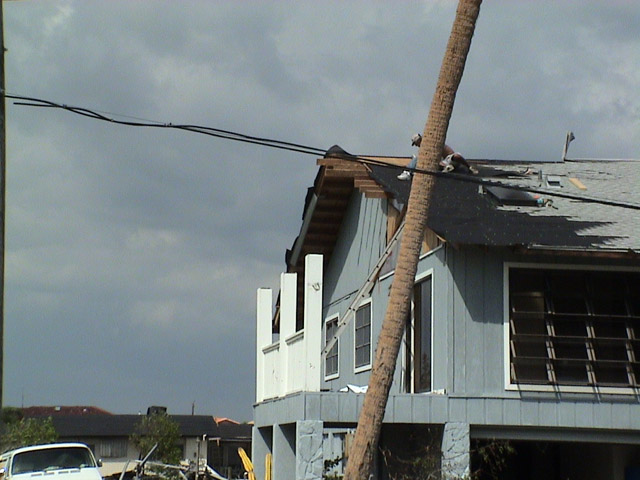
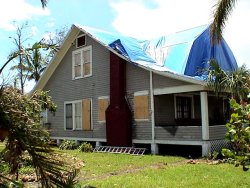
Temporary repairs to reseal the edge of this roof that lost the porch overhang as well as roof cover on the main part of the roof
(click image for larger version) |
|
|
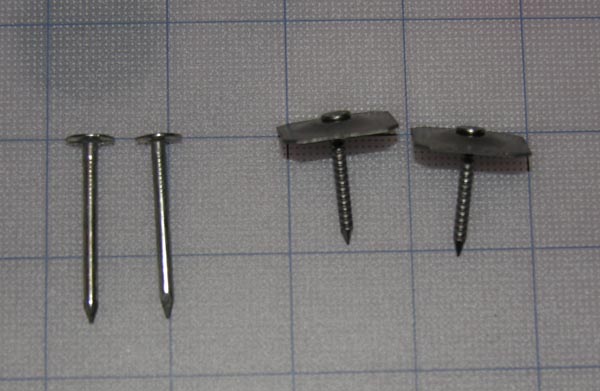
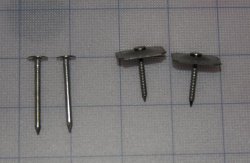
The roofing nails on the right have pre-installed plates or "tabs" to help hold the felt paper in place
(click image for larger version) |
|
Roofing Felt: Roofing felt is the black paper like material you have seen applied to roofs that is sold in 3' wide rolls. It is designed to be used under the weather roof where it is protected from the sun and wind. Sunlight causes it to warp and become brittle. Thus it is not a very effective long term measure for protecting a roof. Even mild winds can tear it. Obviously it is better than nothing and should be considered a fall back to tarps. It is commonly available as a No. 15 and a No. 30. The No. 30 is considerably stronger than the No. 15. The best ways to secure felt is with roofing nails that have metal or plastic tabs about 1" square or round under the head of the nail or with boards lapped over the felt. The big tabs on roofing nails help prevent wind from pulling the felt over the heads. To be effective at holding down the felt, the nails should be placed on a grid 1’ by 1’ and both horizontal and end laps should be nailed with nails no farther apart than 6”. Felt should be lapped in shingle fashion with layers overlapping about 3”. End laps should be at least 6”.
Hints for Applying Tarps, Sheeting, or Felt: Tarps and plastic sheeting material needs to be extended over the ridge of the roof. If gutters are present the material can be wrapped over them and secured to the underside of the roof under the eave. If there is no damage to the roof cover on the other side, you need to use ropes to tie off the tarp or sheeting to large screw eyelets or some other form of anchorage to the fascia or soffit on that side of the roof. If you have to use felt paper, it is likely that you will not be able to extend it over the top of the roof. In this case it will be very difficult to seal the upper edge of the felt in a way that you can ensure that water does not get underneath. You can try to create a shingle effect (This means starting at the bottom and applying one layer of felt over the top edge of the one below). Then, try to feed the upper edge of the top felt piece under the intact roofing material above. This may not be easy, but there is not much choice except to try. Even if it is not perfect it may well be better than nothing in keep rain out. One key is to try to ensure that the felt material that is fed under is well secured (and possibly sealed with roofing cement) to minimize leaks and to help it withstand winds that typically come with rain.
|
Locating Leaks Can Be Difficult Because Water Plays Tricks
Leaks from roofs can be tricky to find because where the leak shows up may be quite distant from the source. There are several reasons for this. One is the water may wander sideways across a roof before it goes down the roof. As it goes down the roof it has to find a way to get through the sheathing. Once it gets under the sheathing it may trickle down the bottom side of the sheathing until if finally drops off an edge or it may run down the edge of a rafter or truss member. Then it may travel on drywall ceilings until it finds a place to collect and begin to show up from the inside. Usually the first place one sees evidence of water on a drywalled ceiling is at the crack created when sheets of drywall come together. Another place is at recessed lights or other holes in the drywall ceiling.
|
Metal Roofs:
|
Some of the materials you can use for temporary patches to holes or tears in metal roofing
(click image for larger version) |
|
Experience has shown that new metal roofs properly installed tend to survive high winds quite well. Occasionally corners and ends might get picked up and twisted by wind however they usually stay on roofs. If they become loose from the roof in an area that is important you may be able to deform them back into position well enough to protect the building. Tarps may be the best way to protect against rain. However, sharp metal corners are apt to cut holes into tarps. A few screws or ropes may be necessary to hold tarps in place and some foam and duct tape may be needed to protect the tarp from sharp edges. Be very careful because metal roofing has sharp edges that can easily cut your hands. The use of leather gloves is recommended.
Older metal roofs may well not be attached as well as new roofs. Real old metal roofs may be very poorly attached or the wood they are attached to may have rotted because of leaks or termites. Consequently, it is particularly important to be careful if you attempt to walk on an older metal roof.
Temporary repairs to holes in metal roofs can be made using metal flashing that is glued down with flashing cement, by one of the self adhesive patching tapes, or by aluminum faced duct tape.
|
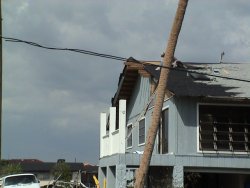
This off-ridge vent broke loose - as a temporary repair, the owner put a tarp over it to minimize additional water leaks
(click image for larger version) |
|
Built Up Roof, Flat, or Nearly Flat Roofs:
Flat roofs can be very difficult to protect from rain after the original roof membrane comes off. On the other hand if the damage is localized to cracks or holes, damage to roof top equipment, or the membrane can be laid back in place temporary repairs may be possible.
If the damage is to roof top equipment, either directly to the equipment or to its connection to the roof, it may be possible to put a "tent" over the leak source. The first issue will be to make sure that the tent is well secured so wind does not blow it off or break water seals where it meets the roof. Likely the perimeter of the tent where it meets the roof will have to be sealed to prevent water from getting under the tent unless the equipment was mounted on a curb that raised it above the roof deck. If the hole is in the deck, it will be necessary to seal the edge of the tent to the deck. If you have a gravel roof, it will be even more difficult but not impossible to make a good seal. It will likely take a large quantity of roof cement designed for wet applications that will need to be imbedded well into the gravel to make a water tight seal. A large quantity means perhaps several 5 gallon buckets.
If the edge of the built up roof gets lifted up and peeled back by wind it may be possible to unfolded the damaged part and lay it back in place. This roofing can be very heavy so it may take several people.
With flat roofs it is all too easy to forget where the edges of the roof are and walk off the roof. So be extremely conscious of roof edges.
Some hints about the causes of water coming into a house; if you don't see anything obvious like missing roof coverings - consider these possibilities:
During hurricanes or other strong wind events the wind has the capacity to blow rain into places one might never suspect. As you can see from the sidebar a 100 mph wind can blow rain up 3"; a 130 mph up 5". Actually the wind blows droplets of water up even higher just like a pot of boiling water does. To compound the problem winds on a roof can be much stronger than winds on the ground and much higher than the weatherman reports because of the additional distance above ground, the geometry of the roof and the effect that neighboring buildings may have in funneling or channeling wind.
|
How far wind can blow water uphill
|
80 mph wind will blow water up about 2"
|
This wind is a low category 1 hurricane
|
|
100 mph wind will blow water up to about 3"
|
This wind is a mid category 2 hurricane
|
|
115 mph wind will blow water up about 4"
|
This wind is a mid category 3 hurricane
|
|
130 mph wind will blow water up about 5"
|
This wind is a low category 4 hurricane
|
|
145 mph wind will blow water up about 6"
|
This wind is a high category 4 hurricane
|
|
155 mph wind will blow water up about 7"
|
This wind is a category 5 hurricane
|
|
Bear in mind that in strong winds rain gets driven by the wind horizontally. In fact a strong wind can blow rain 10 to 30 feet horizontally under a porch. With this knowledge you should be sensitized to look for water entry sources that you would not ordinarily think of. Probably most of these sources are not of immediate concern/worry immediately after a wind event because unless there is another strong wind from the same direction, water entry may not recur. But you do need to assure yourself that the building is not vulnerable to heavy, but not wind-blown, rains.
Here is a checklist of water entry sources other than roofs to consider as possible sources for water in your house.
After Storm Checklist for Sources of Leaks
|
|
|
|
|
[ ] |
Gable end vents and gable end soffits.
|
|
|
|
[ ] |
Side walls with board or plywood siding.
|
|
|
|
[ ] |
A wood frame second floor over a masonry first floor - frequently the flashing does not direct water out of the building at the top of the masonry.
|
|
|
|
[ ] |
Ridge vents.
|
|
|
|
[ ] |
Off ridge vents.
|
|
|
|
[ ] |
Goose neck or other vents for things like bathroom vents, dryer vents, range hood vents, and the like.
|
|
|
|
[ ] |
Flashing that has gotten wind driven rain blown up underneath it.
|
|
|
|
[ ] |
Skylights that typically are designed assuming that gravity will keep water out. We know that strong winds are much stronger than gravity.
|
|
|
|
[ ] |
Water getting blown through soffits and then up into the attic. This source should be suspected if water appears on the ceiling at exterior walls on the down side of roofs or at gable ends.
|
|
|
|
[ ] |
Leaks around doors and windows.
|
|
|
|
|
Drying Out Your House
Once a hurricane start there is little you can do to protect your house except to deal with intruded water. You and your family’s safety are the most important issues. The most important consideration is to stay away from the windward side of the house so that you and your family members are as farther away from debris that could penetrate a wall or even shutters. Bear in mind that unless your house is well away from a hurricane that your house will experience strong winds and rains from a range of wind directions so different sides of your house may be the windward side at different times during the storm.
Though you may be tempted to mop up intruding water coming through windows or doors DO NOT do this during intense winds. It is simply too dangerous to be in windward rooms. Wait until the wind slows down.
Mopping up water that intrudes in large quantities cannot be done with an ordinary supply of towels. If you have a wet-dry vacuum and still have electricity that can be a good way to pick up a lot of water in a short time. A broom and dust pan is a pretty good fall back method. Having a bucket nearby to dump the water from the dust pan can save time and prevent running back and forth to the bathroom or a sink.
If the inside of your house has gotten wet you should check to make sure that there is no structural damage that would make it unsafe to go into certain areas of your home. See if you can block off entry to the damaged part. If you evacuated and are returning, you may find that the building department or fire department has already been through your area and marked homes as safe or unsafe to enter. If it is safe to enter and work in your home there are two things you want to do. One is to limit the chances that additional water will enter your home by a subsequent rainstorm. The second is to try to dry out your home as quickly as possible. It only takes a few days for mold to begin to grow.
You want to start by getting any standing water out of your house. If you have a way to use a squeegee to push the water out, that can be a good start. A mop with a bucket with a squeeze roller system can also be a way to get larger amounts of water off your floors. If you don’t have power, try to open your house up by opening the doors and windows and letting any breezes help to ventilate your house. Unfortunately, this may be of limited value because hurricanes are frequently followed by high pressure with hot humid weather so there may not be that much evaporation potential. If you have wet carpet and no way to dry it out quickly, get it out of the house to prevent serious mold growth.
If you have or can get access to power, either because you were lucky enough to still have power or because you have access to a generator, use a wet or wet/dry (be sure it is set up for the wet vacuuming operation) shop vacuum to remove as much water as you can. A wet/dry shop vacuum can be especially useful for removing water from carpeted areas. While a small generator will not be able to run your air conditioning system, it may be powerful enough to run a dehumidifier or two. Move the dehumidifier from room to room and drain it frequently or hook it up so that it drains automatically to a drain or outside your house.
If you really want to be prepared, but don’t want to spring for a generator that is big enough to power your appliances and air conditioning, considering buying a portable generator that is at least powerful enough to operate one or two humidifiers and be sure to buy the dehumidifier(s) as well since you will likely have a very difficult time getting generators or dehumidifiers right after a storm. If you do get a generator, you might want to look at a small window size air conditioning unit that can also be powered by the generator to make your bedroom more tolerable if you have trouble sleeping when you are hot and sticky. Remember the rules for operating generators safely and don’t run it in your house or garage. Be sure that power cords don’t run through water and don’t try to plug into your house’s main supply – that takes a very big unit and you have to have an electrician install a special switch to allow you to disconnect from the main lines and hook up your own source. Instead, if you are using a small generator, plug in each appliance you want to keep running and be sure that the generator is large enough to handle both the startup and continuous operation of the appliances you have plugged in at one time.
|