|

|
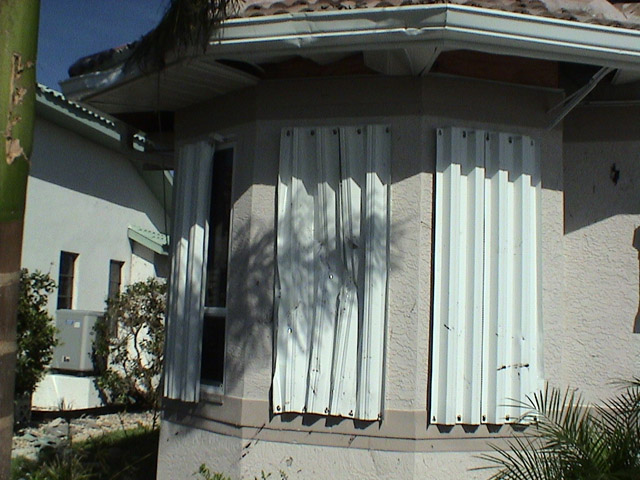
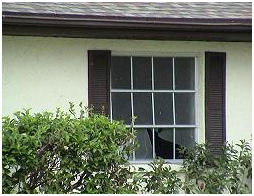
Tiles from surrounding roofs banged up these shutters
(click image for larger version) |
|
Risks associated with windows and doors in hurricanes:
Windows and doors are important features of our homes that provide access, egress, light and view. They
are installed in openings framed into our walls and consequently are frequently referred to as "openings"
in building codes and engineering standards. Few people want to live in the kind of bunker or cave
like environments that would be created if we didn't have windows or glass doors. However, when a hurricane strikes,
windows and doors can be blown open or broken, allowing wind and water to entre the
home. Risks imposed by windows and doors rank right behind those associated with the failure of roof coverings.
Preventing the wall openings filled with windows and doors (including sliding glass doors and garage doors)
from becoming openings through which wind and water can enter your home is an important part of protecting
you home, your belongings, and your roof in a hurricane. the dual threats are wind pressures and wind borne
debris. Your home is particularly vulnerable to having unprotected windows being broken by windborne debris if:
- The design wind speed for your area is 130 mph or greater
regardless of tree cover or your surroundings
- The design wind speed for your area is 120 mph or greater
and you live in an area with moderate tree cover
- You live in a neighborhood with few trees and the design
wind speed for your area is 110 mph or greater
- Vulnerability goes up significantly if you have a tile
roof or if one or more of your neighbors has a tile roof, a
flat roof with gravel ballast or, old shingles that are
starting to curl
Failures of windows and doors from wind pressure tends to be most frequent if they are older units that
are not pressure rated, the units have been poorly installed in the openings, your home is exposed to the wind by being
located near a large open area such as a field, a body of water or a golf course fairway or on the slope or top
of a hill or escarpment.
While these risk factors provide a relative measure of risk, when winds become high enough, damage to
unprotected windows and doors becomes much more frequent. A study of homes impacted by Hurricane Charlie,
conducted by the University of Florida, found that in areas where gust wind speeds exceeded 120 mph, about 33% of the
homes with unprotected windows had at least one broken window. A study conducted by the National Association of Home
Builders of damage to homes impacted by Hurricane Andrew, where gust wind speeds exceeded 155 mph, found more frequent
damage to windows. They found that 64% of the homes with unprotected windows had at least one broken window.
Window or door failures can increase risks of roof failures:
Also, if your home is an older home or was built in an area where
they have not been following a modern high-wind building code, you
may not have hurricane clips or straps holding your roof structure
to your walls. If that is the case, window and door protection may
make the critical difference between losing your roof and keeping
it on. If a large window or door is broken open on the wall facing
into the wind, the overall uplift forces that are trying to lift
the roof off your house may be doubled. Research has shown that
protecting the windows and doors can raise the wind speed required
to lift your roof off your house by one to two hurricane intensity
categories. In other words, if it is likely that the roof of your
home would lift off during a Category 2 hurricane if a large window
broke open on the windward side of your house, it might take a
Category 3 or possibly even a Category 4 storm to lift the roof off
if all of the windows and doors are protected.
Installing shutters over windows and doors can protect them from the
impacts of windborne debris and can keep wind pressures from building
up in your house to the point where it significantly increases the
uplift forces on the roof. However, it probably won't keep the doors
and windows from bursting open from wind pressure if they are weak or
poorly anchored to the walls of the house.
Risks of water intrusion around windows and doors:
Joe Lstiburek of Building Science Corporation likes to point out that
there are only two types of windows and doors, "Those that leak and
those that are going to leak." This comment actually contains a
tremendous amount of truth since the test standards for water intrusion
are set at a very small fraction of the design pressure for the window
or door. A realistic example is that if the window or door you have
in your home is rated for 50 pounds per square foot of wind pressure
(a pressure you might expect from a storm with wind gusts approaching
140 mph) it only has to resist a pressure of 7.5 pounds per square foot
without leaking (a pressure that might occur when wind gusts reach about
55 mph) to pass the water intrusion test standard. Since windows and doors
are going to leak, he makes the point that the key is to minimize or manage
the water intrusion. Keeping water from being driven against and building
up on windows and doors is one way to try and minimize the water intrusion
during a hurricane. Fixed glass window systems (windows that are not
operable) with impact resistant glass that is mounted into the frames with
structural adhesives is another approach.
Windows
The primary ways windows fail in hurricanes are:
- Broken glass from wind pressure or more likely from debris blowing around the yard
- Whole windows, frames and all, being blown into houses
- Water coming through the joints of windows or leaking around the frames and into wall cavities
Broken Window Glass
|
Note all of the small debris on the windows in addition to the broken window - when a window is broken, the water and debris gets blown into your house.
(click image for larger version) |
|
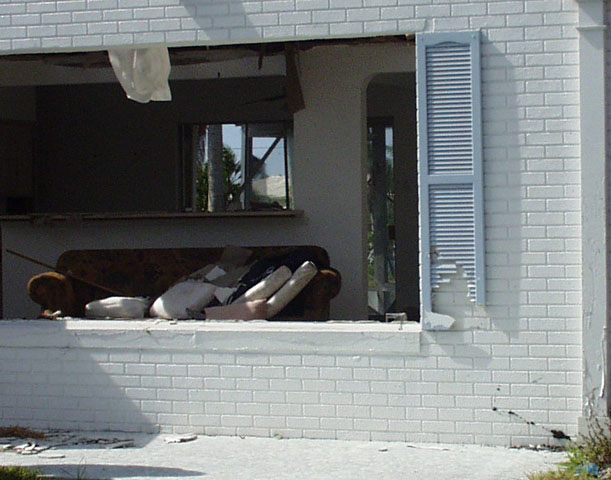
The consequences of broken windows: Windows that get broken by debris will let a huge amount of water and strong winds into your house. A house exposed to hurricane Charley had a bedroom window that measured 3' by 3' broken by a shingle from a nearby house. The wall opposite the window was completely wet from floor to ceiling and there was grass debris plastered on that same area. You can imagine how much water entered that room and flowed into other rooms ruining carpets, bedding, furniture, clothing, and drywall. If that house had not gotten dried out within the next day or so, the repairs would have been extensive and the house would likely have been uninhabitable for some time because of mold and odors and then the subsequent repairs. This is not an isolated incident. It makes it quite clear that protecting windows from getting broken is extremely important. Historically and especially before the days of air conditions, windows let light in and kept most of the cold out. If they leaked a little air that was fine except in the winter. The strength of window units and window glass was barely a consideration. Frames were flimsy, glass thin, and air seals not very good.
Wind pressures resistance of windows: Most windows installed before 1996 in coastal areas were not rated for wind pressures and will not do a very good job standing up the wind pressures generated by a strong hurricane. In recent years some manufacturers have begun installing stickers on window frames that provide the pressure rating of the windows. If you can find such a sticker and the pressure ratings are more than 40 to 50 pounds per square foot, you can have some confidence that your home has well built windows that have a chance of resisting hurricane wind pressures. If you don�t find a sticker but know the manufacturer of the windows and the year they were installed, you may be able to track down the pressure ratings. Otherwise you should assume that the windows will probably not do very well in a strong hurricane and plan or retrofit accordingly.
What you should do about windows: When you live in a hurricane prone region and face the kinds of risk factors listed at the top of this page, you should seriously consider ensuring that your windows can resist both the expected wind pressures and impact of windborne debris or you should protect them with a protective system
(see the Shutter section for ideas) and is both pressure and impact rated.
Incentives for protecting windows: If you protect all of your openings � that is all windows, entry doors, sliding glass doors, skylights, and garage doors, in the State of Florida, you will qualify for an insurance discount. If you install pressure or pressure and impact rated windows that are also energy efficient, you will get two benefits. New windows can be substantially more energy efficient because they are more air tight and more importantly for most windows they can have glass that reflects the heat from the sun whether sunlight shines directly on windows (say east and west facing windows) or whether the light is indirect (north or south). Direct and indirect heat gain can be substantial so not letting it in will save air conditioning dollars. Sometimes new windows allow one to use a smaller air conditioner when it has to be replaced thus saving money every year.
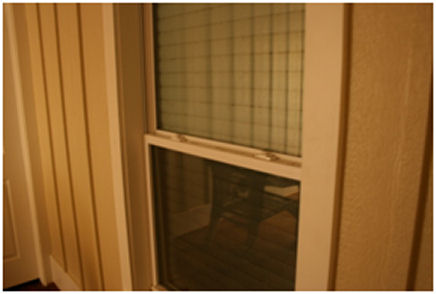
Keeping a Window in Place
Wind forces on window assemblies: Three common problems in older homes are that the glass is not mounted into its sash well enough to resist wind pressure, that the sash doesn�t stay in, and that window frames are frequently not well enough attached to the house to withstand very strong winds. A 50 mph wind only pushes on a window or door with about 5 to 7 pounds of force per square foot of area, whereas a 100 mph wind applies 20 to 28 pounds per square foot, and a 130 mph wind applies 34 to 47 pounds per square foot. These forces are applied on every square foot of a window. This means that a bedroom window that is say 3' wide by 5' long, when subjected to a 100 mph wind, has between 300 to 420 pounds of force applied to the window and the frame. Think about having 2 men or 3 women sitting on the window. Most windows simply are not designed for those kinds of weights and traditionally have not been installed to withstand them either. The good news is that most window frames lend themselves to being more securely attached to a house.
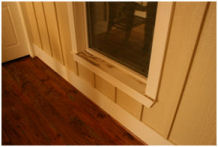
|
Poorly attached frames can break loose in high winds - this one was pushed out to relieve internal pressures.
(click image for larger version) |
|

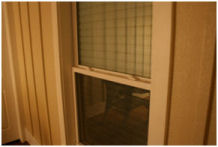
|
This window and frame was pushed in by the wind.
(click image for larger version) |
|
|
Unless a shutter is pretty well sealed to the house, it will not significantly reduce the wind pressures on the window. Research has shown that is doesn't take much of an air gap around the edges of the shutters for pressures on the outside of the shutter or wall next to the shutter to be applied to the window. At even the highest wind speeds in a hurricane, air is basically incompressible (you have to get close to the speed of sound before you compress air vary much) so unless the windows are very leaky, it will not take much air flow into the space behind the shutter before the pressure builds up on the window. Consequently, you should stay away from windows even if they are shuttered and if you notice that windows are starting to bow inward because of wind pressure,
get out of the room - do not try to help by pushing back on the windows! Broken glass blowing onto you can be fatal. It is like knives or razor blades blowing around.
Strengthening the installation of windows in frame walls: Screws or nails can be installed through the jamb of the window and if the screws are long enough they can penetrate the house framing well enough to provide good anchorage. Bear in mind that screws have to be long enough to get a bite into the framing of the building after they have penetrated the spacing gap that has traditionally been left between the window and the wall so that the window could be shimmed to make it vertical even if the framing is not quite perfect. A gap of 1/2" to 1" on each side is pretty typical. When you tighten the screw, be sure you do not distort the window frame (jamb) because the distortion could let more water in between the frame and the sash, and might prevent the window from operating properly or smoothly.
Strengthening the installation of windows in block walls: Tapcons can be installed through the jamb of the window. They have to be long enough to penetrate the jamb of the window, the shim space, and perhaps a 3/4" think wood buck strip, plus get a 1 1/2" bite into the masonry wall. Be sure the head of the Tapcon does not interfere with the operation of the window. A bevel head may be best. Note that you will have to pre-drill a hole for each screw. You can drill through the window jamb and the wood using a normal high-speed drill bit but you will need to drill into the masonry with a masonry drill bit of the correct diameter for the particular Tapcon screw you intend to use. When you tighten the screw, be sure you do not distort the window frame (jamb) because the distortion could let more water in between the frame and the sash, and might prevent the window from operating properly or smoothly.
|
 Screw, nails and Tapcons: The length of the fastener will be determined by the considerations already discussed. Wood screws should be #10. Nails should be 8 or 10 penny. Tapcons can be 3/16" diameter. Finish nails will be the least visually apparent. Counter sinking nails just a little below the surface and then filling the shallow hole with caulk will make them nearly invisible. If you are sure you are getting a good bite into the structure of the house, then space the first fastener within 6" of the end of the jamb (one fastener at the top and one at the bottom of each side) and then no farther apart than 12". When you install fasteners you can probably feel how well they are biting into the building. If they are absolutely loose, you may have to use a longer fastener. If they are just somewhat infirm the wood of the house may be rotted because of water damage or termites. Or the fastener may be missing the structure. This is sometimes the case when the window on a frame house is located near the outside face of the wall.
You should discount the value of any existing nails or screws holding the window in place because in the past not much attention was paid to how many or more importantly how far they penetrated into the structure.
|
|
Caulk: You can use a good quality caulk such as a urethane caulk to help secure a window. A good bead of caulk around a window that is wedded to the surface of the house and the window can provide a lot of strength and secondarily provide a barrier to water entry. Regular silicone caulks are not recommended. If you use white caulk select one formulated to be UV resistant so it does not turn yellow. The bead of caulk should not be left so the shape is concave because this does not leave the caulk thick enough to be very effective. Further it is likely to crack because of temperature changes. Most of us find it difficult not to make the caulk look pretty by running our finger along the joint, but it does substantially reduce the effectiveness of the caulk. With this said, it can be beneficial to assure adhesion of caulk by pressing it into the two surfaces to form a concave shape. If you do this, you will need to go back and add a continuous bead of caulk to this first layer so that there is enough thickness for the caulk to react to temperature changes without cracking.
|
Leaks Around Windows
The Risks: You may well have noticed that water has accumulated on windowsills in thunderstorms. The water is probably rain that got blown by the thunderstorm between parts of the window frame (sash) that holds the glass and the overall frame of the window assembly. Because this is such an occasional event, it usually does not do any or much damage to the house other than cause paint to peel. However, windows that are already leaking like this are a disaster waiting to happen in a hurricane when there can be hours and hours of wind driven rain. If the paint around a window is blistered, especially on the lower end of the window, then the window may be quite prone to let a lot of water in the house if a hurricane blows through.
Ways to reduce leaks around windows: Keeping water from leaking around windows is still a work in progress. All that can be offered at the present time are three ideas that may be worth trying and the recommendation that it is wise to think about water management. The three retrofit ideas are: 1) using opening protection shutters to help keep water off the windows, 2) applying a removable sealant to the outside of the window frame joints, and 3) applying a sticky water resistant tape to the outside of the windows over the frame joints.
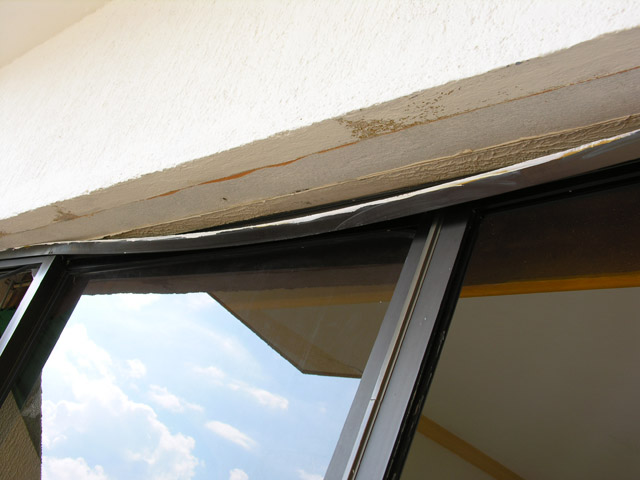
Shutters: While opening protection would seem to offer sure fire protection against water intrusion, it is not a guarantee by any means as recent hurricanes experience has shown and evidenced by the two photos below that shows on the window frame and window sill that was covered with silt left by water that was blown past the shutter and through the joints in the window framing. There are indications from water intrusion tests that some of the fabric shutters may seal against the window frame and help reduce water intrusion. Installing shutters some distance from the windows may also help keep water off the windows and window frames.
|
|
Both of these windows had roll down shutters in front of them during hurricane Ike that had wind speeds of at most 115 mph. Yet, water came past the shutters and in through the joints of the window where it dribbled down the wall onto the wood flooring. Don�t be confused when viewing these photos by thinking the view is from the outside. It is actually from the inside of cottage type homes that had paneling on inside walls.
(click image for larger version) |
Sealant: There is a rather unique kind of sealant that can be applied to joints of windows that has the property that it can easily be peeled off without damaging the window. This is true even for painted window frames. This sealant was developed to keep cold air out of houses in cold climates. However, it can work quite well to keep water out. One such product is manufactured by Dap� and is called Seal�n Peel
TM and aptly described as a Removable Weather Caulk. In hot climates, it is not apt to be stocked in stores; however, it can readily be ordered by stores that stock Dap
products.
Warning: By sealing windows this way, they will not be able to be opened from the inside while the sealant is still in place. These means that windows that might be used as a means of escape are not available.
Tape: Water resistant tape applied to joints of window frames can be effective as long as the wind pressure is against the window. If a house becomes pressurized because of openings on the opposite side of the house, the tape is apt to come loose so when the wind shifts and blows wind driven rain against the window, its tape will be less effective. To work, the tape must be sticky enough to stay on and must be water resistant enough to maintain its effectiveness. Two types of tape might offer such features. One would be a good quality cloth duct tape. Unfortunately there are a lot of inferior quality duct tapes. Aluminum foil type taped used by AC duct installers is more reliable. The aluminum tape about 2�" wide has paper applied to the sticky side that one removes when applying the tape. Some brands of this tape have printed instruction for installation. The most important installation hint is to use a semi-rigid squeegee to rub over the tape to press the adhesive to the substrate. When using any tape, the surface must be dust and oil free. Unfortunately nearly all tapes have to be applied to dry surfaces. So plan ahead.
Water Management: In thinking about water management, look around and think about what you would do to reduce damage if you had an inch of flood water on your floor. You would want to get throw rugs off the floor, you would not want wall to wall carpeting, you would want to get anything that could be damage by the water elevated or at least protected from soaking up the water.
Retrofit Measures for Windows that Don't Work: While one might suppose that the simple methods described below would work in ordinary circumstances and conditions, in hurricanes they don�t. These are warnings to the wise.
Tape on the inside: Tape between a window sash and the frame applied on the inside will be almost completely ineffective at keeping water out. The wind will just loosen the tape to let water pass.
Overhangs: One would suppose that windows seemingly protected by having a long roof over them would be safe. They are not. Wind driven rain will drop only about 8� when driven by a 100 mph wind and only about 5� by a 130 mph wind. This makes it clear that overhangs cannot shield windows.
Hurricane rated operable windows: Hurricane rated operable windows, while stronger and more water intrusion resistant than ordinary windows, will still let wind driven rain intrude.
|
Leaks around windows: The gap between the frame of the window and the sash (movable part of a window assembly) can be made to be pretty air tight under normal conditions. Hurricanes are not normal conditions. In order for a sash to move in the frame over a range of temperatures the manufacture has to provide a gap. Even if the gap is only as large as the thickness of a couple of sheets of paper it can cumulatively result in a much larger area than you might think. For example if a we consider a bedroom egress window sash it is likely on the order of 36" wide by about 36" high so it has a perimeter of 36" times its 4 sides. So the total crack is 72" long. The area of the crack accumulates to be equivalent in area to a square hole with 1 inch sides. In a hurricane this could be like someone standing outside with a garden hose squirting it through your window. You can imagine how much water can come through. So you should not be surprised that in a hurricane a window will allow a lot of water to enter; more water than you can mop up with bath towels. Besides if you are prudent you will not be in that upwind room during a hurricane.
Window manufacturers are working on designs that are less likely to leak, but most of the high performance windows currently available are for commercial buildings and cost considerably more, are rarely operable, and look a lot different than windows for homes.
Although there are no hard numbers to back up the extra protection against water intrusion afforded by shutters, there is evidence that they can help. This is particularly true if the shutters help keep down the amount of water that builds up on the window and thus is available to be driven through cracks. One row in the shutter matrix gives some preliminary thoughts about how various systems may perform in reducing water intrusion.
|
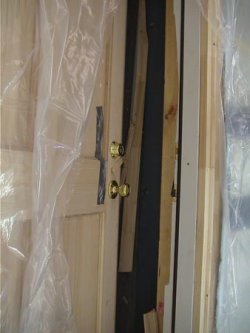
Hinged Exterior Doors

|
Incompletely shuttered entry where not all the door was covered and none of the transom window. Something was better than nothing as long as there was not a false sense of effectiveness.
(click image for larger version) |
|
The Risks: Hinged doors are usually large compared to a piece of glass in a window. So if a door gets broken open by wind, unless it is shuttered with a non-porous system, it will almost always result in pressurization of the interior of the home, which then usually causes windows and doors on the downwind side of the house to blown out or roof sheathing to be pushed off. Either of these can be catastrophic to a house, regardless of the structural damage, because of the water intrusion. Furthermore, if the roof is poorly connected to the walls, you could lose the entire roof.
Doors, in the context of this discussion, are assemblies that consist of the door panels, door jambs, locks, hinges, and thresholds. Door jambs are the wood structure immediately around a door panel. The connections of the door jambs to the wall framing are also vital to the performance of the door. The assembly is only as strong as the weakest component.
Door panels are attached to the surrounding jamb by three hinges and one or two latches or locks for a total four locations. According to the `How Many Men� highlighted box below, a 130 mph wind could impose 580 pounds of pressure on a door. That means that each hinge would have to withstand about 100 pounds and the lock or locks have to withstand 290 pounds. In a 150 mph wind, the hinges have to withstand 130 pounds and the lock or locks have to withstand 390 pounds, the weight of very big man. When wind pressures push against a door that swings out, the door is also restrained by wood of the jamb on three edges (wood stops) and by the threshold at the bottom if the threshold is of the `stop� style profile, not bumper style. When wind pressure acts in the opposite direction, the negative or pulling direction, that same out-swing door has only the hinges and locks holding it in place. For a door that swings in, the above situation is reversed and the same strengths and weaknesses exist; except that the positive pressure that accompanies wind driven rain pushing against the door will tend to push it away from the stops, opening up gaps through which water will pour. Furthermore, in-swing doors are more likely to burst open when they are impacted by windborne debris because the only things holding them back are the hinges and latches � the wood stops don�t provide any help in this case. The majority of sliding latches that can be added to the lock side of doors are not strong enough or well enough attached to a door or the door casings to offer much additional resistance to wind pressures. Better, stronger, latches are available that can be effective if they have screws long enough to penetrate the wood beside the door. Bear in mind that most molding (door casings) around doors are so thin and so poorly attached that they cannot be counted on to provide much restraint. Screws holding strong slide latches on walls have to be long enough to penetrate through both the casing and drywall, and be well embedded into the wood framing to be effective.
|
How many men equal the wind pressure on your door?
In a 130 mph wind, category 3 hurricane, a typical 3' wide door has about 580 pounds of pressure applied to it. That is more than two heavy men standing, if not jumping, on your door. In a 150 mph wind the
580 pounds becomes 780.
That is three 260 pound men standing on your door. Bear in mind hurricane winds are not nice smooth steady winds. Instead, they are pounding winds that shake and tear things apart. Perhaps you can visualize the effects of wind pressures on your exterior door by considering them mounted flat above the floor with the frame on blocks or supported by chairs and men standing or jumping on it. Would you feel safe?
|
The primary ways that exterior hinged doors fail in hurricanes are:
-
The door panel itself fails by buckling or splitting around the lock/latch or bending so much that the lock/latch pulls out of the strike plate; or, the door panel fails from impact of windborne debris.
-
A French door or double entry door fails because the connections of the fixed half (top and bottom latches) fail, the two doors bend enough to allow the latch/lock to disengage between the two doors, or one or both of the doors split.
-
The door-to-door jamb connections fail because the wood of the jamb cracks or breaks around the strike plate fasteners or hinge attachment points.
-
The door jamb-to-wall connections fail because the door jamb was not adequately anchored to the wall framing.
-
Water is driven in around the door flooding the floor area behind the door.
The discussion below will help you evaluate your doors for these critical issues. Be sure to evaluate all exterior hinged doors including the side door to the garage. For garage doors for cars see
Garage Doors.
Door Panel Failures: If the door is made of metal or fiberglass and there is no glass in the door, the door panel may well resist wind pressures and windborne debris impacts. Some kinds of solid wood doors will also provide good protection from wind pressure and debris impacts. Look on the edge of the door, where the hinges are mounted, for a sticker that indicates the design pressure and impact rating for the door. Beware of doors that have raised flat wood panels installed in a framework of solid wood around the edges. These panels and support members are typically not well attached to each other and the doors frequently burst apart when impacted by debris. Wood panel doors while being aesthetically pleasing can in places have thicknesses as little as a quarter of an inch which is way less than is necessary to resist high winds and windborne debris. Doors with glass inserts, even factory made doors, are at risk of having the glass broken unless the glass and its framing is impact rated. Most doors with glass inserts and nearly all those that were made before 2004 are not likely to be impact rated.
Doors that are not solid wood are usually made by building a frame a few inches wide that goes around the perimeter of the door. Foam or other type filler is used to fill in the remaining space. Then a skin of wood veneer, metal, or fiberglass is applied to both faces. A weakness of nearly all of these doors is the proclivity of the door edges to split where the latches or locks are installed. Entry doors are usually 1-3/4� thick so when they are bored for installation of latches for locksets and deadbolts there is not much wood left. The result is that when wind applies pressure to the door, the edge of the door with the locks does not have much wood left to resist the forces. Compounding the minimal amount of wood remaining at this critical location is the fact that the wood is oriented so that forces on the latch tend to split the grains apart. In fact, it is not unusual to see that wood has been split at these locations because someone or a wind gust closed a door with the latch of the deadbolt protruding. Beware of these kinds of door panels unless they have a sticker indicating that they are pressure and impact rated.
|
|
French doors frequently burst open during strong hurricanes.
(click image for larger version) |
|
Double Entry Door Failures: Double entry or "French doors" have been particularly susceptible to failure from wind pressure. This is largely due to the fact that you have two relatively flexible doors meeting in the middle. While one of the doors has latches that connect into the header and threshold, these connections are usually not strong enough to resist hurricane wind forces. In some cases the latches will pop out of the header and threshold, in other cases, the door may split around these anchors and they will pop out of the anchor holes.
|
|
This un-reinforced door frame gave way at the strike plate when the door was subjected to wind pressures. The vinyl sheeting was used to help apply the pressure.
(click image for larger version) |
|
Door-to-Door Jamb Connection Failures: Exterior entry doors, and particularly those that open inward, can be forced open by wind pressure or the impact of flying debris. Doors are held to the frame around them by not much - just hinges on one side and the door latch/locks on the other side. Remember that doors can get pulled out as well as get pushed in; but, it is the inward acting forces of the wind accompanied by wind driven water that pose the greatest threat for water intrusion and the impact of windborne debris can impose very high localized forces that can burst a door open into the house. Adding slide latches can add strength to the lock side of the door, but only if the latches are rather substantial, are sizeable, and have long enough screws to hold the latches in place. If a door only has two hinges it probably can't withstand a hurricane wind - Period. Frequently one can see that the wood of the door jamb has been split by the screws holding the strike plate or by abuse. Almost always there is not much wood in the jamb to hold the screws for the strike plate in place. One can purchase deadbolts that are heftier than others. However if the door or door jamb is split or weakened a stronger lock may not offer much additional protection.
In short the failure points at the door jamb are the connections of the door to the jamb at the hinges and at the latches of the locks.
The hinges: All doors should have at least three hinges and a security lock with a dead bolt that is 3/4" to 1" long. Hinges must be well connected to the jamb or better yet to the wall framing behind the jamb. This can be done by replacing the hinge screws with ones 2 �� to 3� long.
Latches or Locks: Dead bolts must extend far enough into the strike plate (flat metal on the door jamb that receives the deadbolt and holds the door in the closed position). Importantly the strike plate has to be secured into the jamb really well. Many times that is not the case.
Door Stops: Door stops are integral parts of door jambs against which doors stop against when they are closed. Actually, the door stop may be the same piece of wood as the jamb or it may be an added piece (actually three pieces, 2 sides and top) applied to the jamb. And actually, the door bumps against weather stripping attached to the edge of the stop. Door stops only work in one direction, the direction where the door pushes against them when the door is closed. As pointed out above, the door stop will be most effective in a hurricane when the door is an out-swing door.
Door Jamb to Wall Connection Failures: If field made sidelights or transom windows are present it is highly unlikely the door frame is attached to something that can restrain the high pressures that can be expected to be applied during hurricanes. A strong door and door frame attached to a weak structure is no stronger than the weak structure. Another common cause of weak structure is rotted wood. Wood, studs and jacks, at the sides of doors are commonly found to be somewhat rotted at their bottoms and independently not well attached to the floor structure.
Like windows, the wall framing around door openings is usually larger than the door frame that is going to be installed. This allows the frame to be shimmed so that the door is vertical, even if the framing is not quite vertical. Consequently, fasteners used to hold the door frame in place have to go through the door frame, through the gap and into the wall framing. Fasteners can be added to improve the anchorage of the door frame to the wall. The length of the fastener will need to be at least 3 inches. Wood screws should be #12. Nails should be 10 or 12 penny. Tapcons can be 3/16" diameter. Counter sinking nails just a little below the surface and then filling the shallow hole with caulk will make them nearly invisible. If you are sure you are getting a good bite into the structure of the house, then space the first fastener within 6" of the end of the jamb (one fastener at the top and one at the bottom of each side) and then no farther apart than 16" along the vertical sides and the top. When you install fasteners you can probably feel how well they are biting into the building. If they are absolutely loose, you may have to use a longer fastener. If they are just somewhat infirm the wood of the house may be rotted because of water damage or termites. Or the fastener may be missing the structure. If you are using screws, make sure not to tighten them so much that you warp the door frame.
The door framing and installation details are key elements of a pressure and impact rated door system. To retain that rating, the doors have to be installed according to the manufacturer's installation instructions using the tested hardware.
Evaluating the Risk of Door Jambs: Look for peeling paint at the bottom of the door jamb and the door casing as well as peeling paint on the baseboard. Lock for peeling paint and blistered drywall near the door just above the baseboard. Though termite damage can be hard to see because termites tend to stay below the outer surface of wood and behind paint, one can get hints that there is a problem if one pushes on wood and it gives. In that case one can use an ice pick to attempt to push it into the wood. Where one initially tries the pick it may just happen to hit hard grain (winter grain) so be sure to probe in a couple places. The nice things about using an ice pick is that one gets a tactile feel for the consistency of wood and the cosmetic damage is so small that a little caulk will fill the hole. Termites also eat the paper on drywall where careful examination of drywall may reveal their presence.
A checklist for evaluating door jambs:
- Look for peeling paint at the bottom of the door jamb, the door casing, and drywall.
- Look for wood weakened by termites.
The Risks Of Water Intrusion: Out-swinging doors are likely to work better at keeping water out than in-swinging doors because they will tend to push harder against the weather stripping as the wind blows harder. However, no door, except submarine doors, can keep all water out. A 3' wide door with a threshold crack only 1/16" tall is the same as a square hole 1 and 1/8" on a side or a round hole nearly 1 and �" in diameter. Imagine standing outside with a garden hose and squirting water through your door. How much water would come into the house? During the time that hurricanes drive rain against a house, it could be gallons and gallons - much more than you can sop up with towels. And remember hurricanes don't squirt water gently. Do not be mislead by thinking a sweep, piece of rubber or vinyl, at the bottom of a door will keep hurricane wind driven rain out. It won�t because it will just get pushed in by wind.
Entry Door Evaluation Checklist
|
|
[ ] |
Is there no indication on the door that it is pressure or impact rated?
|
|
|
|
[ ] |
Is the edge of the door split where the deadbolt is located?
|
|
|
|
[ ] |
Is the door jamb split at or near the strike plate for the deadbolt?
|
|
|
|
[ ] |
Is the strike plate well anchored to the jamb or are the screws short, loose, or wood split?
|
|
|
|
[ ] |
Is the deadbolt loose or does the deadbolt seem flimsy?
|
|
|
|
[ ] |
Does the door have only two hinges?
|
|
|
|
[ ] |
When you push on the lock edge of the door and push it towards the hinges, do the hinges move the frame (jamb) in a way that does not instill confidence?
|
|
|
|
[ ] |
Does the door jamb seem well secured to the framing of the house? If it obviously is not well secured, you have a problem. But even if it seems well secured then it may take a professional to determine that more definitively. See side bar.
|
|
|
|
[ ] |
Does the threshold seem well attached to the floor? Many times they are not well secured or the anchors/screws work their way loose. It is important that thresholds that have stops (the door bumps into a ledge) be well secured because they will help hold a door in place in one wind direction.
|
|
|
|
[ ] |
If you have double doors with pins at the bottom or top then examine them carefully to determine how effective they are. Are the plates that hold the frames of the pins well secured to the edge of the door? Is the wood around them split? Are the screws secure, long enough, and effective? Do the holes into which the pins are inserted in the threshold and above the door look effective at keeping the doors closed? Do the pins insert at least �" into the holes?
|
|
|
|
[ ] |
Does the door have a sidelight?
|
|
|
|
[ ] |
Does the wall around the door seem strong? If a door has `handmade' sidelights, then one needs to be especially concerned about how much strength there is to hold the door and sidelight in place. The forces can easily be excess of 800 pounds.
|
|
|
|
[ ] |
Does the door have raised panels such that when you look at them carefully they are less than �" thick in places?
|
|
|
|
[ ] |
Is the door a wind rated door? Is it rated by its manufacturer to be able to withstand pressures in excess of 40 to 50 pounds per square foot? Unless it was manufactured after 1994 it likely is not rated for pressure. If the door is wind rated it will have a label on a side edge or the top edge.
|
|
|
|
[ ] |
Is the door rated to be debris resistant? Unless it was manufactured after 1994 it likely is not rated for impact.
|
|
|
|
Retrofit Measures for Exterior Hinge Doors
If your answer to any one of the questions above is "yes" then you need to address the issue or just assume the door will fail. There are three approaches to protecting the door opening. One is to attempt to repair the door, another is to install non-porous shutters in front of the door so that
the door itself is not such a big issue, and the best solution in many situations is to replace the door with one designed to withstand wind pressures and to resist windborne debris impacts.
Pay special attention to French or double entry doors: Double entry or "French doors" have been particularly susceptible to failure from wind pressure and should have the highest priority for strengthening or shuttering. If you have glass panels in the doors or wood doors with raised panels, your least expensive option will likely be to shutter the door. If they are solid doors, at a minimum you should improve the anchorage of the fixed door by adding heavy duty barrel bolt sliding latches at the top and bottom and make sure the barrels extend into the header and floor (not just the threshold).
Repair the door: There may be ways to repair or strengthen a door installation. Here are some ideas. However, if the door is not pressure or impact rated, you should either replace it or shutter it and then concentrate on reducing the water intrusion possibilities.
-
Replacing the screws that secure hinges to the door jamb can add a lot of strength to the fastening. In newer doors typically two screws supplied with the hinges of each hinge are longer than the other two. In older doors this may well not be the case. Even when longer screws are used, they may not be long enough to penetrate the wood jamb of the door, the shim space (which can be as much as 1/2� or more), and get a good bite into the structure of the house. Unfortunately screws typically used for hinges are a little odd in size, being either #7 or #9 depending on the size of the hinge. The screws should penetrate the structure of the house at least 1�" inch. That is they should penetrate the wood frame and the shim space and still penetrate the framing the recommended 1��. A 2 �� or 3� screw is recommended. Replacing a flimsy deadbolt might solve part of the problem on the latch side of the door connection.
-
If the door or jamb is split, it may be possible to repair the splits using security hardware available at hardware stores (designed for making door more secure against burglars). A skilled carpenter may be able to salvage a door by the use of suitable glue and some screws. In some situations a metal security plate might solve your door's problems.
-
Adding security slide latches can help, but do not be deceived by the effectiveness of ones that use little screws less than �" long. When using latches be sure the wood they are being fastened to has the capacity to resist vigorous and repeated tugging.
-
Increase the throw of latches or locks. Regular entry locks and some deadbolts are made in two pieces. One is the lockset part and the other is the latch mechanism. If the design of a lock has not changed, then it may well be that a latch with a longer throw can easily be swapped for the existing one.
If the door is split in the lock and deadbolt area, an inexpensive fix may be to install a door edge guard. They are available at home supply stores. They help hold the door together where the latches are installed. In addition, they add more security against break ins.
|
Door guard wraps the lock side of a door edge
(click image for larger version) |
|
If your door has one or more sidelights you need to evaluate whether the wall is strong enough to hold the door in place when the door and the sidelight is subjected to wind forces. It may take a professional to make this evaluation.
Shutter the door opening: Shutters are designed to provide protection against debris, a very important value. However, they may not provide protection against the door being blown open by wind pressure. Also, they may not provide much protection against water intrusion if the panels are not fastened to the house in a water tight manner. If shutters are installed a few feet in front of a door, then they will offer water intrusion protection as well. If they are close to the door, a sizeable impact may damage the door.

|
This shutter took a direct impact of a large tile missile. The door behind the shutter was damaged as a result.
(click image for larger version) |
|
|
The door behind the shutter shown to the left.
(click image for larger version) |
|
|
Replacement: Your best bet my well be to replace the door with an outward swinging door that is specifically designed and rated for high wind and debris applications. Bear in mind a new wind rated door panel is only as good as the weakest element in the assembly that includes the door panel, door frame, the hardware and the attachment to the structure. If you replace a door, make sure that the entire assembly is a pressure and impact rated assembly and that it is installed according to the product approval used to obtain the rating. When replacing a door frame, it is a good time to make sure the screws securing the door to the framing of the house are long enough to hold the door in place in hurricane winds. Such a properly installed door should give you confidence. Getting a new door and getting it installed is not inexpensive, but may be the most cost effective solution. Some doors are simply too hard to effectively repair. Another advantage of a new door is that the weather stripping will likely be better than in an older door. For convenience it is hard to beat a new door because it will always be in place ready to do its storm protection job for you without your having to lift a finger. So with a new door you get better wind storm protection and probably better energy efficiency 24 hours a day. When selecting a door there the two important criteria are the wind pressure rating of the door and whether the door is debris resistant. The design pressure is given as a DP rating for the door. For impact standards, see
Local and National Debris Impact Standards. Minimum design pressures in the building code are based on the design wind speed for your location. You can get an estimate of the design wind speed by checking the map in
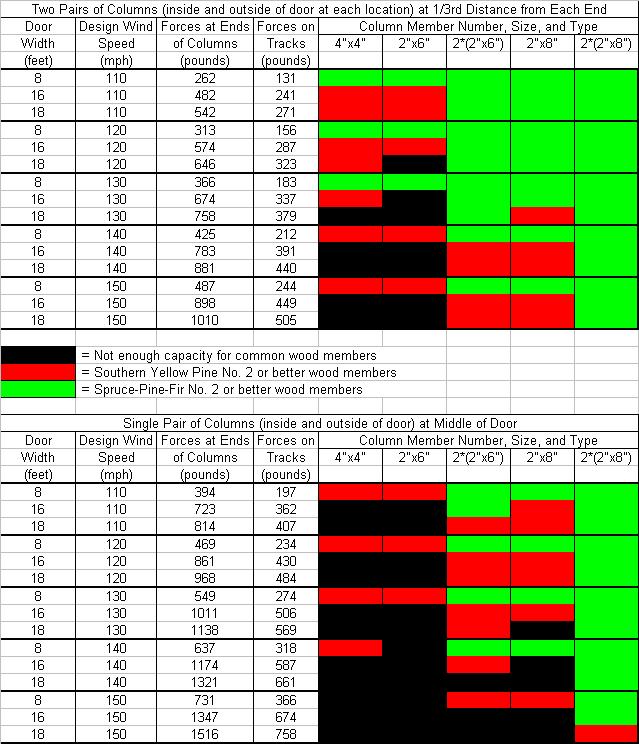
FLAG ASSESS Assessing your Risks. The following table provides values from the building code for doors located near corners of the house. The values will be slightly lower for doors located away from corners (more than about 4-feet away).
Design Pressure Ratings for Doors - Code Minimum Values Based on Wind Speed
Zone of the House Location
|
Design Wind Speed (mph)
|
Design Pressure Needed for Door Near Corner (pounds per square foot)
|
Design Pressure Needed for Door Away From Corner (pounds per square foot)
|
|
110
|
30
|
25
|
|
120
|
35
|
25
|
|
130
|
40
|
35
|
|
140
|
45
|
40
|
|
150
|
50
|
45
|
Retrofit Measures for Water Intrusion � Reducing Gaps and Improving Alignment:
Hinges: The first thing to look for is whether the top hinge has become loose from the jamb. This is easily done by pushing the lock edge of the door towards the hinges while the door is nearly closed. Observe whether the top hinge or the jamb moves. If one of them moves there is a problem. Sometimes if the hinge is loose, just tightening the screws will solve the problem. Be very careful not to over tighten the screws so they strip the wood. If the screws have stripped the jamb or the house framing replace the screws with longer ones. Make sure that you use a screw with the same head size as the original screw so that it will properly seat in the hinge. This may require that you use screws of the same diameter as the original hinge screw which is likely to be a #7. It could be a #9. If the screw head is too small, it will not hold the hinge and maybe not get a good bite into the house framing. If the screw head is too big, it will protrude from the face of hinge perhaps making it hard to close the door or more likely distort the hinge so it does not operate properly. Screws 2 �� to 3� long will work in most cases. If the jamb moves and tightening or replacing the hinge screws with longer ones does not solve the problem, the jamb anchorage can be improved using something of a trick. The trick is to remove the hinge and install one or two larger screws to anchor the jamb to the wall framing. The screw should have a bevel head and you should counter sink it in the jamb so the screw will be flush with the jamb and allow the hinge to fit snuggly over top of it. The advantage of this trick is that one does not have to find a #7 screw (the usual hinge screw size) of the right color to match the existing ones. Number 8 or 10 screws 2 �� to 3� long work just fine.
Air Gaps Under Doors: When inspecting, don't hesitate to get on your hands and knees to look carefully under the door to look for cracks and to see how easily you think water can slip through. Your door threshold is likely to be an adjustable one if it has two holes in the top of it below which are bolts that are used to move the threshold up or down. If the rubber on a nonadjustable threshold is deteriorated you can buy a new threshold from which you can salvage the rubber. This way you won't have to go to the effort of changing the threshold itself. Another way to deal with gaps under doors is to replace the threshold with a higher one. They are readily available in a variety of heights. Another approach is to add a spacer to the bottom of the door. Unfortunately this means removing the door. If the gap under a door varies much it may be that the door has pulled away from the jamb at the top hinge. This is fixable by installing larger or longer screws or by replacing the hinge and installing larger or longer screws. Weather stripping applied to the face of a door may well not be effective at keeping water out. If you have a steel or fiberglass door with deteriorated weather stripping under the door, it can usually be replaced fairly easily by removing the door. When you shop for the replacement it would be helpful to know the brand of the door. Unfortunately, that may be difficult to determine. To get that replacement stripping you will likely have to get it from a lumber/contractor supply store.
Air Gaps At Corners: The weather stripping of doors is often such that a little adhesively applied felt or brush pad is required to be placed at the lower corners of the jambs. These pads tend to come off with use and sometimes they are never even installed. The pads are about 2" by 2" and about 1/8" thick to �" thick. Sometimes they have a wedge shape. They are not readily purchased except from door manufacturing facilities that may be a part of the lumber companies where builders buy their supplies.
Air Gaps Around Warped Door: If the door is warped you probably should consider replacing the door as it will probably leak badly during a hurricane. Alternatively, you can replace or supplement by building out the weather stripping. You might notice that a warped door changes shape with season and in the case where a door is exposed to direct sunlight the door may even change shape between morning and night. This is reason to check the effectiveness of weather stripping right before the hurricane season.
Air Gaps Weather Strips At The Tops And Sides Of Doors: The first thing is to determine whether the door is salvageable and the condition of the weather stripping. If the door is salvageable but the weather stripping is damaged or has lost its flexibility, then consider replacing weather stripping. Usually that is pretty easy to do. In some situations especially for door jambs not made in a factory you can easily replace the weather stripping that is built into a wood strip on the door jamb that is called a door stop. A door stop is usually about 3/8" thick by about 1 3/4" wide that has a hollow vinyl strip, a flapper shaped piece of rubber, or a vinyl coated spongy weather strip attached to the 3/8" edge facing the door. Sometimes you can replace the weather strip without having to replace the entire door stop. If you choose not to replace the door stop, you may have to shop around to find the right size and shape of weather stripping. Some weather stripping can simply be pulled out of a grove in the door jamb. In other situations you will find staples or little nails that were also used to hold the weather stripping in place. Simply tear the stripping out of the slots and then remove the nails or staples before attempting to install new stripping. Small wire cutters are handy tools for cutting the nails or staples in the groove. Before you do any of this it might be prudent to cut off a little piece of weather stripping near the floor so you can take it as a sample when you go shopping. An alternative is to simply replace the door stop. They are readily available at home supply stores. The disadvantage of replacing the door stop is that it will need to be painted.
If your steel or fiberglass door came as a factory made assembly with jamb and threshold it will likely have a sweep of some sort under the bottom edge of the door. The sweep may be several flaps of rubber or vinyl that are presumed act as blocks to keep water from passing under the door. They are easily torn if the space between the bottom of the door and the threshold is too small.
|
Duct tap may be no joke!
Water Intrusion Preventative Measures At Doors
Although it is unproven, it seems that suitable tape applied to the outside of your doors to cover the cracks between the frame and door panel might reduce the amount of water getting driven into your house. The tape must be sticky enough to stay on and must be water resistant enough to maintain its effectiveness. Two types of tape might offer such features. One would be a good quality cloth duct tape. Unfortunately there are a lot of inferior quality duct tapes and most do not handle even small amounts of dust or moisture. Aluminum foil type taped used by AC duct installers is more reliable. The aluminum tape about 2�" wide has paper applied to the sticky side that one removes when applying the tape. Some brands of this tape have printed instruction for installation. The most important installation hint is to use a semi-rigid squeegee to rub over the tape to press the adhesive to the substrate. When using any tape, the surface must be dust and grease free. Unfortunately nearly all tapes have to be applied to dry surfaces. So plan ahead.
|
Shutters: Shutters may only offer marginal protection against water intrusion. If your entrance way for a door has in effect an exterior hallway consider locating shutters at the entrance of the "hallway" so that water that gets blown behind the shutters will have to travel some distance to the door. If you can reduce the buildup of water on the door, less will be driven through cracks by the wind pressure difference across the door.
Sliding Glass Doors

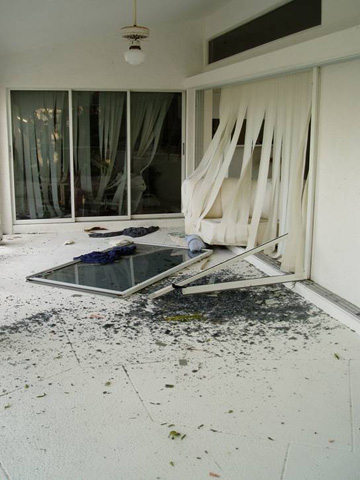
|
The failure of French doors at the front of this house resulted in the sliding glass doors being blown out of their tracks. Note one of the tempered glass panels did not break.
(click image for larger version) |
|
The Risks: Sliding glass doors, while wonderful for views and openness, expose houses to substantial risks if they are not rated for wind pressure and debris resistance. The problem is that unless sliding glass doors were specifically designed for high wind, they are not very resistant to being pushed or pulled out of their tracks by hurricane wind pressures. When that happens, wind driven rain will flood in and more dramatically it is possible that doors and windows on the other side of the house will get blown out. When this happens, wind and water blow through the house, furniture gets drenched and damage can be extensive.
Newer sliding glass doors will have as a minimum tempered glass, which is about twice as strong as regular window glass, for safety purposes. If it is tempered glass, a label indicating this will be etched in one of the corners. However, even if a door has tempered glass, that does not mean the glass meets wind pressure requirements imposed by building codes or that it is impact resistant. It just means that the glass is stronger than non-tempered glass and that if it breaks it will pose a substantially lower risk of injury to you or your family. Non-tempered glass can be a guillotine because it can break into big sheets whereas tempered glass breaks into many smaller pieces. Although the small pieces are quite capable of cutting they are not big knives. If the sliding glass doors are both pressure and impact rated, they are special doors that use a laminated glass panel that consists of two layers of glass with a membrane laminated between the panes. Laminated impact rated sliding glass doors will also have a label in one of the corners of the glass that indicates what test standards it meets.
Not only is glass strength an essential component of hurricane resistant sliding glass doors so are the frames into which the glass is mounted and the tracks at the tops, bottoms, and sides of the doors. A non hurricane rated sliding glass door is very vulnerable to getting pushed out of its tracks and head piece or being shattered by large debris. The tracks and head pieces on non-wind rated doors have simply not been designed to hold the doors in place in strong winds. When you look at what holds your door in place, do not be deceived by noticing that there is an inch or two of overlap of the top head piece over the door. Many older doors have very little ability to resist bowing and they can bow so much that the door can pop out of the head piece. This has been witnessed time after time. The loss of one of these doors creates a large opening for wind and water to enter, which was often seen in areas affected by the highest winds from the 2004 hurricanes. Interestingly, a no-name storm on the west coast of Florida caused many sliding glass doors to be pushed into rooms. The glass did not break unless it happened to hit a sharp corner of furniture. These doors bowed so much that their heights changed by over an inch so they withdrew from their top track to fall into the rooms.
If a sliding glass door is blown in or pulled out, the damage can be catastrophic with substantial water intrusion, failure of windows and doors on the opposite side of the house and possibly structural damage including loss of roof sheathing or portions of the roof.

|
A screen product protecting an entire porch area keeps water away from doors and prevents a sudden in rush of wind.
(click image for larger version) |
|
Evaluating The Risks of Sliding Glass Doors:
You should look over your sliding glass door(s) to see whether there is a label indication that the unit is pressure rated or pressure and impact rated. If there is such a sticker, the pressure rating will be listed as the DP (Design Pressure) rating. If the sticker indicates that the window meets the requirements of TAS 201, 202 and 203 or ASTM E 1886 and ASTM E 1996, the door is also impact rated.
If you can�t find a sticker indication a pressure rating or a pressure and impact rating, we recommend that you make a trip to your local home improvement store or building supplier and take a good look at sliding glass doors that have a DP rating of 30 or 40. (This means they are rated to resist a pressure of 30 or 40 pounds per square foot.) You will see that compared to sliding glass doors built before pressure ratings were being checked, the pressure rated units are substantially heavier. The glass is thicker and much heavier; the frames are wider, heavier, and stronger; the tracks deeper and stronger; and the side and top pieces also are more substantial. The differences are dramatic.
Now, check your sliding glass doors and look at the relative size of the frame around your glass and at the tracks. Are they as hefty as those you saw in the store for the same size sliding glass doors? If they are as substantial, you will want to check the corners to determine what kind of glass has been used in the door. In most cases you will probably already know if it is an impact rated product because you chose to install that type of product, the builder told you it was, or the previous owner or realtor pointed it out when you bought the house. So, if you don�t already know it is impact rated and it is a newer pressure rated unit, it will likely contain tempered glass.
If it is tempered, it will be labeled as tempered in one of the corners although the etched label may be hard to find. If it is not tempered, it really is a safety hazard especially if there are children around. Adults have been known to inadvertently walk into these doors, break the glass, and suffer severe cuts. The non-tempered glass breaks easily and breaks in big knife like sheets. This alone may be justification for replacing the doors. A compromise would be to have the glass replace while retrain the door frames. This is a good safety precaution, but not a very effective hurricane protection measure.
Look at the bottom track for the door. If you don't trip over the track, it will not be very effective in keeping water out in a hurricane. Does the track of the door have a piece of metal that comes up on the inside (water dam) at least 3 to 4 inches? Be advised that even with a high water dam it may not keep water out in strong hurricanes though it will certainly help in weaker ones.
Finally, check to make sure that there are a number of screws holding the track in place - both on the sides and along the top and bottom. Also check to see how well the door frame is caulked to the door jamb.
If you don�t come away from the inspection feeling pleased that your sliding glass doors are as substantial as the ones you saw at the home improvement store and that they are well installed, you should read through the following section on retrofit measures.
Retrofit Measures For Non-Hurricane Rated Sliding Glass Doors: The options for dealing with an older sliding glass doors are limited. You can either replace them or shutter them.
Replacing Sliding Glass Doors: Replacing is not as simple as taking the old doors out and putting new one in. Instead, the tracks on the floor and the aluminum extrusions at the sides and top have to be replaced as well. Likely, the stronger replacement extrusions will be a bit wider than the originals. The track will have a higher dam which where wheel chairs are used may mean that a short ramp will be needed. Replaced doors have the advantage of always being in place while not obstructing the views and light that would be blocked by most shutters.
Most people will want a professional to replace their sliding glass doors. The professionals will assure that the installation is done effectively, meaning that the doors are secured well to the houses and that they are caulked/sealed properly, and that the wind pressure ratings and impact ratings are appropriate for the wind exposure location of your house. Professionals are practiced at making the door replacement aesthetically acceptable.
In Florida and some other areas a building permit will be required to replace a sliding glass door. This is because they want to know that the door is properly rated for wind pressure and impact (if required), and that the doors are properly (strongly) fastened to the house. Having a building permit and building inspection will give you more confidence that the doors have been properly chosen, properly installed, and will perform as well as they can.
Shuttering: Shuttering costs less than replacing doors and shuttering the doors is one of the most cost effective ways to protect them from flying debris, and should help reduce water intrusion. Using a non-porous shutter system will also help prevent the house from getting pressurized if the sliding glass door behind it fails during a hurricane. However, because most shutter systems, even those that are considered non-porous in terms of pressurizing your house, allow pressure to build up behind the shutter on the sliding glass door. That pressure can cause the door to pop out or the glass to break. In some cases, the tracks for the doors may not be all that well attached to the walls of the house. You should check inside the framing to check the condition of the screws, the number of screws, and the distance between the screws. Where practical, install shutters some distant away from the doors they are protecting so that any water that intrudes through or around the shutters is less likely to build up against the doors.
Click on Shutters to get an idea of the variety of products available or visit
Do-It-Yourself Shutters or
Professionally Installed Shutters to look at more details about specific options. Generally, plywood do-it-yourself shutters for sliding glass doors are larger than a single sheet of plywood and are difficult to make structurally strong enough or attach well enough to provide significant protection against sliding door glass breakage. If the doors open onto a porch or lanai, installing code approved impact resistant screen products or accordion shutters around the perimeter may be one of the most cost effective ways to protect all the openings to that area from flying debris and also reduce water intrusion around the doors. If you do install shutters around the perimeter of a lanai, make sure that the shutters are well anchored and that the roof of the porch or lanai to which shutters are attached is well anchored to the floor slab or foundation, which it probably is not. Click on
Porches & Attached Structures for ideas about improving the anchorage of porches and lanais.
|
A track anchorage failure for a set of sliding glass doors. Note the single fastener hole above the door panel.
(click image for larger version) |
|
Strengthening Existing Sliding Glass Doors Protected By Shutters: It is not easy to make regular sliding glass doors strong enough to deal with wind pressures because there are two problems, neither of which is easy to overcome. One issue is that non-pressure rated doors will frequently deflect quite a bit. Now this may not seem very plausible, but it is unfortunately a fact that doors can deflect (bow) so much that they pull out of the aluminum at the top that holds them in. This is true even if the head piece extends down the door an inch or so. At the bottom track, doors would come out even sooner if it were not for the weight of the doors. Sometimes metal reinforcing can be added to the sides of doors. Some homeowners have also installed braces across the doors at mid-height that run from side to side. This bracing can be effective near the walls but it would take a pretty hefty beam to provide much support in the middle of the door. If you find that there are fewer than 4 screws along each of the vertical edges of the door frame or fewer than 2 screws along the bottom or top frame of each door segment, you should consider adding screws to improve the anchorage of the frame to the wall.

|
One potential type of sealant for use in sealing plastic sheeting to the bottom track of a sliding glass door.
(click image for larger version) |
|
Reducing Water Intrusion Through Any Sliding Glass Door: Although hurricane rated sliding glass doors have improved resistance to water intrusion compared to older doors, they are not perfect. Water intrusion can still be a risk. Some people think that because they have tile or terrazzo floors that water intrusion is not a big deal. They are correct in thinking that it is less of deal; but, if you evacuate and water remains in the house for an extended period of time without electricity to dry it out, moisture levels rise in the house to the point that mold becomes endemic.
Wind driven rain in hurricanes travels nearly horizontally and the water will build up on the sliding glass doors and work its way through cracks on all sides of the doors because of the wind pressure driving it. The best way to reduce the water penetration is to keep the water from building up on the doors. You can do this to some extent with non-porous shutters and this technique will be most effective if the shutters are located some distance away from the doors. The best technique that door manufacturers have found for keeping water from flowing into the house under the door is to build a deep dam that the water has to rise above before it overflows into the room. The height of the dam on the inside of the door track is the most critical element. A 130 mph wind can create a pressure of 35 pounds per square foot (psf) on a door in the middle of a wall. Each inch of water height exerts a pressure of 5.2 pounds per square foot at its base. Consequently, the 35 psf wind pressure equals the pressure applied by water 6.7 inches deep. Building a dam about 7 to 8 inches deep that can be sealed to the door frame on the inside of the door, in such a way that water doesn't leak under it, would greatly reduce the chances that much water would be blown in when winds approach 130 mph.
You may be able to use plastic sheeting taped to the edges of the wall opening for the door and sealed to the bottom track (you will need to remove dirt, dust and oil from the track) inside your house to keep water from spraying into the room through cracks or flowing in over the bottom track.
Incentives To Replacing Or Shuttering Sliding Glass Doors: There are three advantage of replacing or shuttering sliding glass doors. 1) You will have protected what is probably the window or door that poses the greatest risk to your house. 2) The new doors will be more energy efficient because they will leak less air and you have the option of selecting glass that is far more energy efficient in that it reflects heat thus saving on air conditioning. And 3) You may qualify for an insurance premium discount.
Replacing sliding glass doors with pressure and impact rated units provides the advantage and comfort of knowing that they will always be in place to do their job. Although shutters can offer you the same protection, they are not always in place and they have to be stored. Further, the replacement door allows light to enter the house and provides a view.
Garage Doors
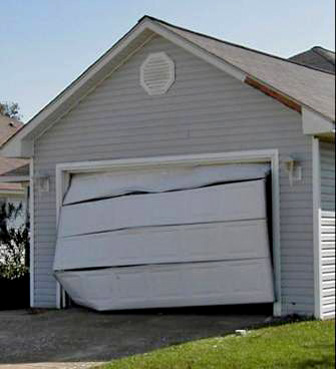
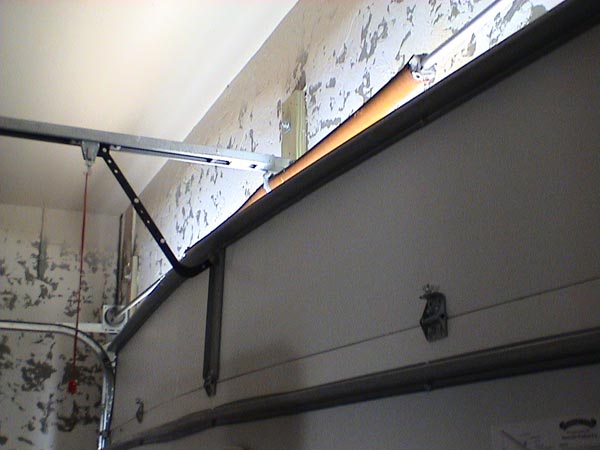
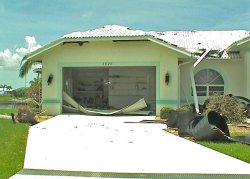
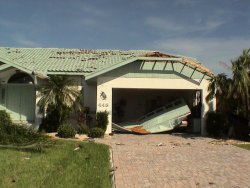
The Risks: Because garage doors are so big, usually the single biggest opening on your house, and because most old doors are so weak, the survival of your garage door is very important to the survival of your house. Experience has shown in older houses that when garage doors fail in hurricane winds a lot of additional damage follows. When you are evaluating your house for its vulnerability to hurricanes you need to look at your garage door as one of the first and most important vulnerabilities. Older garage doors and new ones that are not pressure rated are highly susceptible to wind damage, including buckling, twisting off the tracks, total collapse, and failure due to impact from windborne debris. Doors can be pushed in by winds blowing onto the door, the upwind side, or pulled out as winds whip around the corner of the house where the door is located, the downwind side.
|
Garage door pushed in by the wind
(click image for larger version) |
|

|
Garage door pulled out by the wind
(click image for larger version) |
|
|
Failure of the garage door allows the full fury of the hurricane enter the house to act on interior walls, doors, ceiling or roof that form the barriers between the inside of the garage and the rest of the house. This frequently leads to failure of these surfaces and can lead to significant loss of roof sheathing or loss of a part of the roof.

|
The failure of this garage door probably contributed to the loss of roof sheathing.
(click image for larger version) |
|
Water intrusion around the perimeter of a garage door is not usually a big problem unless you have things that can be damaged by water sitting directly on the floor. Most garage floors are gently slopped towards the door so that water that blows in around the door will tend to drain out of the garage. However in a hurricane winds may blow water into the garage for some time so it is probably prudent to raise vulnerable contents off the floor and away from the door.
|
Using Your Car
Backing your car against the door provides little additional bracing. It may help brace the panel the car bumper pushes against from positive (inward acting) pressure; but, it will do nothing to help with negative (outward acting) pressures. It just puts the car closer to possible debris impact damage.
|
Garage door blown in on top of car. Note the loss of roof sheathing over the garage.
(click image for larger version) |
|
|
Inspecting Your Garage Door. Is It Strong Enough?
-
Is your door wind rated? If you don't know then most likely it is not. If it is wind rated there will be sticker on the door indicating the Design Pressure for the door.
-
Is you door rated for debris impact resistance? If you don't know then most likely it is not. Again, if the door is debris impact rated there will be a label on the door indicating the rating.
|
If you don't see a sticker but still want to further evaluate the door, look for the following. They are all indications of a door that will perform poorly when a hurricane strikes.
- Does your garage door only have one bar across each of the four panels or maybe only one or two panels have bars?
- Is your garage door made of wood?
- Are some of the door panels rusted or rotted?
- Are some of the door panels dented rather badly?
- Are the brackets that hold the track to the wall loose, broken, or missing bolts or nuts?
- When the garage door is closed, do the brackets supporting the track line up with the rollers?
- Are the hinges between panels loose, broken, or missing bolts or nuts or screws?
|
Protecting Your Garage Door Opening:
One of the simple solutions is to
replace the door and its tracks
with a door that is code approved for both wind pressure and impact protection (about $1,500 for a door wide enough for two cars). When you Install a wind and debris rated door your worries are over. The door is always there to provide the needed protection. When you are selecting a door there are two primary considerations. One is to be sure the door is rated for the correct wind pressure for the design wind speed of the area in which you live. The other is to select a door, at additional cost, that is also debris rated. Such a door will give you the ultimate in protection and is NOT an indulgence, but instead a prudent choice. If your house is in Miami-Dade or Broward Counties, the replacement door is required by the Florida Building Code to be pressure and debris impact rated. If your home is located in other areas of the state that are part of the windborne debris region defined in the Florida Building Code and your replacement door includes windows, the garage door has to be pressure rated and the windows have to be pressure and debris impact rated. Otherwise, the code only requires that the replacement door be pressure rated � that is rated for the design wind pressure appropriate for that location.
If your door is relatively new but does not have a sticker indicating the wind pressure rating, you may be able to get the door manufacturer�s local representative to add horizontal bracing, new wheels with solid shafts and additional track braces that will make the garage door assembly similar to that for which they have a pressure rating and product approvals. These changes will likely require replacing the springs to bring the balance of the door back within specifications. Such kits are available and can be installed by some manufacturer�s representatives for under $500. However, if an opening protection insurance discount is one objective of your retrofit, you should check to make sure that you will be able to obtain a letter certifying the compliance of your retrofitted door that will acceptable to the insurance company. You will likely be better off replacing the door with a rated product that has an official sticker if you want to ensure that you will get the insurance discount available once you protect all of your openings.
Another solution that should make your garage door protection eligible for insurance discounts once you protect all openings is to protect the garage door with a shutter or screen product that is
rated for both wind pressure and debris impact. Storm panels are a very effective and easy way to protect a garage door because they are effective and are relatively easy to deploy. If your door is relatively new then storm panels may be the best route. On the other hand if the door is deteriorated and is or will be in need of replacement then replacing the door will be most cost effective solution in the long term. You can check out shuttering options in
HRG Shutter Matrix Usually the only effective way to shutter a garage door is to install panels or a system that attaches along the top and bottom of the door opening.
Vertical Bracing:
Vertical bracing systems can be effective for supporting the door against wind pressure loading and at least one company makes a retrofit kit with vertical members that has Florida Building Code approval. An example is listed below. There may be others.
Examples: Secure Enterprises, LLC FL# 6420
Horizontal Bracing, What Does NOT Work: Horizontal bracing with wood members is rarely very effective and usually not a good idea. Sixteen foot and wider garage doors are big structural elements. They are so wide that It Is not easy to make them strong with wood (steel � yes; wood � no). If you have looked at wind rated doors you may have noticed that the manufacturers have usually installed several steel beams across each panel and they may have provided posts to further strengthen the door. It takes really hefty wood members to span the width of a two car wide garage door and make it much stronger. Permanently installing wood members to the garage doors will change the balance of the door and will make it so heavy that the garage door operator does not have the power to lift the door (human or motor power).
 Garage door springs can be very dangerous and even leathal! For this reason springs should be adjusted or replaced only by professional garage door installers.
Garage door springs are sized or adjusted at time of initial installation to balance the weight of the door. If you add much weight to a door, then the door may not open as easily. In fact a garage door operator may not have the strength to open the door or the motor of the operator may burn out because of the extra work it has to do to lift the door.
|
|
Label on commercial door indicating the need to install a vertical post - the note says that the post should be installed for winds above 75 mph. Even commercial doors sometimes use a center post to improve the pressure rating by effectively making the door "narrower." If your door needs the brace, be sure to close the door and install it before the storm. This owner did not install the brace before Hurricane Charley struck and the door paid the price. The posts are so easy to install that one should always install them regardless of the anticipated wind speed because one never knows whether the hurricane will gain speed or a tornado associated with the hurricane cause increased wind speeds.
(click image for larger version) |
|
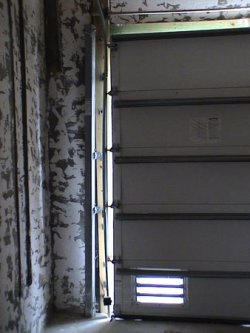
|
Note the bracing post in the corner beside the door (7)
(click image for larger version) |
|

|
Without the post in place, the door bowed in and almost came completely out of its tracks.
(click image for larger version) |
|
|
Adding posts that are installed after the door is closed can make a door stronger because the posts serve the purpose of making the door structurally narrower. Not only do door panels have to be strong to meet the design pressures; but, the tracks, the rollers for the wheels, the wheels, the axils for the wheels, the mounting of wheels to the doors, hinges connecting the doors, and the mounting of the track to the face of the house have to all be stronger than on older doors.
|
How Much Pressure Does Your Garage Door Need to Withstand?
Can you imagine turning your garage door so that it is suspended over a hole and parking your car on top of the door? At 130 mph, a 16' by 7' door would have to support a typical family car and at 150 mph it would have to support a large SUV.
|
Door Size
|
Pounds of Force Applied By Wind
|
|
100 mph
|
130 mph
|
150 mph
|
|
8' wide by 7' high
|
1120
|
1920
|
2560
|
|
16' wide by 7' high
|
2095
|
3540
|
4715
|
|
18' wide by 7' high
|
2355
|
3980
|
5310
|
If your house faces a big open area, these forces are likely to increase by 30 percent.
|
Do It Yourself: The only do-it-yourself options that seem to make sense are to add vertical support posts. You can buy one of the kits for bracing the door as suggested above or install your own wood columns. You can install the posts at the center of the door (this will cut the forces on the tracks in half but the supports will have to carry half of the forces on the door) or possibly 1/3rd of the way in from each edge of the door (this will reduce the loads on the tracks by 2/3rds and the loads on the supports will be 2/3rds of what they would be with a single center post). You will need to add pairs of supports, one
on the inside and one on the outside at each location where you choose to brace the door. The Tables below can be used to choose the size of the wood columns you would need to install and the strength of the anchors you will need at each end of the column. You will have to look at your particular garage door situation and then be creative in selecting the appropriate hardware to anchor the columns to the floor and to the header over the garage door. Simpson Strong-Tie and USP both make hardware that has the kinds of capacities you will need to anchor the ends of the columns. The first table lists column sizes and forces for homes located in a normal suburban area where you are surrounded by houses and trees. If your home is located on the edge of a large field, lake or golf course, you should use the second table to identify the size and type of wood to use in the columns. All wood for the columns is assumed to be Number 2 grade (something that is commonly available at lumber yards and some home improvement stores). Southern Yellow Pine (SYP) wood is stronger than Spruce Pine Fir (SPF) wood. The red squares indicate that SYP lumber must be used. The black squares indicate that none of the common lumber is strong enough for the required bracing strength.
Keep in mind that even if you brace the garage door, you are not protecting it from damage from windborne debris. If you have a wooden garage door with panels, debris may knock out the panels and create a large opening for wind and rain.

|
Table 1. Sizes of Wood Columns for DIY Bracing of Garage Doors in Suburban Setting with no Large (600-ft wide) Open Areas Next to House
(click image for larger version) |
|
|

|
Table 2. Sizes of Wood Columns for DIY Bracing of Garage Doors for Houses with Large (600-ft wide) Open Areas (fields, parking lots, water, golf course) Next to House
(click image for larger version) |
|
|
Conclusions About Garage Doors: If you have an old style garage door (i.e. not one especially designed for wind applications) you should seriously consider replacing the door or protecting it with a shuttering system. Shuttering will cost less than replacing the doors, however if the door is old or deteriorated it may well make more sense to bite the bullet for the long term advantage of having a new door sooner and not having to pay for storm panels only to have no use for them when you are forced to replace the door. Using retrofit kits and posts has the disadvantage of not taking into account the particular design of your garage door and its strengths and weaknesses. However, if the door is relatively new, but just does not have a label indicating compliance with wind pressure or debris requirements, adding the posts might make sense. But, such doors may not qualify your home for insurance premium discounts related to opening protection.
Common Misconceptions and Myths
Before we move on to methods for protecting windows and doors, it is important to address a couple of common misconceptions about ways to protect windows.

(click image for larger version) |
|
Tape: We often see windows with masking tape, duct tape, or any other type of tape placed across the glass and are asked whether this will provide protection against storm debris - the unequivocal answer is NO. Hurricanes are devastating forces of nature and more substantial protection than tape is required to withstand their wrath. The tape may keep some of the glass shards together as a clump; but, the tape does not do anything to strengthen the glass or to keep it from breaking out of its frame.
Window Film: Some homeowners have considered window film as an alternative to other window protection systems. The most common method of installing window film is known as "daylight installation." The process involves pre-cutting the adhesive-backed film to a size slightly larger than the windowpane to which it will be applied. Then, at the time of installation, the film is trimmed back to the size of the windowpane and a sealant may be applied to the perimeter of the film to connect it to the sash. This type of installation does nothing to keep the window attached to the frame, so it provides very little or no additional protection from the glass breaking out of the frame and winds and rain entering your house.
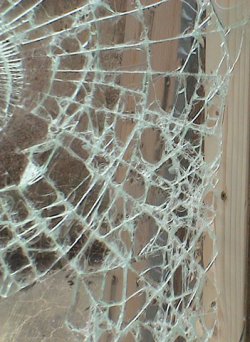
|
This window was impacted by a light weight missile at enough speed to just crack the glass but not high enough to knock the glass out of the frame. The missile weighed less than 1 pound and was traveling at less than 20 mph (much much less of an impact than any of the standard missiles used for certifying window protection against large missile impacts). Raising the missile speed a couple of miles per hour completely knocked a similar pane out of the window frame. Note that the window film does keep the shards of glass together.
(click image for larger version) |
|
One of the most common types of window film is known as "safety film." This type of film should never be less than 4 mils in thickness. Typically, safety film products meet the same break-safe requirements as tempered safety glass. This means that the safety film should hold the glass shards together, thus preventing a potential hazard from sharp, broken glass. Safety film may also offer a degree of protection in the case of high winds, particularly if it is well anchored to the window frame using a method that has been shown to keep the film in place after the window is broken. Window film installations with proper anchorage tend to be quite expensive compared to the "daylight installation" and usually have only been proven for commercial applications where the frames are more substantial than those typically found in residences. Some products have passed the small missile test standard when applied to Commercial Windows glazed with 3/16 tempered glass and the film is adhered or mechanically fastened to the window frame, but we are not aware of any systems that have passed the large (9 lb lumber) missile impact at 34 mph. Experts and the building codes do not consider window film to be an adequate protection for windows of homes in hurricane-prone areas.
The link listed below is to the International Window Film Associations website, this will take you to a letter they prepared for the Florida Attorney General's office concerning dealers selling window film to Florida residents for use as a hurricane protection product.
A brief quote from the letter says �� statements such as �hurricane proof� or �meets Dade County standards� are, at best, misleading to the public or, at worst, fraudulent,��.
IWFA Letter to Florida State Attorneys
Shutters
There are a large number of shutter products and systems currently available that will provide you with good solutions for protecting your windows and doors. We like impact resistant products that are always present or which can be deployed automatically for protecting openings that are generally inaccessible or require extension ladders to access. Less expensive products or systems that require lifting and fastening are most appropriate for locations where it is easy to install them from a stable position on the ground, on a deck or from a low position on a secure step ladder. Information on many of the types of shutter systems available can be viewed by clicking on
Professionally Installed Products and by reviewing the information in the
HRG_Shutter_Matrix.pdf.
What You Should Do: As a homeowner in a hurricane-prone area,
you should always purchase a product or system that has been tested
and certified as passing one of the large missile (i.e. 9-lb 2x4 wood
member striking end on at a specified impact speed) impact-resistant
standards. See
Local and National Standards
to get more information on the various test standards and
performance requirements. In Florida you can determine if the product
has been tested and certified by looking at the label on the product
or by looking it up on the Florida Department of Community Affairs
product approval website.
Florida Department of Community Affairs Product Approval
For Miami/Dade and Broward County approvals you can look it up on their product approval web site.
Miami-Dade County Building Code Compliance Product Search
 Manufacturer Members of the International Hurricane Protection Association,
a Not-for-Profit trade association, have all submitted for independent testing
and engineering. Member Manufacturers produce products that have the necessary
Texas Department of Insurance, Miami-Dade and/or Florida Building Code
approvals for use in Florida and Texas. This is important because buying an
unapproved system means you will not be eligible for Windstorm Insurance
Discounts, and the strength or reliability of the system will likely be unknown.
It is possible to waste your investment in a protection system or on a product
that is substandard or virtually worthless. Look for the IHPA logo at dealers
and manufacturer's websites this will help identify systems that are Florida
Building Code and International Building Code compliant.
Manufacturer Members of the International Hurricane Protection Association,
a Not-for-Profit trade association, have all submitted for independent testing
and engineering. Member Manufacturers produce products that have the necessary
Texas Department of Insurance, Miami-Dade and/or Florida Building Code
approvals for use in Florida and Texas. This is important because buying an
unapproved system means you will not be eligible for Windstorm Insurance
Discounts, and the strength or reliability of the system will likely be unknown.
It is possible to waste your investment in a protection system or on a product
that is substandard or virtually worthless. Look for the IHPA logo at dealers
and manufacturer's websites this will help identify systems that are Florida
Building Code and International Building Code compliant.
The best way to protect your existing windows and doors from damage in
hurricanes is to install tested and approved impact-resistant shutters over all
windows and glass doors. Not only do they protect doors and windows from most
common wind-borne objects, but they can reduce the chances of damage caused by
pressurization of your home if a window or door is broken.
The easiest retrofits are typically those that simply cover the opening with
an approved structural panel. In addition to
Professionally Installed Products
that are professionally installed, there are a wide variety of
Do-it-Yourself Options, some of which will qualify for
Windstorm Insurance Discounts and some that may not qualify. Note that
insurance companies will not give a Windstorm Insurance Discount unless all
openings are protected by an approved product.
You can find out more about windborne debris protection options by clicking
on the links below. The information has been organized according to the type
of "opening" you are trying to protect. A matrix that summarizes protection
options has been prepared and can be viewed or printed. See the link below.
HRG_Shutter_Matrix.pdf
|