|
|
|
PDF Version
Questions
|
|
Home > Roofs > Roof & Attic Water Intrusion
|
|
Roof & Attic Water Intrusion
What to do if you re-roof,
What you can do if you don't re-roof,
Roofing Terms
|
|
|
Risks Associated With Leaks
Recent hurricanes have shown that even houses with extremely high structural integrity can still be catastrophically damaged by the wind driven rains of hurricanes. These rains travel almost perfectly horizontally. Wind driven water intrusion can cause catastrophic damage to the walls, ceilings, interiors, and possessions of homes that leads to major disruption of households. When wind speeds get above 60 mph, rain water is driven against the exterior of your house with great penetrating force. Whenever water builds up on the exterior wall surface it is practically driven into any cracks or openings because as it spreads across a wall it is being pushed into the wall. And when there is lower pressure on the inside of your house, the water penetrates in large quantities (quarts and gallons) through cracks, holes and gaps in the siding and around windows and doors. When this happens for hours at a time towels and buckets simply are not up to the task of water management. After hurricanes usually there is no electricity available to dry out homes using air conditioning or dehumidifiers so mold invades the house that can be as devastating as direct wind damage. As far back as Hurricane Hugo in 1989, researchers observed that a number of homes looked completely intact from the outside but a closer look revealed that the interior wall surfaces were literally melting away, ceilings were collapsing and wallboard was coming off the walls. This meant people lost many possessions and had to move out of their houses, find another place to live, settle with insurance adjusters, arrange repairs, and await repairs. This was not a pleasant experience.
In an ideal world, your house would keep water out even in the extreme circumstances of hurricanes. However, because houses cannot affordably be built to submarine standards they can't keep all water out. But you don't have to sit back and take what comes. If you minimize the quantity of water that enters through attic ventilation system components, you will improve the chances that your home can be dried out without having mold develop to dangerous levels. Most houses have several roof and attic ventilation related vulnerabilities that allow water to enter that can be easily fixed, some in just an hour or so.
Entry Points for Leaks:
The main sources of water intrusion into houses (aside from floods) arise from windows and doors, attic vents (including the ones on the roof, vents on gable end walls, and soffits (eave and gable end), wall penetrations for utilities, cracks in wall siding. Each needs to be evaluated for risk to your home. The section on Walls includes a discussion of leaks through windows, doors, wall penetrations, and cracks and methods for retrofitting to reduce this water intrusion. Loss of roof coverings, to the point that roof decking is exposed, is usually catastrophic if it extends very much over living areas. Methods for reducing water intrusion due to roof cover loss is discussed in the What to do if you re-roof and What you can do if you don�t re-roof sections. The following primarily deals with water intrusion through the attic ventilation system components and retrofits that can be made to reduce this water intrusion.
How Far Can Wind Drive Water?
It is important to appreciate what a hurricane can do to drive water into your house. Armed with that, you can get a good feel for what needs to be done to minimize the risk of water intrusion. First, all houses leak air around windows and doors, through vents, cracks, holes, gaps and in a variety of other places. When winds blow on a house and flow around it, they create positive pressures on the windward wall and windward soffit and negative pressures on most other surfaces including the side walls, downwind wall, soffits above those walls and the roof. Consequently, the pressures inside the house and inside the attic are usually slightly negative (that is lower than the outside pressure). This tends to draw (or suck or pull) water on the surface of the house into the walls and ultimately into the house. When wind driven rain hits the windward wall it collects on the surface and this difference between the positive pressure on the windward wall and the negative pressure inside the house or the attic, acts as a driving force that pushes and pulls water through any cracks, holes, gaps etc. If a window or door fails, the situation gets even worse since water that has gained momentum from the wind gets carried into the house.
The pressures created by a 100 mph wind will drive water about 3-1/2 inches up through any crack or opening anywhere on the roof, gable wall or through the soffit.
The pressures created by a 130 mph wind will drive water about 6 inches up through any crack or opening anywhere on the roof, gable wall or through the soffit.
The pressures created by a 150 mph wind will drive water about 8 inches up through any crack or opening anywhere on the roof, gable wall or through the soffit.
Vents on Roofs
Introduction:
Attics are vented (cooled) three ways. 1) vents on the roof, 2) gable end vents, and 3) vents under eaves or overhangs (soffit vents). Each can be major paths to let water into your home. In fact, most have already let water into your attic, but because the rain was of short duration, no real damage was done and you may or may not have been aware it. The fact that water has come in is usually evident in attics at gable ends. Elsewhere, it may well have come in, but is just harder to see; however, if one goes into an attic one can usually see water stains on the gable end wall below vents and perhaps on the ceiling below as well.
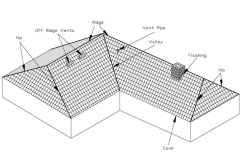
The two types of vents on roofs are those on the main part of the roof that are called off-ridge vents and those on the ridge line or in the case of mono roofs at the top of the roof that are called ridge vents. Mono roofs are those whose tops meet a wall. There are other things on roofs that are of concern. Plumbing pipes that may not be so obvious as plumbing, but are. Other vents on roofs include chimneys for gas appliances (for example tankless water heaters and gas fireplaces), fireplaces, and stoves. Skylights and light tubes may also be on roofs.
|
Sketch identifying off-ridge vents and typical hip roof features
(click image for larger version) |
|
Vents on roofs either serve to cool the attic or they are exhausts vents for range hoods, dryers, and bathrooms. All are intended to be a path for air to exit a house either hot air from the attic or from rooms and devices from within the house. The path that allows air transfer in or out will let wind driven rain in even if there are slanted louvers or louvers that only open when a fan comes on. The reason is that these devices are not water tight. To be water tight they would have to be much more precisely fabricated, which would dramatically raise the cost.
Roof vents can let hurricane driven rain into an attic because most vents are not designed to resist hurricane forcefully driven rain. Further, during a hurricane wind can blow rain water up the roof in sheets. Yes, water can flow uphill when blown by wind. In other words, water may not flow down to eaves on the windward side, but instead can be driven up the roof to the peak. In that path it passes vents on the roof. Again, the vents are not typically able to keep water out from that direction. They are designed to keep ordinary falling rain out. Some vents, gooseneck vents, have a front slope on them that has a slide seemingly designed to direct water up into them. Many vents have flapper valves intended to keep water out, but the valves are so lose fitting that they are not very effective. Many flappers are so flimsy that they buckle under wind pressure.
Off-ridge vents:
These vents are vents for dryers, bathrooms, or range hoods or they are vent that provide an attic ventilation function. Attic vents cover holes cut in the sheathing a relatively small distance down the roof slope from the ridge. With these types of systems, cooler air typically enters through the soffits and hot air exits through the ridge or off-ridge vent. This sets up a circulation that cools the attic and provides a route for moisture expelled from the heated roof sheathing to exit the attic. Ridge vents are often dislodged or lifted off roofs in hurricanes and this damage can lead to significant water intrusion. Similarly, we have been made aware of a number of instances where off-ridge vents leak for certain wind directions and others where off-ridge vents have broken loose and water has poured in through the hole in the roof.
|
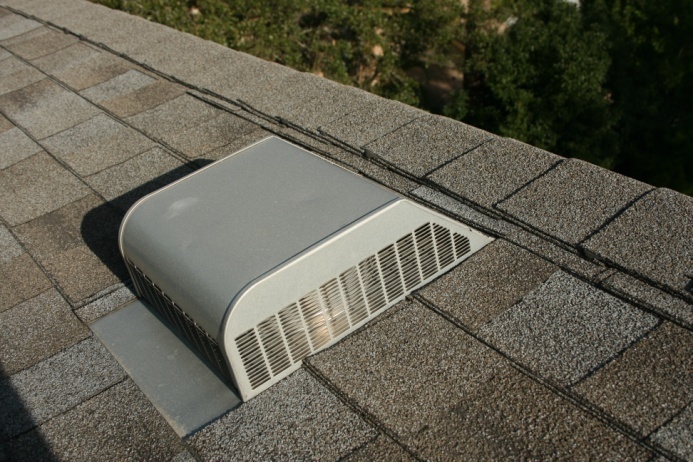
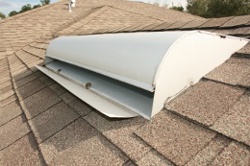
Off ridge vent
(click image for larger version) |
|
|
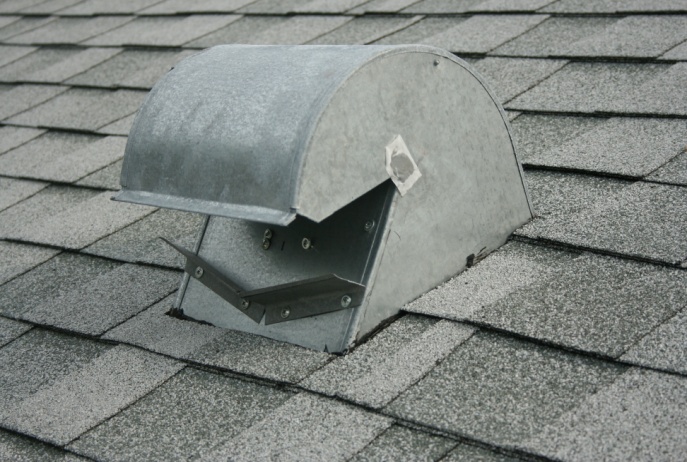
AVR (Air Vent Round) Slant backs
(click image for larger version) |
|
|
|
|
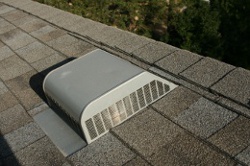
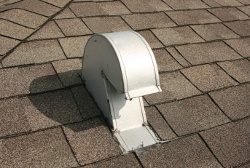
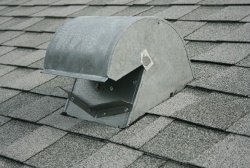
Gooseneck vent for range hood.
(click image for larger version) |
|
|
Gooseneck vent for bathroom or dryer exhausts.
(click image for larger version) |
|
|
|
Retrofit Measures for Off Ridge Vents:
It is generally not easy or cost effective to replace off-ridge vents with wind rated ones unless they are so severely damaged that there is no other choice. A professional roofer should be consulted for replacements because this is one of the most difficult tasks for a roofer to do and requires a skilled mechanic to execute it properly. If vents are not damaged, covers can be made of sheet metal to cover them and block water intrusion. These vents should not be left permanently in place because they would block attic ventilation. Thus they need to be installed just prior to a hurricane. Unfortunately, installing them requires a trip to the roof. If off ridge vents are damage or look feeble (which many do) they can be strengthened by securing sheet metal at seams to better connect the two pieces of metal. To avoid corrosion problems the sheet metal used to supplement the strength of a vents should be the same as the vent itself and the fastener should be combatable as well.
An untested method draws on the method used for some roof vents (roof ridge) that have Florida Product Approvals. Also, it is similar to the method used on aluminum ridge vents. The method is to place a deflector in front of the vent that would deflect most wind and water that would otherwise enter the vent. The advantage of this method is that it is always in place in contrast to the cover method. The problem is that it is untested for some vents. The photo of the wide off ridge vent shows a deflector that is part of the vent with Florida Product Approval. The photo below shows a gooseneck vent that has been outfitted with a deflector.
|
This shows a wind off ridge vent that the manufacturer supplies with a deflector
(click image for larger version) |
|
|
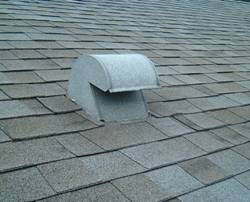
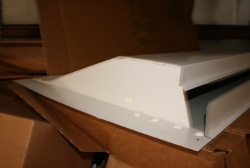
This shows a gooseneck that has had a field applied deflector added to it
(click image for larger version) |
|
|
|
Both deflectors were made from drip edge metal that is standard roof metal profile used on shingle roofs.
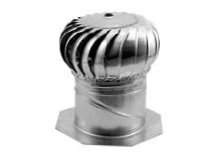
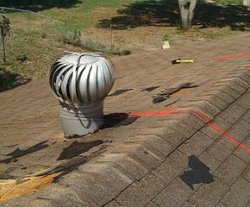
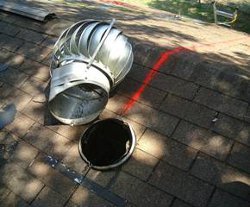
Turbine vents: Turbine vents are comprised of two parts. One part has a round neck to support the main turbine and also has a flange that is attached to the roof. The second is the main rotating/turbine part with its neck that can be articulated to make the turbine vertical. Many, many turbines are made of very thin metal and many have very poor connections between the two parts because of indifferent installation practices. In addition, turbine vents stick way up in the air where they can easily be damaged by debris from roofing materials or from tree debris. Almost no turbine vents are built strongly enough to withstand the debris created by hurricanes.
|
Turbine Vent
(click image for larger version) |
|
|
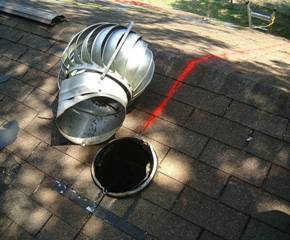
Turbine vent and the hole in the roof
(click image for larger version) |
|
|
|
|
|
Retrofit Measures for Turbine Vents:
Existing turbines may be strengthened if more screws are added to secure the parts together. Corrosion resistant screws made of compatible materials should be used. However, as has been pointed out, strengthened turbines vent are still at risk if for no other reason than they are so easily destroyed by debris. Another, safer, option is to remove the top part of the turbine along with its articulating neck and placing a cap over the pipe that projects from the roof. Caps manufactured for this purpose are available at some larger home supply stores and from supply houses that cater to roofers.
Ridge Vents:
Ridge vents are vents placed over gaps of roof sheathing about 1-1/2� wide on each side of the roof peak that provide an outlet for hot air to exit the attic. Ridge vents are little vented hats. They have the advantage of having a small profile, so they obstruct wind much less than most other roof vents. However, they are frequently not fastened to the roof with enough fasteners or long enough fasteners. Many times nails are used which would be fine provided there are enough of them and they are long enough. A common problem when shorter nails are used is that they somehow work their way out. Probably due to temperature changes over the years. Look for nail heads that are too far above the vent.
Retrofit Measures for Ridge Vents: If nails have worked their way above the ridge vent one can replace them with #10 screws that are long enough to penetrate all the way through the roof decking. They should be spaced no farther apart than about 12� on each side of the ridge vent.
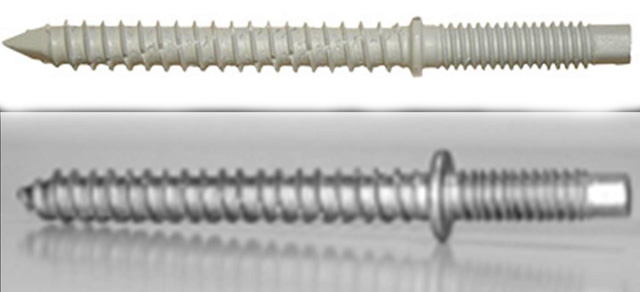
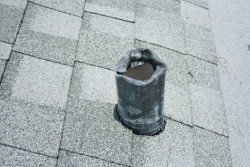
Pipe vent flashing (plumbing stacks): Plumbing vent pipes are usually located on the back sides of roofs. They may be wrapped so that it is not obvious that they are pipes. The wrappings, called roof jacks, boots or pipe flashings, serve as ways to keep water from leaking into the attic through the holes in the roof made for the pipes. One type of pipe vent cover fits tightly around the pipe to keep water out. Another, common type wraps around the pipe and extends up above the top of the pipe where it is bent down into the pipe. For some reason rats and squirrels like to gnaw on the coverings thus defeating their water resisting function. If vermin have chewed on the wrappings, inspect them carefully to determine if they can let water in.

|
This vent pipe flashing fits snuggly around the pipe preventing water from getting into the attic.
(click image for larger version) |
|
|
|
|
(click image for larger version) |
|
|
(click image for larger version) |
|
|
|
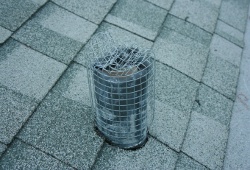
This lead vent flashing wraps down into the pipe so water cannot get in between the pipe and the roof. Squirrels or other vermin chew on flashing made of lead. Inspect for chew holes at the top and near the roof. The vent on the right has been shielded with hardware cloth to keep squirrels from chewing on the lead and to keep squirrels and vermin from falling into the pipe.
|
|
Pipe Vent Retrofit Measures:
If gnawing has occurred to such an extent that water can enter the top edge of the wrapping and run down the outside of the pipe, one can use similar material fitted over the rim and projecting down on both the outside and inside of the pipe. Securing the added piece will probably be almost automatic as one places the covering. If holes exist around the shank of the pipe, one might be able to use a caulk/sealant suitable for outside use. Bear in mind that roofs have severe exposure to sun so the sealant may not be a good long term solution. If in doubt have a professional roofer give repair advice. To prevent future gnawing one can wrap hardware cloth, the screen type material that has a grid of about 1/4� to 1/2�, around and on top of the vent pipe. Wrapping over the top has the advantage of keeping squirrels and rats out of your sewer system where they can present themselves to your horror in your toilet bowl. Since plumbing vents pipes are frequently placed on the back side of the houses for aesthetic reasons, the hardware cloth may not be objectionable.
Gabe End Vents (Attic Vents on Gable End Walls):
Gable end vents are practically assured of letting water into attics. In fact, most likely one can find water stains in the attic and on the drywall ceilings created by ordinary thunderstorms. Thunderstorms are nothing compared to hurricanes. Thunderstorms are short term events whereas hurricanes may subject the house to driving rains that last for hours. In that time, there can be a number of inches of rain. Because gable end vents can be large they can provide good attic ventilation. By the same token they can (do) allow wind driven water to enter relatively unimpeded. If they let air out, they can let the wind driven rain in as well.
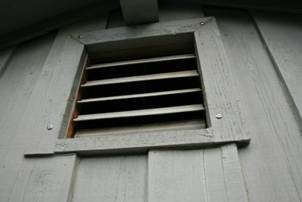
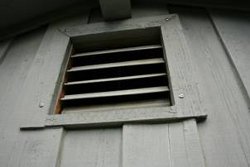
The most common types of gable end vents are passive openings with louvers that may be rectangular in shape or triangular to match the roof pitch. Even though these gable end vents have louvers designed to keep water out, they are not designed to keep out water driven by hurricane force winds. The louvers would have to be at least 6 to 10 inches high to have any hope of keeping the water out. Even then, the flow of air would likely keep the water moving into the attic.
Another type of gable end vent is not passive, but instead a powered by a fan in the attic directly behind louvers that are only opened because the wind from the fan forces them open. So ordinarily they are closed. One might suppose that these vents would be effective at keeping water out. Doubtlessly, the ordinarily closed louvers do help moderate the amount of water that can get in. However, these louvers are not designed or made well enough to be very effective in keeping wind driven rain out. Bearing in mind that water on walls during wind driven rain events is under great pressure, the water on the wall is looking for an escape. The louvers of power vents provide a great escape.
Retrofit Measures for Gable End Vents:
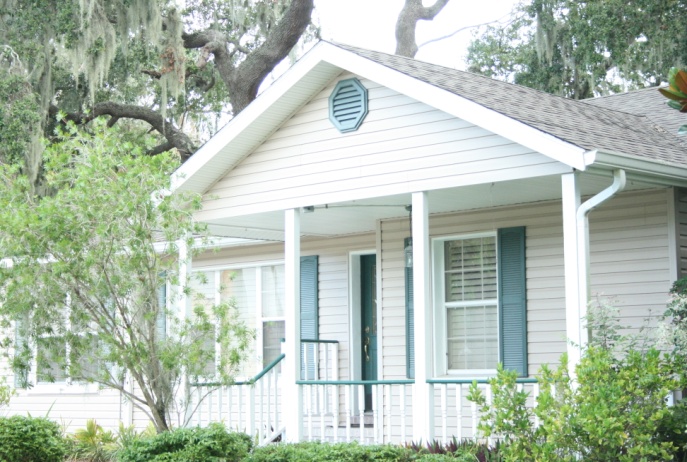
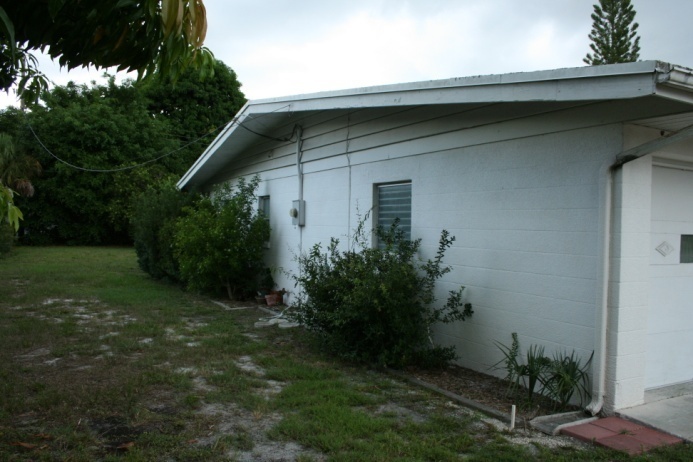
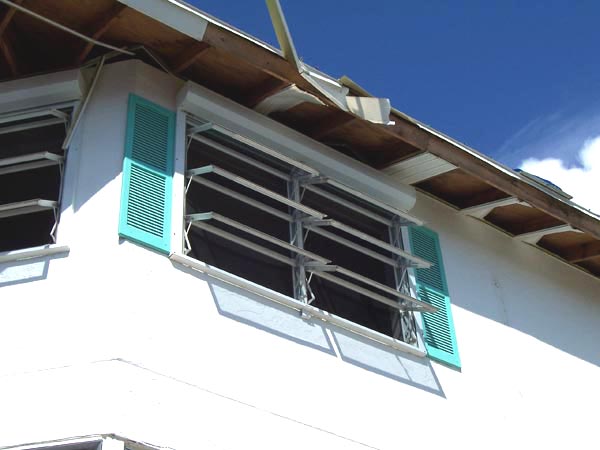
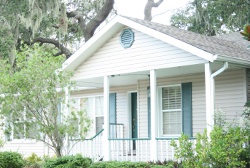
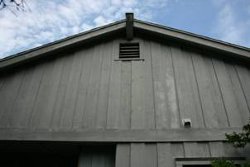
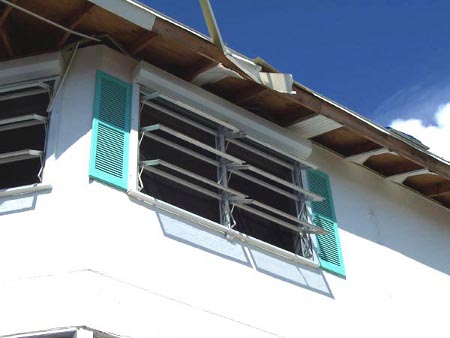
Both triangular and rectangular vents can be fitted with storm panels much like those used to protect windows. However, these will be far more effective if they are made of flat material that will provide a reasonably tight connection to the wall. This will minimize the path for water entry. In fact, the figure of the house with grey vertical wood siding shows four fasteners already in place so that a piece of plywood can be quickly installed. An added precaution would be to place a gasket of foam rubber between the plywood and the frame of the vent. Gable end vents that protrude beyond the face of the house can be a challenge to figure out how to prepare for installation of plywood covers. However, the section on Do-it-yourself shutters provides information on a variety of typical fasteners that can be used for unusual situations.
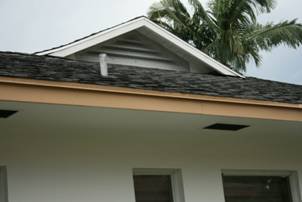
Retrofitting triangular gable vents can be a challenge because some types have louvers that protrude and it may be difficult to find places to attach fastener for covers especially where louvers go all the way to the overhang as shown in the photo immediately below on the left. A little ingenuity and thought can solve most of these challenges.

|
Triangular gable end vent on a Dutch hip gable end. Note soffit vents on the eave.
(click image for larger version) |
|
|
This shows an appliqu� type vent that may be functional or decorative
(click image for larger version) |
|
|
|
|
(click image for larger version) |
|
|
(click image for larger version) |
|
|
|
Rectangular gable end vent fitted with fasteners so plywood covers can easily and quickly installed before a hurricane. The close up shows fasteners in place for plywood covers.
|
|
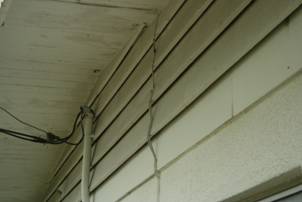
Another type of gable end vent is where there is a gap between overlapping siding boards whose gaps are practically guaranteed to let water into attics. This nice unobtrusive architectural solution to providing ventilation certainly presents a high risk and a challenge to retrofit. A reasonable water prevention measure is to apply a flat (panel type) storm panel over the entire exposure.
|
(click image for larger version) |
|
|
(click image for larger version) |
|
|
|

|
(click image for larger version) |
|
|
(click image for larger version) |
|
|
|
Gaps between boards provide aesthetically pleasing attic ventilation at the expense of extreme risk to water intrusion from wind driven rain.
|
|
|
Wind driven rain at less than the lowest hurricane will deposit rain into this attic between the siding boards.
(click image for larger version) |
|
|
|
Soffit Vents:
What a surprise it was to owners of homes in 2004 subjected to the various hurricanes where roofs were fine; but, water that came through soffits caused damage to such an extent that the houses were uninhabitable until mold was mitigated and lots of drywall replaced. Homeowners were bitterly disappointed to learn that water came into homes from soffits. Because soffits are under roofs they were supposed safe from rain. The culprit was the wind driven rain. The wind was so intense that it carried the rain with it right up into the attic. If air can enter an attic through soffit vents to cool an attic, then strong air can carrying with it rain.
In the hurricanes of 2004 and 2005, by some counts, 75% of the homes that suffered significant damage lost soffit material. Keeping soffits in place can also help keep water out of your house. In general, solid soffits made of plywood or other solid panel material, with occasional screen covered vents, have not been observed to be as great a problem as light weight vinyl or aluminum soffits.
Soffit vents at gable ends where winds blew directly at them during the 2004 hurricanes, were found to allow very damaging amounts of water to enter attics and cause nearby drywall ceilings to collapse. Usually, mold became a problem because the homes were without electricity for so long that the accumulated moisture provided an ideal environment for mold growth.
|
Narrow Continuous Vent
(click image for larger version) |
|

|
Panel vents
(click image for larger version) |
|
|
|
Keep Soffit Panels In Place:
The key to keeping large amounts of water from entering through soffit vents is to keep them in place. Unfortunately, many vinyl and aluminum soffit panel installations have been poorly installed. Tests of manufacturers recommended installation techniques have shown that properly braced and installed vinyl and aluminum soffit materials can resist the kinds of wind forces expected in a hurricane. All of the high wind installation guides call for wood frames that will support the tracks used to support the ends of thee soffit panels and additional braces at about 12-inch spacing across the width of the soffit perpendicular to the wall of the house.
|
Soffit damage was widespread � this photo shows both fascia cover and wall track damage
(click image for larger version) |
|
|
Soffit Inspections:
In most areas of Florida, light weight vinyl or aluminum soffits are not installed according to the manufactures instructions. For this reason we suggest that you test the soffit system to try to determine if yours has been installed properly. For example, from a ladder, inspect the connection at the wall and at the fascia board, measure the width of the soffit and if the soffit is more than 18 inches wide, push up on the middle of the soffit to determine whether it makes contact with a wood support structure. If you have an older house, it is possible that the vinyl or aluminum soffit was installed over an existing wooden soffit as part of a residing project. If this is the case, you don�t need to worry about the anchorage of the soffit material, but you may still want to check the anchorage of the fascia cover as outlined below.
Check the connection of the soffit system to the wall of the house. Vinyl and aluminum soffit panels can be pulled down or pushed up by wind pressures and they can pop out if they bend too much, if the trim at the wall rotates or breaks loose or some combination of these factors. Start by pushing up on the middle of the soffit panel while watching the trim. If the trim rotates a noticeable amount, it is likely that there is no wood above the trim. If it doesn�t rotate very much, then it is likely that there is wood above the trim or that it is well attached to the house. Now, pull down on the edge of the trim to see if it is attached to the wood above (assuming it didn�t rotate much when you pushed up) or to the wall. For a 12� wide soffit, each foot of soffit length only needs to be able to resist a downward force of about 20 pounds, so don�t pull too hard.
Next check the soffit panels to determine how secure they seem to be. Can they be slipped away from and towards the house so that they fall out or nearly fall out? If so read farther down for a solution. Now check how the soffit is connected to the eave. This may be a bit harder to inspect and even harder to determine the adequacy of the connection because in some instances the ends will be covered by what is called a fascia cover or wrap made of aluminum or vinyl. Gently pull down on the fascia cover so that you can see the ends of the soffit panels. Sometimes soffit panels are nailed or stapled to the fascia board. That is probably a good sign if the staples are not too corroded and if the staples are substantial enough (that is much heftier than the kind use to fasten papers). If there is a fascia cover or wrap it likely plays an important roll in preventing soffit panels from getting pulled off the house by negative air pressures that occur when the wind is blowing around the corner of the house. Until the hurricanes of 2004, soffits had not received much attention and were not thought to be very important. Not important because they were under a roof. In any case fascia covers usually play a key roll in keeping the fascia ends of soffit panels in place so it is important that fascia covers are securely installed, which usually they are not. A �good� fascia cover installation will have one tiny nail on the big face of the fascia cover once every 12 feet and on the bottom 2� edge, about every 12�. Even this �good� fastening is not good enough in a hurricane unless the soffit panels are well fastened directly to the fascia board.
Retrofit Options for Soffits Running Horizontally:
If you find that your soffit panels are not well attached and well supported, you can always have the existing materials removed and new soffits installed following the manufacturer�s recommendations for high wind installations. This will be one of the most effective ways to mitigate this potential weakness that affected so many homes that went through high winds from the 2004 and 2005 hurricanes.
Short of removing and reinstalling soffit tracks and panels, there are some do-it-yourself retrofits that can make a difference, at least up to a point. The goal is to tie the soffit parts together so they act as a unit to limit one weak part from starting a general failure. Caulk/sealant is the tying mechanism. Urethane sealant, though a bit messy to use, has the adhesive qualities needed to tie parts together plus it is available in a variety of colors. However, be warned about white caulking. Regular white urethane caulk will yellow within just a few weeks. So for white you need a urethane product formulated to resist yellowing. Such formulations are not typically available at other than specialty stores that cater to contractors or you might find them at some paint stores. Another term used to describe non-yellowing sealants is hybrid urethane or siliconized urethane.
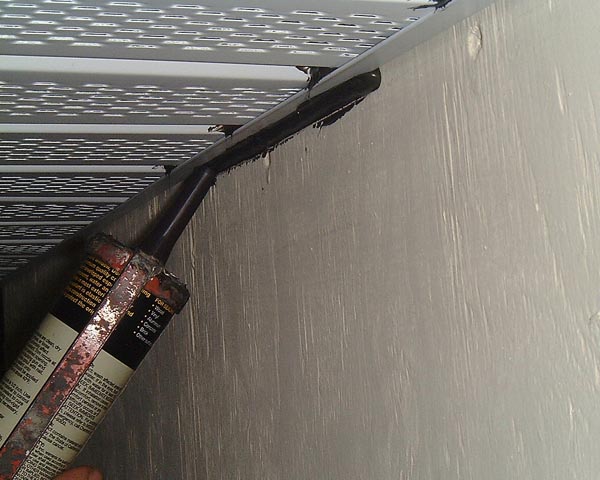
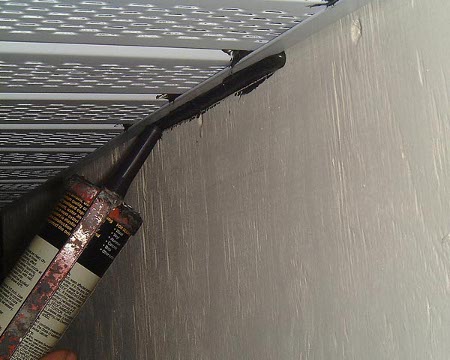
If you suspect that the trim piece against the house is not well secured to the wall you can caulk the bottom of the trim piece to the wall by applying a bead of caulk at the interface between the two. Ideally, you should not do what most of us want to do by pushing the caulk into a concave shape so it looks prettier because by doing so one is making the caulk thinner and therefore weaker. It does have the advantage of helping to assure that the sealant actually adheres to both the wall and the trim. Aside from improving the connection of the trim to the house, the sealant helps prevent the trim piece from rotating. This will help keep the soffit panel from popping out.
|
Caulking bottom edge of soffit wall J track to wall to improve anchorage of track � black caulk shown for contrast.
(click image for larger version) |
|
|
To hold soffit panels in place one should squirt a dab of sealant about the size of large marble into the V-shape hole formed by the intersection of the soffit panels with the bottom edge of the trim into which the soffit panels are inserted. Do this where two soffit panels mate so that both are tied to the trim and they are tied to each other. To be effective the dab can�t just sit there. It has to make good physical (adhesive) contact with both the soffit panels and the trim. To help assure this, you should push the point of the caulk tube into the joint until it hits the back of the trim. Then squirt the sealant in until it nearly wants to fall out of the trim, and then slowly continue inserting sealant while simultaneously withdrawing the tip. When you have inserted all that is needed discontinue inserting sealant and quickly withdraw the tube. You may have a string of sealant to contend with. Use a bladed tool to push the sealant in and to make it look prettier. It will not be perfect, but at the distance one ordinarily sees it, the look will likely be just fine - especially after you have gotten practice. For this reason you might want to practice on a less conspicuous part of the house before working near the front door. If there is no trim piece at the fascia end, just the fascia cover, use the same technique described above. When you finish, you will have done all the caulking/sealing needed to hold the soffit panels in place.

|
Inserting dollop of urethane caulk to connect soffit panel to track
(click image for larger version) |
|
|
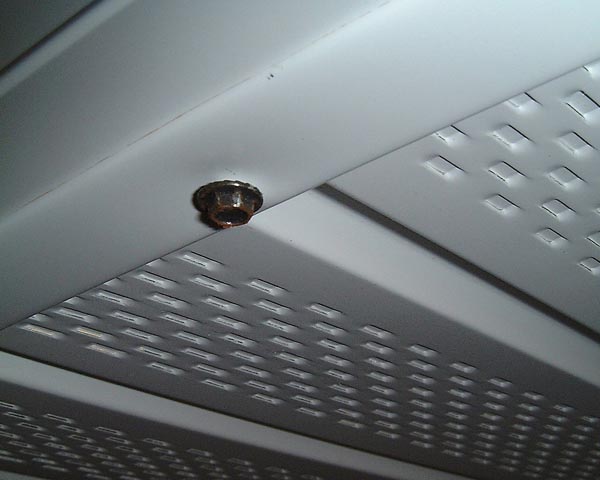
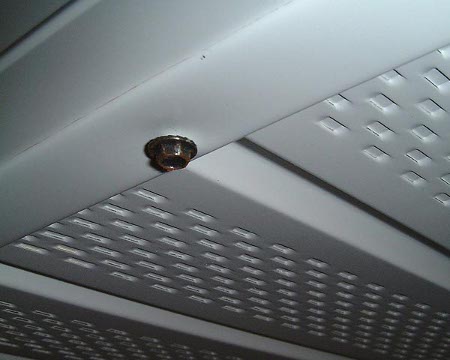
If the fascia cover appears to be holding soffit panels in place instead of nails or staples driven into the fascia board, you may also want to install screws up through the fascia cover into the 1 �� edge of the fascia board. Screws spaced about 24� apart provide enough anchorage. When you install these screws they will pass through the fascia and the soffit panels. To provide the best anchorage install the screws were two soffit panels mate. That way you might be able to screw through both of them so that they are even better anchored to the house. You may be able to find powder coated screws painted white or bronze to match the color of the soffit fascia cover at your local home improvement store. If you found wood above the wall trim piece, but the trim rotated or pulled down, you can anchor it and the soffit panels to the wood by driving screw through the trim, the soffit panels and into the wood.
|
Screw inserted through edge of fascia cover, through soffit panels and into fascia board
(click image for larger version) |
|
|
|
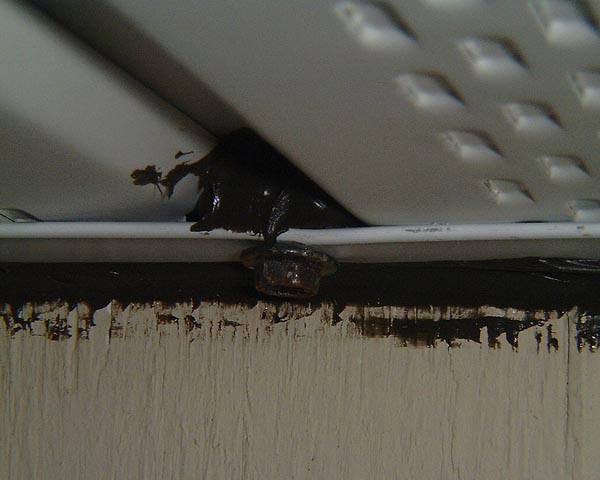
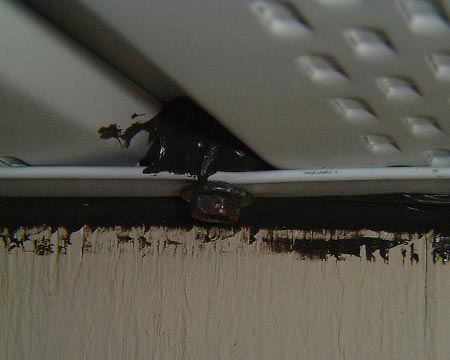
Screw installed through wall J channel and through soffit panel and hopefully into wood above � black caulk shown for contrast. You can usually find screws that also match trim color.
(click image for larger version) |
|
|

|
Adding urethane caulk at fascia cover for extra anchorage
(click image for larger version) |
|
|
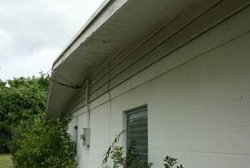
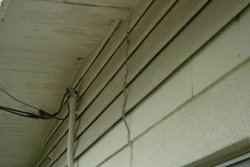
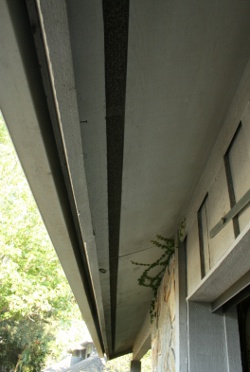
Retrofits for Soffits Running Along Gable Overhangs:
Soffits under overhangs at gable ends, if vented to the attic, are almost certain to allow water to enter attic spaces even in rather mild storms because there is no water dam to stop the wind driven rain. Not all overhangs at gable ends are actually vented to the attic. You can check easily by looking for daylight along the top edge of the gable end from within the attic. If you do see daylight, then you really do need to address this issue. If there are just cracks you can caulk them. If there are bigger gaps, like the 3 �� gaps that occur between the framing members of an outrigger system, then you can cut aluminum to fill the space. Because you will likely not be able to make water tight fits with the aluminum you need to caulk between the aluminum and wood to make the seams water tight. If you need to maintain the gable overhang vents to satisfy ventilation requirements for your attic (no other venting is available near the peak of your roof) then make the blocks removable so that you can install them before a storm and remove them afterwards.

|
Sketch of gable roof structure with outrigger system showing water entry point through gable soffit vent
(click image for larger version) |
|
|

|
Note aluminum flashing installed and caulked to block water entry during hurricane
(click image for larger version) |
|
|
What to do you if you re-roof
What you can do if you don't re-roof
Roofing Terms
|
|
PDF Version
|
|
|