|
Basic steps for making your current roof more hurricane resistant:
- Strengthen the attachment of the roof sheathing to the roof framing.
- Strengthen or replace roof vents.
- Do what you can to improve the wind resistance of your existing roof cover.
The following provide more information on alternatives for completing these basic steps.
Strengthen the Roof Sheathing Attachment
The most cost effective way to permanently improve the fastening of roof sheathing to the roof structure is to add fasteners when the roof cover is being replaced. However, if your roof cover is reasonably new or in good condition and you are not going to re-roof soon, you should check the types of fasteners and their spacing to determine whether the connection is weak. A weak connection would make your sheathing vulnerable to being lifted off by hurricane induced uplift pressures on the roof. When plywood sheathing was first introduced in the 1970�s building codes allowed the sheathing to be installed with 6d nails. The nails were to be no more than 6-inches apart along the 4-foot edges of the sheets (edges) and 12-inches apart along the intermediate framing members (the field). This spacing was driven by shear requirements with little regard to roof uplift pressures. These requirements continued throughout most of the hurricane prone regions until the widespread damage from Hurricane Andrew clearly showed that this nailing pattern was inadequate in hurricane prone regions. There has also been widespread use of staples to attach the roof sheathing. This was allowed by the Standard Building Code (the code that was used, if any was required, throughout most of the Southeastern US) until 1998. Testing has demonstrated that neither of these methods of fastening performs well when the sheathing is subjected to the wind uplift pressures that are produced by even a moderate hurricane. The testing conducted following hurricane Andrew also indicated that the most critical spacing of fasteners was that of the nails in the field where a larger spacing was historically allowed.
Loss of even one piece of roof sheathing can result in internal damage to your home and contents that is nearly ten times the cost of the damage to the exterior of your home. Consequently, one of the things you need to do is to determine what kind, size and spacing of fasteners (nails or staples) is used to attach the roof deck to the trusses or rafters. The greatest risk of losing roof sheathing is on houses with gable ends where the sheathing has been attached with 6d nails or staples.
Inspecting - Checking the attachment of your sheathing to the framing
Tools you will need:
- Tape measure
- Thin ruler or a piece of heavy paper
- Stud Finder with metal detector capability
- A marker
- Light (You can work with a flashlight but a light that can be clipped onto a framing member and aimed where you want would be better.)
What to do:
- Bring out the
Roof Sheathing Evaluation Checklist.
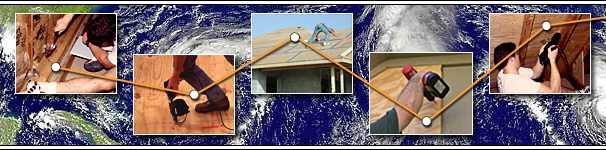
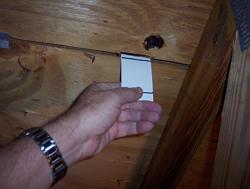
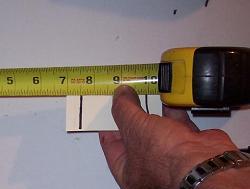
- Look for a label on the sheathing indicating its thickness and rating. If you can�t find a printed label, look for an exposed edge of the sheathing where you can measure the thickness of the sheathing. If you can�t find an edge that you can get to, find a joint between two of the roof sheathing members and stick the heavy paper or thin ruler into the crack until it touched the roof covering.
Don�t push too hard with the ruler as you may damage the roof cover.
If you are using the heavy paper, just bend it over at the bottom edge of the deck material or use the marker to draw a line and measure the distance from the edge to the bend or line. If you use the thin ruler, just measure the thickness directly.
|
Using heavy paper to measure roof deck thickness
(click image for larger version) |
|
|
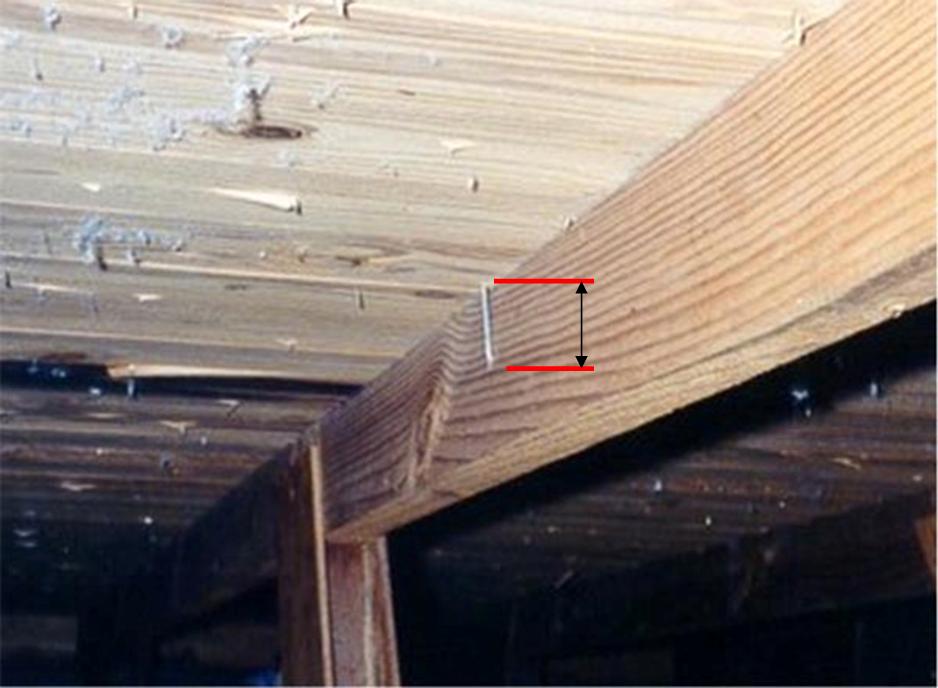
Determine the thickness of your roof sheathing
(click image for larger version) |
|
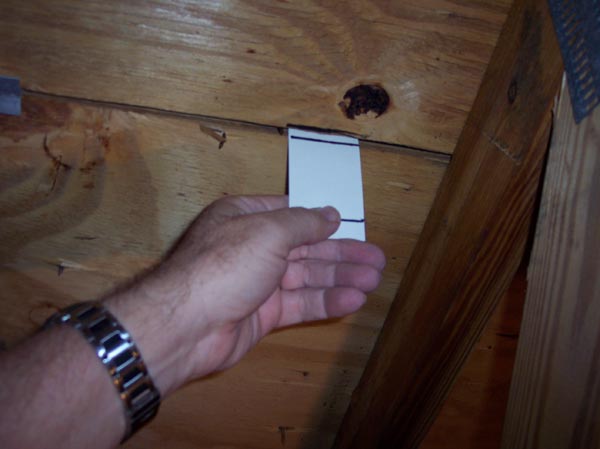
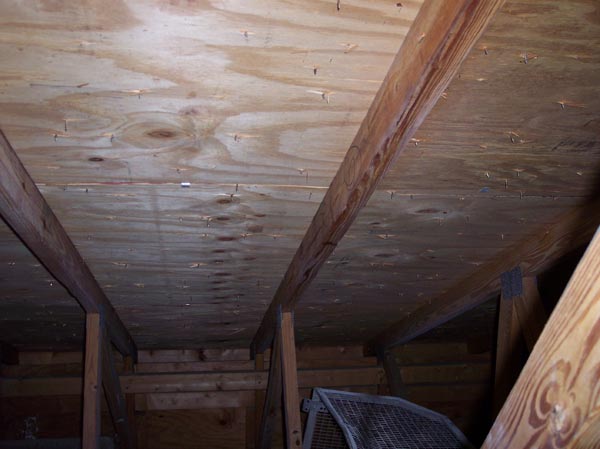
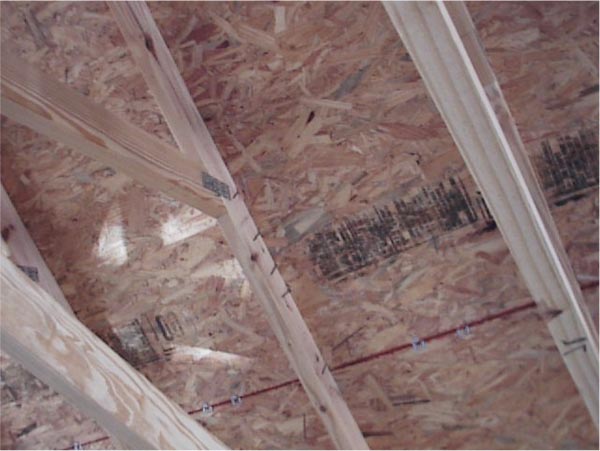
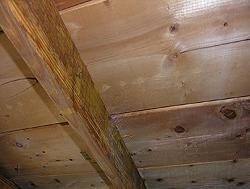
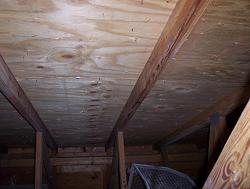
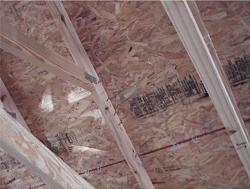
- Note whether you have planking, plywood or Oriented Strand Board (OSB) roof sheathing.
|
Planking roof deck
(click image for larger version) |
|
|
Plywood roof deck
(click image for larger version) |
|
|
Oriented strand board roof deck
(click image for larger version) |
|
-
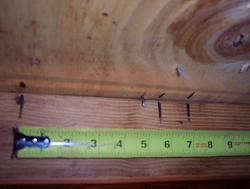
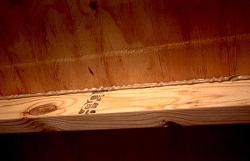
Look along the sides of the rafters or trusses for a �shiner� � that is a fastener that missed the truss or rafter or is sticking out the side of the truss or rafter. When you find one, measure the length the fastener extends below the sheathing. Add the sheathing thickness you determined earlier to this length to get the overall length of the fastener. Look at the fastener and determine whether it is a smooth-shank or ring-shank fastener and note what you find on the checklist. If you see a very thin fastener that looks like a wire instead of a nail, you probably have staples holding down your roof sheathing. In some cases, if it is a total miss of a staple, you will see two wires close together sticking down from the sheathing. Indicate whether you have staples, 6d (2� long nails), 8d (2.5� long nails), Nails longer than 2-1/2�, or ring-shank nails at least 2-3/8� long.
|
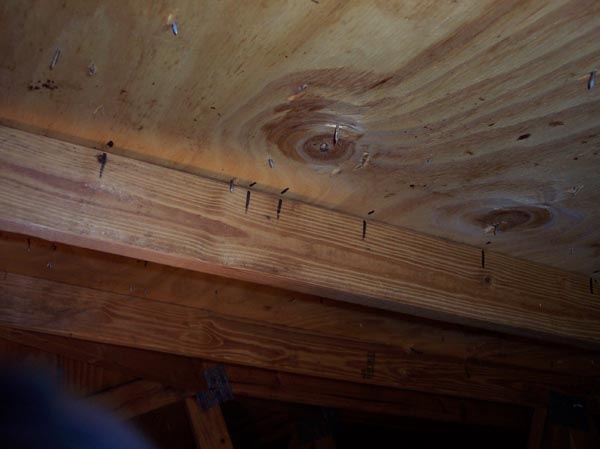
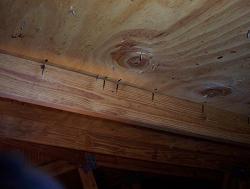
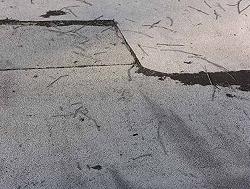
A shiner through wood plank roof sheathing
(click image for larger version) |
|
-
To determine the spacing of the fasteners, use the stud finder with the metal detector turned on. Mark a beginning point and ending point for the scan (about 48 inches long) on one of the rafters or truss top chords where you have easy access. Slide the stud finder along the rafters or truss top chord and mark the rafter, truss or roof deck every time you �find� a fastener. Note that if you select a rafter or truss where the ends of two pieces of sheathing are attached, you could �find� a lot of fasteners (at 6� or less spacing). To be sure that you aren�t at one of those joints, conduct the scan and marking on the next rafter or truss in the line. Pick the scan that indicates the fewest fasteners and divide the length of the scan (in inches) by the number of fasteners found to get the average fastener spacing in inches.
|
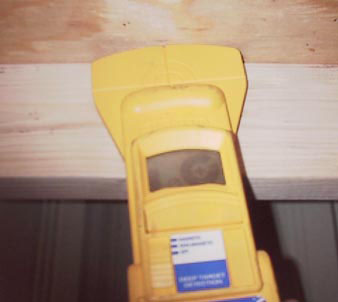
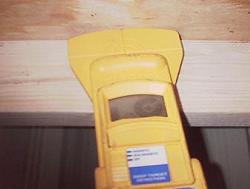
Using metal detecting stud finder to locate fasteners in rafters or truss top chords
(click image for larger version) |
|
|
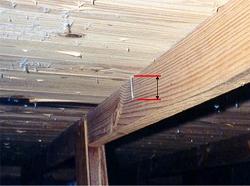
Marks showing locations of fasteners
(click image for larger version) |
|
|
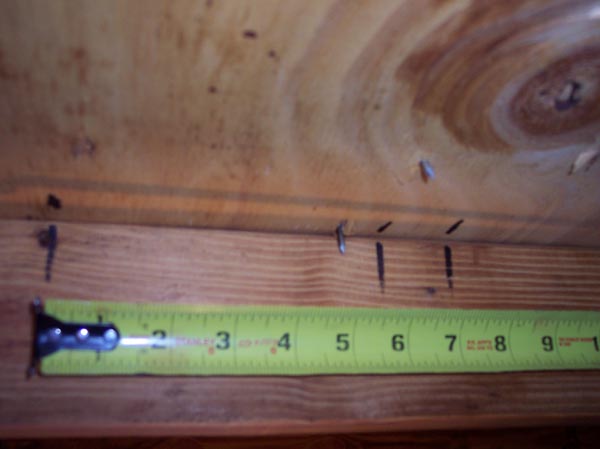
Measure the largest distance between fasteners
(click image for larger version) |
|
Assessment - What to do about what you find from the inspection:
The ideal situation would be to find that you already have 8d (2-3/8� or longer) ring shank nails spaced no farther apart than 6� along all the rafters or trusses. Unfortunately, it is unlikely that you will find this ideal situation unless your house was recently built to high wind standards. Building code minimum nailing requirements for many years (70�s through early 90�s) were 6d smooth nails (about 2� long) at a 6� spacing along the edges of the sheathing and a 12� spacing along all the structural members crossing the middle of the sheathing. Fortunately, most builders in hurricane prone regions used 8d smooth nails (about 2-1/2� long) instead of the 6d nails, but it is not uncommon to find spacing of these nails of 12� or more in the middle of the panels.
-
If you find staples, no matter what the spacing, your roof sheathing is not well connected to the roof framing. You could lose roof sheathing panels when gust wind speeds climb towards 100 mph. You should consider using one of the internal retrofit options described below.
-
If you find 6d (2� long and smaller diameter than 8d), no matter what the spacing, your roof sheathing is not well connected to the roof framing. You could lose roof sheathing panels when gust wind speeds climb towards 100 mph. You should consider using one of the other internal retrofit options described below.
-
If you find 8d nails with a spacing of 12� or more, you are not much better off than the sheathing connected with 6d nails as described above.
-
If you find 8d nails and the spacing is never greater than 8 to 9 inches, your roof sheathing is certainly better attached than the preceding cases but likely still needs additional fasteners when you re-roof. If your home has gable ends and particularly if one or more of the gable ends faces a large open field, parking lot, or the road in a cull de sac, you should consider using one of the other internal retrofit options on the gable ends.
-
If you have 8d or larger nails and the spacing is not more than 6�, your roof deck is reasonably well connected for high winds. However, we recommend that you consider following the guidance on re-nailing in
What to do when you re-roof.
Retrofit Options:
Enhancing Roof Sheathing Attachment with Sub-floor Adhesive:
You can improve the uplift resistance of the roof deck from the attic � without removing the roof covering. This is how:
-
Using a caulking gun, apply a 1/4 -inch bead of wood sub-floor adhesive (AFG-01 rated) along the intersection of the roof deck and the roof support element (rafter or truss chord) on both sides. Make sure that the adhesive is in contact with both the deck and roof support elements.
|
Bead of adhesive applied along the intersection between roof sheathing and rafters or truss top chord
(click image for larger version) |
|
|
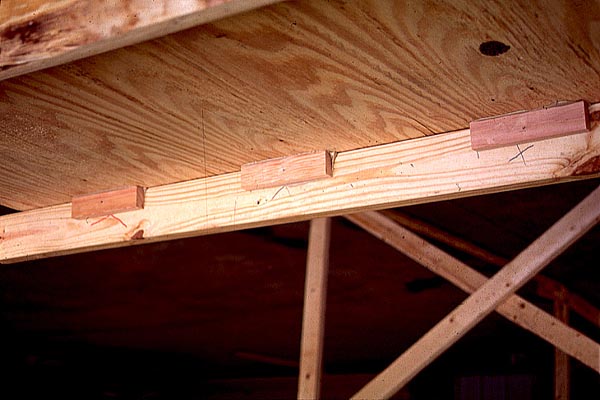
You can also get similar improvements in uplift using blocks of wood with adhesive on two sides
(click image for larger version) |
|
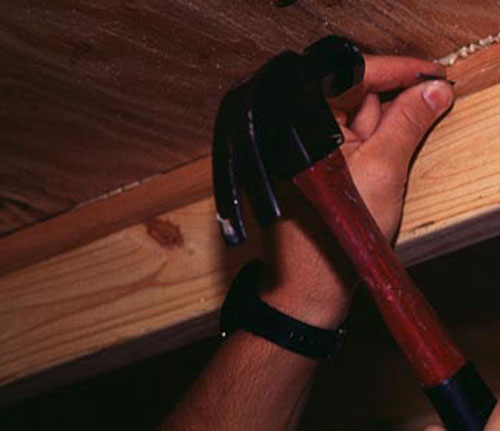
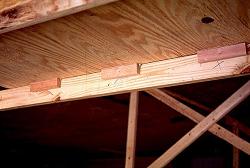
At places where you have limited access to either side of the roof support, such as the last rafter or truss at the gable end of the house, use � or � inch quarter-round pieces of wood and run them as far along the length of the roof support as you can. Pre-drilling holes for finishing nails before you get up in the attic will make it a lot easier to hold the quarter-round, nail, and adhesive because you can eliminate the need for �the third hand� by inserting the nails into the pre-drilled holes. Apply the adhesive along the two adjacent sides of the quarter round. Press the wood pieces onto the intersection making sure the adhesive is in contact with the deck and roof support elements and tack in place with the finishing nails. You can tell when you have applied enough adhesive if it squeezes out. The nails should not be driven into the deck as they may go through the deck and damage the roof covering. As an alternative, you could clamp the wood pieces in place while the glue sets up.
Warning: Note that this will permanently attach the roof deck to the top edges of the rafters or trusses. If at a later time one of these pieces of decking is damaged and has to be replaced, the roofer should not just try to pry the deck off the rafter or truss as this will damage the rafter or truss top chord, necessitating expensive repairs. If the glue approach has been used, the roofer needs to run a circular saw along the edge of the rafter or truss on either side and remove the sheathing in pieces.

|
Use of quarter round wood strips to significantly increase strength of the connection
(click image for larger version) |
|
Attics are typically tight, enclosed areas with poor ventilation. When applying the adhesive, be sure to follow the directions for proper application and ventilation. You can check the labels on the available adhesives and select the one that gives off the least amount of fumes. Nevertheless, a fan that circulates fresh air should be used to help ventilate the work area.
Laboratory tests show that using the wood adhesive can increase the wind uplift resistance of the plywood roof sheathing by as much as three times the old code minimum method of securing the sheathing with 6 penny nails or staples. A variety of AFG-01 rated sub-floor wood adhesives are available at local hardware and building supply stores. You will likely find it more efficient and economical to buy the large caulk gun size tubes of adhesive. It will require fewer changes of tubes and that can be important in attic work and you will probably save more than enough to buy the larger caulk gun.
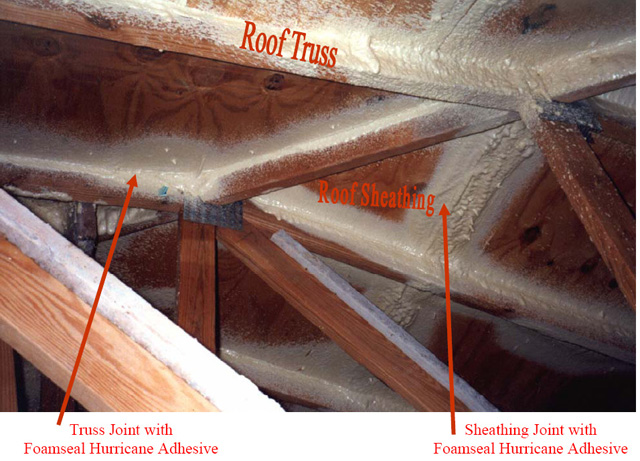
Enhancing Roof Sheathing Attachment with Spray Foam Adhesive
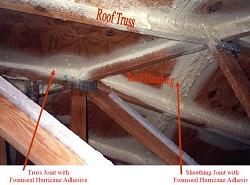
There are also some foam adhesives (usually polyurethane) that can be applied in the attic along the joints between the roof sheathing and the rafters or trusses. These adhesives are widely used in the manufactured housing industry and are
different from insulating products such as Icynene. If also sprayed over the joints between the sheathing, these adhesives can help to keep water out if the roof covering is damaged. These systems use special chemicals that are mixed on site and require professional installation. Costs have typically started just under $2.00 per square foot of roof and go up depending on the difficulty of attic access.
This spray foam adhesive retrofit has been recognized in the Florida Building Code Existing Building. The requirements for the foam are stated in section 611.7.1.2 as:
"611.7.1.2 For roof decking consisting of wood structural panels, fasteners and spacing required in columns 3 and 4 of Table 611.7.1.2 are deemed to comply with the requirements of
Section 606.3 of this code for the indicated design wind speed range.
Wood structural panel connections retrofitted with a two-part urethane-based closed cell adhesive sprayed onto the joint between the sheathing and framing members are deemed to comply with the requirements of
Section 606.3 of this code, provided testing using the manufacturer's recommended application on panels connected with 6d smooth shank nails at no more than a 6-inch edge (152 mm) and 12-inch (305 mm) field spacing demonstrate an uplift resistance of a minimum of 200 psf (9576 Pa).�
|
Foam adhesive sprayed over all joints between sheathing and along intersections between roof sheathing and roof structural members
(click image for larger version) |
|
Enhancing Roof Sheathing Attachment with Closed Cell Spray Foam Insulation:
Spraying a layer of closed cell polyurethane based foam insulation (about 3 to 4 inches thick) to the bottom side of the roof sheathing has gained popularity in recent years because of its benefits for reducing energy consumption and creating an un-vented attic space where ductwork and air handlers are operating in �Semi-conditioned� space. These foams bond very well to all the structural members as well as the roof sheathing and have been found to significantly increase the stiffness and rigidity of the roof, including the deck. While the cost of doing this is relatively high, the benefits in lower energy bills can be substantial. In addition, although there has not yet been any formal testing to determine how much the uplift resistance of the sheathing is increased, the expectation is that it will provide a substantial increase, perhaps doubling, the initial uplift resistance of the roof sheathing connection. Our expectation is that if the installation is done correctly and the attic is converted into an un-vented attic it will create multiple positive effects including, lower energy costs, a stronger roof that is better able to resist wind forces, and significant reduction in water penetration.
Strengthen or Replace Roof Vents
Ridge vents are typically the last thing installed when a roof cover is applied. Consequently, its attachment is usually accessible and can be strengthened or the vent can be replaced with a high-wind and water intrusion resistant vent. Similarly, professional roofing companies routinely replace off ridge vents when they develop leaks. So, if you find that your off-ridge vents are poorly connected or loose, contact a reputable roofer in your area and have them evaluate the vents and determine whether they can be replaced.
Improving the Wind Resistance of your Existing Roof Cover
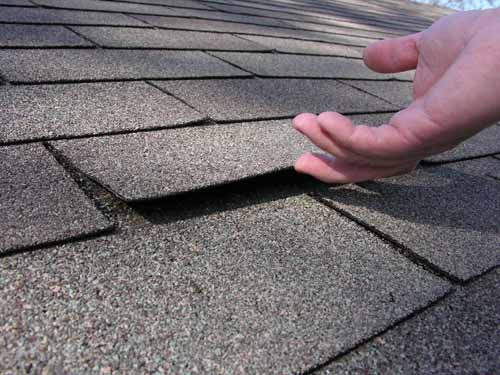
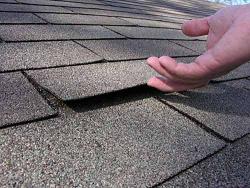
Shingle Roofs: It is important to periodically evaluate your shingles and check to make sure that the tabs are well sealed. If you are not comfortable or shouldn�t be on a ladder, have a qualified person inspect a number shingle tabs to see if the adhesive has engaged and the tabs are well anchored to the shingle below. Use the tips of your fingers or thumbs to gently lift up on the edge of the shingle tabs. If the shingle tabs are not well stuck to the shingle below, asphalt roofing cement should be used to bond the shingle tab to the shingle below.
Short Term Fixes - Hand tabbing of shingles: As long as the shingle is still flexible enough to lift and re-set flat, dabs of roofing cement can be applied to reset the tab. To cement the shingle tabs to the underlying shingles, using a caulking gun, place three dabs of asphalt cement about the size of a silver dollar under each tab. Press the tab firmly into the adhesive (step on it if you are comfortable standing on your roof) to assure that the bottom of the shingle tab lies flat on the shingles below and reduce the chances that the wind will pick up the elevated edge of the shingle tab. (Be aware that you will likely get the asphalt cement on your shoes, whether you use your shoe to press on the shingle or not, and you will get it on your hands.) Be sure to cement all loose tabs throughout the entire roof area. If some shingles are only partially loose, you can use a putty knife to break the tab loose so that you can apply the roofing cement. Be careful not to bend the tabs too far up off the roof when applying the adhesive as old shingles often get brittle and they may crack or break. Repair (glue down broken tabs with asphalt cement) any shingles you damage immediately, as a short term solution. However, the fact that shingles are brittle and one or more cracked or broke is a very strong indication that the shingles should be replaced.
[Video: Resetting Tab Seal]
Caution: Note that this is not something you can do just before a storm as it may take 2 to 4 weeks for the adhesive to cure. You may make the situation worse by trying to do it at the last minute.
|
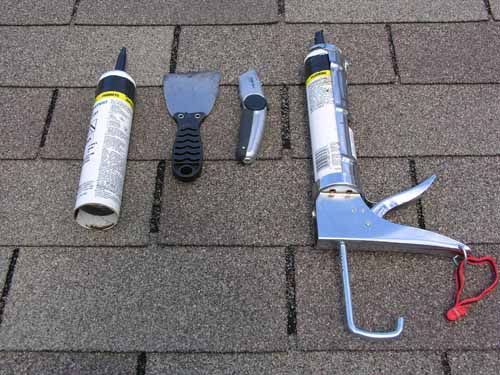
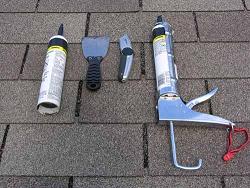
Tools and materials:
-
Caulk gun and tubes of asphalt roof adhesive
- Putty knife and utility knife
- Ladder
(click image for larger version) |
|
Directions: Start with shingles that are clearly loose and those around the edge of the roof. Pry up edge of shingles using putty knife. Do not lift tab too high as the shingle may crack or break. Insert dabs of adhesive (silver dollar size � three per tab) or run short lines of adhesive about 1-inch back from edge of shingle. You can provide an extra measure of protection along the gable ends by hand tabbing at least three tabs in from the gable edge.
[Video: Gable End Tabbing]
|
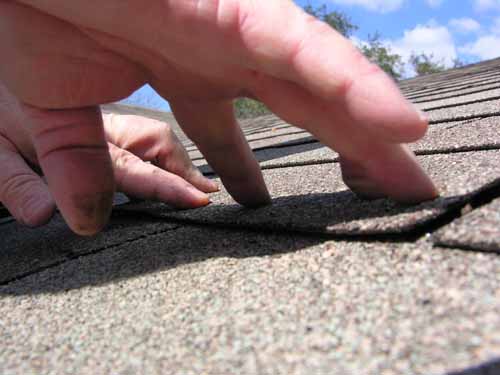
Loose shingle tab
(click image for larger version) |
|
|
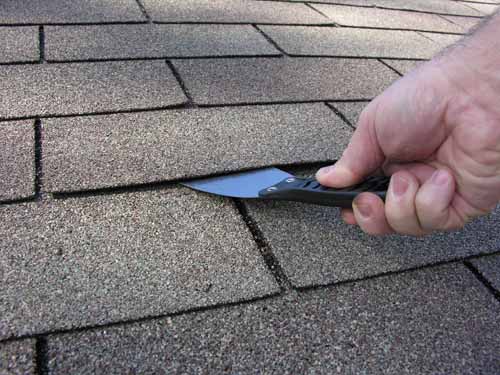
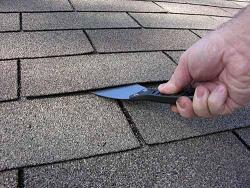
Breaking loose a partially adhered shingle to allow hand tabbing
(click image for larger version) |
|
|
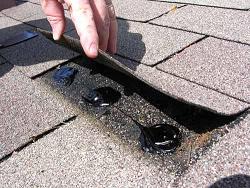
Applying dabs of asphalt adhesive under shingles tab (Hand Tabbing)
(click image for larger version) |
|
|
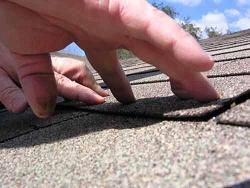
Pressing tab back against roof after applying dabs of asphalt adhesive
(click image for larger version) |
|
Tile Roofs: There is considerable debate about whether retrofitting of tile roofs is practical or cost effective.
Due to the uncertainty of the tile staying in place on the roof, the smartest thing to do may be to make sure that you have adequate debris impact protection for all your glass window and doors. Tile from your own roof can break your windows, but frequently the roof tile debris will come from your neighbor�s roof.
Retrofit Options: You could have a roofer remove the
hip/ridge and eave tiles and re-install them using one of the new two part expanding foam adhesives for tile roofs and an appropriate sized 2x? (2�, 3�, 4� or more?) board along the hip/ridge. In most cases, the foam adhesive will end up bonding the board to the mortar and underlayment running under the hip/ridge and the mortar edge. Do not rely on the attachment of the mortar along the longitudinal edges of the hip/ridge tile. If the tiles are removed without breaking them and if they have appropriate holes in them, they can be mechanically attached to the board supplemented by adhesive at the overlaps of the hip/ridge tile. Otherwise, they can be adhered to the board using the same foam adhesive used to set the board. If the ridge or edge is filled with mortar and the tiles have come loose, they can be re-attached to the mortar using one of the new two part expanding foam adhesive or another type of adhesive approved for use with tiles.
The bottom edge of eave tiles can be held down using clips suitable for a retrofit installation (they connect to the bottom edge of the tile and the fascia board) if they are available for your style of tile. Eave tile can also be anchored more securely by injecting one of the approved two part expanding foam adhesives into the gaps under the eave tiles.
Caution: Note that the adhesives need to be approved for tile installations (able to withstand high heat). The typical foam insulation or adhesive available at a home improvement store will not work for this type of application.
Having a roofing professional evaluate your retrofit options and perform the retrofit is a good idea for most homeowners.
Metal Roofs: At this point in time, use of metal roofs in residential applications represents a fairly small portion of the roofing market. Consequently, we have limited experience with the performance of these products in hurricanes, particularly in hurricanes where local wind speeds at the homes with metal roofs exceeded 120 mph. Overall, metal roofs do seem to be performing reasonably well. However, we have certainly seen cases where one or more panels of a standing seam roof have been lifted off and we have seen more frequent damage to ridge caps for all types of metal roofs. Aside from the types of metal roofs, such as the 5-V crimp, where the fasteners are installed from the top through the metal we are not aware of any retrofits that can be taken to strengthen the roof covering connection. With the externally applied screws, it is possible to periodically check the fasteners to ensure that they are tight and that the metal is not rusting around them. Additional fasteners can be installed if the spacing is too large between the existing fasteners (see the manufacturer�s installation instructions for your design wind speed) or existing fasteners can be replaced with larger ones if they become loose.
Membrane or Built-up Roofs: Membrane and built-up roofs are very common on commercial buildings and roofers have developed a number of ways to patch and repair them. The key starting point is the anchorage of the roof deck to the structural members. Consequently, if the opportunity arises to re-roof your low slope roof, you should take advantage of that opportunity to make sure that the roof deck is properly attached to the roof structural members. Short of the opportunities that arise when you re-roof or repair your low-slope roof, the only cost effective retrofit measure we are aware of is to improve the attachment of the flashing around the edge of your roof. Frequently, the nails used to attach the flashing to the fascia boards are too few, have very small heads and are spread too far apart. Most product approval specifications for flashing require nails at no more than 12-inches on center.
Beyond this, you should monitor the condition of your roof and if you see indications of leaks or significant ageing of the roof, you should get a qualified roofer to check out your low slope roof.
|
Patch on a section of membrane roof
(click image for larger version) |
|
Shingle Roofs,
Tile Roofs,
Metal Roofs,
Membrane or Built-up Roofs,
Roof Structure,
Roof Sheathing Evaluation Checklist,
Gable End Overhangs,
Gable End Bracing,
What to do if you re-roof
|