|
Key Issues
Roof Sheathing:
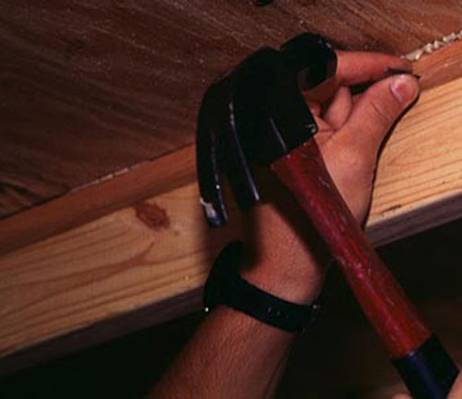
Re-nailing your roof sheathing following the recommendations in this guide will go a long way towards reducing the vulnerability of your gable end to wind damage in a hurricane. If you are not ready to re-roof or have just re-roofed and did not get the deck re-nailed, you may still be able to reduce this vulnerability by using the sub-floor adhesive technique to retrofit the roof deck attachment that is described in What to do if you don�t re-roof. Since you will only be able to get at one side of the gable end truss or rafter, we recommend using either one of the urethane based closed cell foam adhesives or wood blocking with a wood adhesive on two adjacent sides of the blocking as shown in the figure below, to glue the roof sheathing to the last gable truss or rafter. In addition, we recommend at a minimum that you continue the foam or apply �-inch beads of adhesive to both sides of the two rafters or trusses that are next to the gable end truss or rafter and any other joints between the sheathing and the framing, regardless of the direction of the framing, within 4� of the gable. By applying adhesive from within the attic in this area, you are helping to hold down sheathing over the living area, even if it begins to tear loose at the overhang.
|
If sheathing has not been re-nailed, use wood blocking with adhesive to make a strong connection between the sheathing and the rafter or truss at the gable end rafter or truss
(click image for larger version) |
Overhang Strength:
The biggest problems with gable end overhang strength occur if your roof overhang is greater than about 12-inches. Of the many ways that gable end overhangs are built, the two most common ways are the use of ladder details and outriggers. Ladder details are usually adequate if the overhang is less than about 8-inches although they are frequently used for longer overhangs.
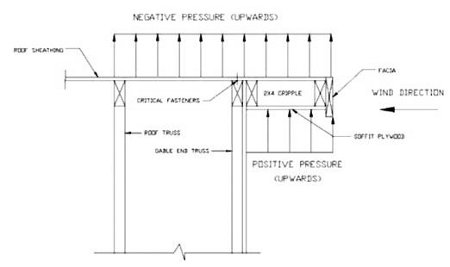
The ladder detail is frequently used when the builder continues the same truss size or rafter size all the way through the gable end. In this system, the outer framing under the overhanging roof deck sheathing is formed by two parallel long 2x4�s or 2x6�s that are connected together laterally by short blocks like the rungs of a ladder. It can be thought of as a rafter outside the attic and another one along the edge of the roof sheathing overhang. This framing is nailed to the outside face of the last truss top chord or rafter. The roof sheathing extends to the edge of the overhang and provides most of the support and resistance to uplift for the overhang as shown in the figure below.
|
Sketch of a Gable End Overhang Constructed Using the Ladder Detail. The figure also indicates the directions of the wind forces that will tend to lift off the roof sheathing and gable overhang.
(click image for larger version) |
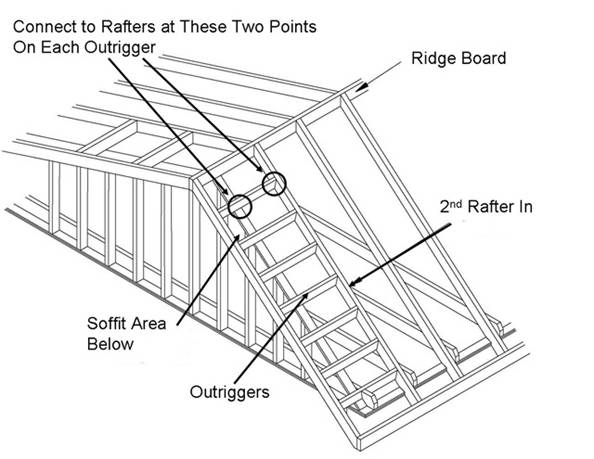
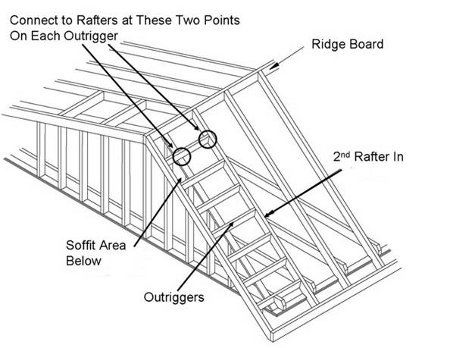
The second method uses outriggers and is more frequently used if the overhang is greater than 12-inches. In fact, most high wind construction guides require outriggers for gable end overhangs greater than 12-inches. In this system, the last truss or rafter is often made smaller than the rest so that the top chord of the truss or the rafter is 3.5� or 5.5� lower than the tops of the other trusses or rafters. Outriggers (2x4 or 2x6 members) are then installed on top of the gable truss or rafter so that they butt up against the truss or rafter next to the gable one, and extend out to support a fascia board along the edge of the overhang. They cantilever over the wall. Unfortunately, the outriggers and trusses are sometimes notched to allow installation of the outriggers when the gable truss or gable rafters are the same size as the other trusses or rafters. Frequently, these outriggers are only toe nailed to the inside rafter or truss and to the top of the gable end truss or rafter. Consequently, the connections of the outriggers themselves need to be checked and improved if needed. The outrigger system is shown in the figure below with a conventionally framed gable end wall.
|
Sketch of Gable End Overhang Constructed Using Outrigger Detail - a conventionally framed gable end wall is shown but the situation would be nearly the same for a truss gable end wall.
(click image for larger version) |
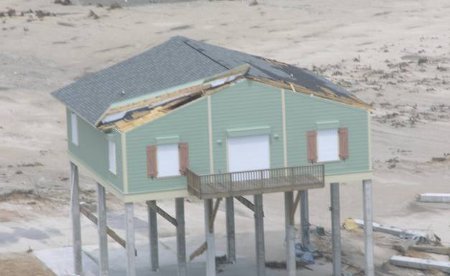
It is important to ensure that the outlookers are adequately attached to their supports. For outlookers, the supports are the gable truss or rafters and the first truss or set of rafters back from the gable truss or rafters. These support points are identified for one outlooker in the figure shown above. Failure of these connections can lead to the loss of a whole section of the roof at the gable end. The figure below shows gable end roof damage after a hurricane. This damage was a result of the failure of outlooker connections to the top of the gable end wall.
|
Gable End Roof Sheathing Damage From Outlooker Connection Failure: The Gable Overhang on the Left Side of the Roof Flipped Onto the Roof
(click image for larger version) |
Retrofitting Gable End Overhangs
Gable end overhangs constructed using the ladder detail:
If the gable end overhang uses the ladder detail method of construction and the length of the overhang is greater than 8-inches to 12-inches, you may be able to strengthen the connection of the overhang by installing, from the attic, �-inch diameter lag screws that are long enough to go through the gable truss or rafter, through the wall sheathing and 1-1/2-inches into the inside framing member of the ladder framing. This will be most effective if the lag screws are installed towards the bottom of the gable truss top chord or rafter and the soffit is covered with wood sheathing that is fastened well to the overhang framing.
Gable end overhangs with outlookers:
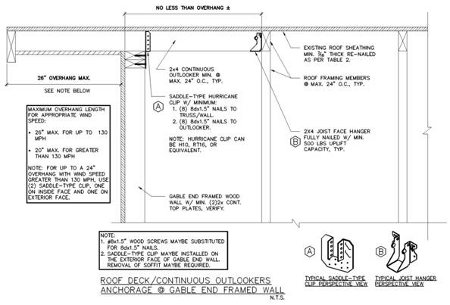
You can strengthen gable end overhangs with outlookers by adding either the saddle type hurricane clip shown in the drawings below to the connection where the outlooker crosses the gable end wall/truss. As an alternative you can use two smaller H2.5 style clips, one installed on each side of the outlooker. Finally, add a 2x4 joist hanger as shown in figures below where the ends of the outlookers butt up against the second truss/rafter from the gable end.
|
Typical Gable End Framed Wall and Outlookers Anchorage Improvement
(click image for larger version) |

|
Typical Gable End Truss and Outlookers Anchorage Improvement
(click image for larger version) |
Roof Structure
Gable End Bracing
What to do you if you re-roof
What you can do if you don't re-roof
Back to Roofs Main Page
|