The following provides more information on these basic steps.
It is important to strip the roof cover down to the sheathing because it:
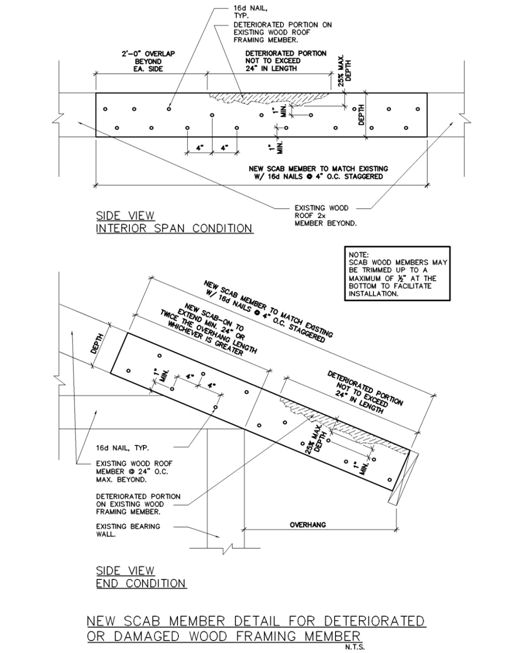
If roof sheathing is damaged, the framing members under the sheathing should also be inspected to make sure that they are still sound and have not been damaged. If a short section of the roof framing has been partially damaged, it may be possible to add scabs (Short pieces of framing lumber, with the same cross-section as the existing framing members, installed beside the damaged section.) that extends about 2-feet beyond the damaged section in both directions and is nailed to the existing roof framing with at least 6-16d nails on each side of the damaged area. The 16d nails should be driven in a staggered pattern with a minimum spacing of 3-inches. It is also a good idea to add scabs to the framing located at the ends of the spaces where sheathing has been removed and nail the replacement sheathing to these scabs rather than to the original framing. This avoids adding more nail holes to the original framing member. The original framing member probably already had lots of nail holes because the ends of two pieces of sheathing terminated on it.
Check the nailing of the roof deck to the rafters or trusses that support the deck.
For wood plank decks, the existing nailing has generally proven to be adequate (If at least two nails were installed every time one of the planks crossed a rafter or truss and the planking is not too wide � See Table 1 below) so you should not need to re-nail a deck made of planking.
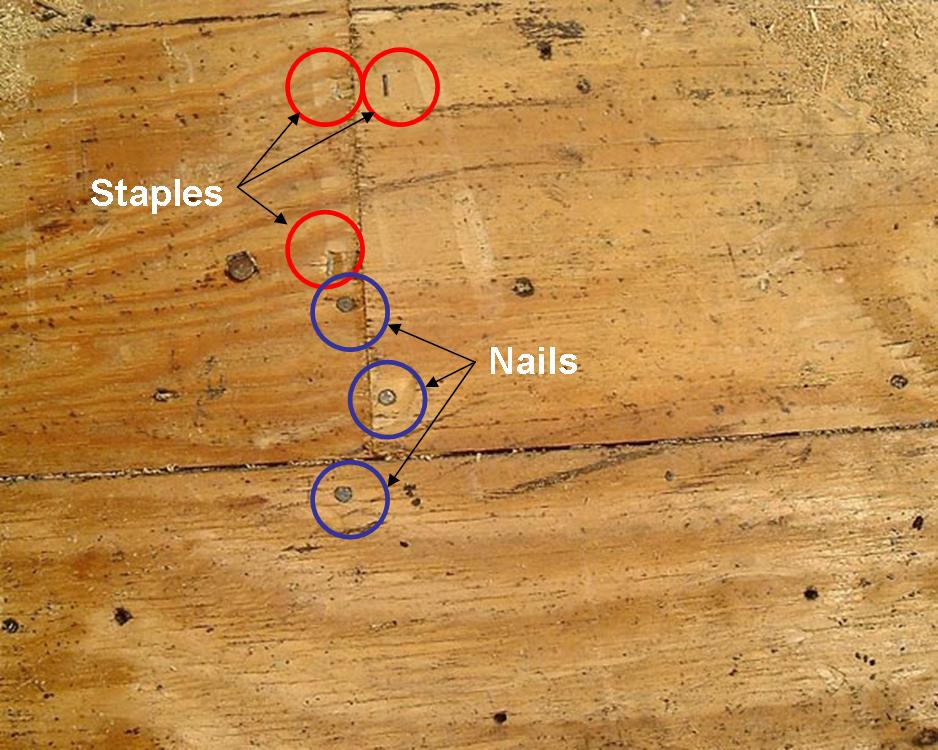
For wood panel sheathing (plywood or Oriented Strand Board, OSB) nail sizes and nail spacing commonly used, particularly along trusses and rafters in the middle of the panels have been inadequate to provide the needed resistance to uplift in hurricanes. Staples have been found by both engineering testing and hurricane experience to not hold roof sheathing down very well, regardless of how close together they may be.
Check every single sheet of plywood or OSB. Sometimes during construction sheathing does not get completely nailed down as intended. Sometimes the carpenters forgot to nail down the sheathing completely because they got distracted or were in too big of a hurry. And, sometimes the sheathing does not get nailed down adequately because the building code standards for the nailing were less stringent at the time the sheathing was applied. In high wind situations, poorly attached sheathing will come off first, and it only takes one failure to have a catastrophe. Bear in mind that nails don�t cost much and if the roofer uses a pneumatic gun, the cost of adding nails is small in relation to the benefit. In Florida, the existing building code (FEBC) requires that roof sheathing be fastened to today�s standards before replacement shingles are applied.
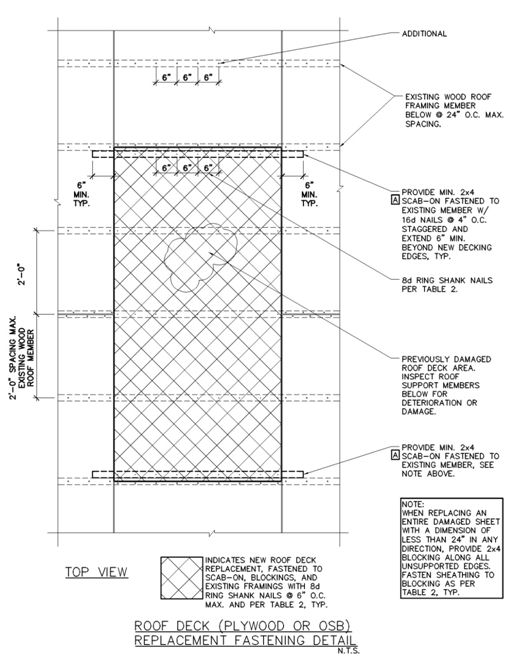
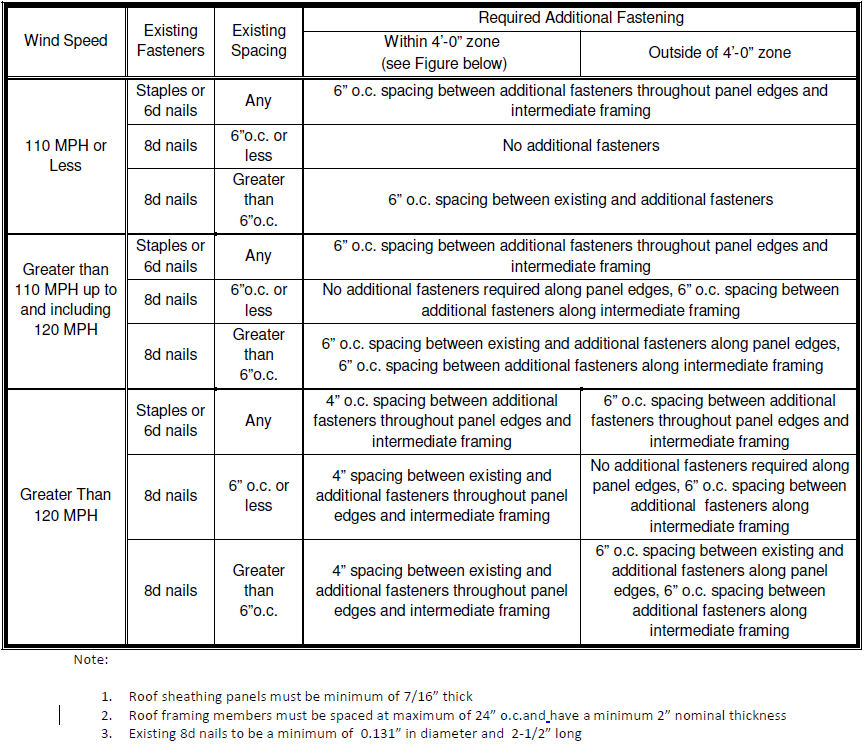
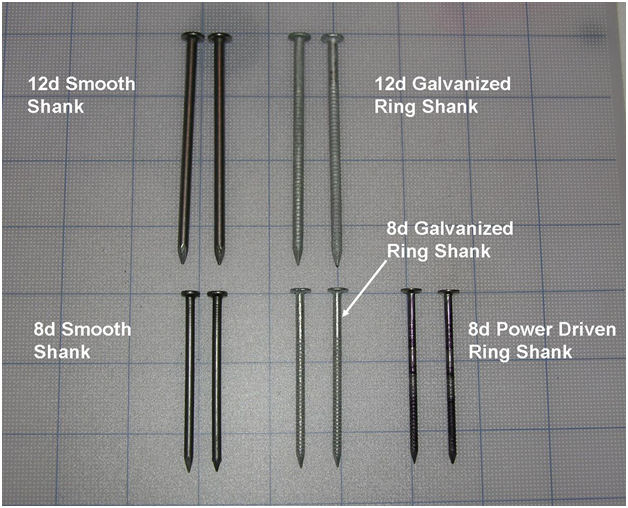
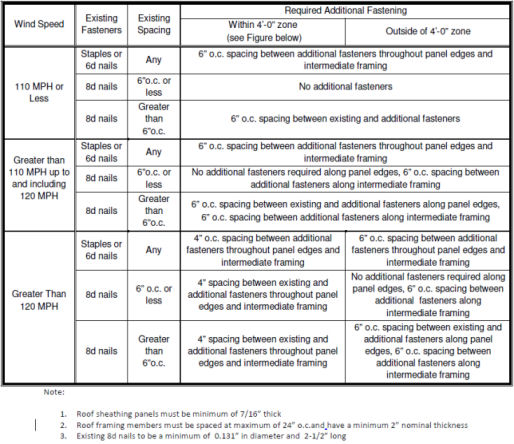
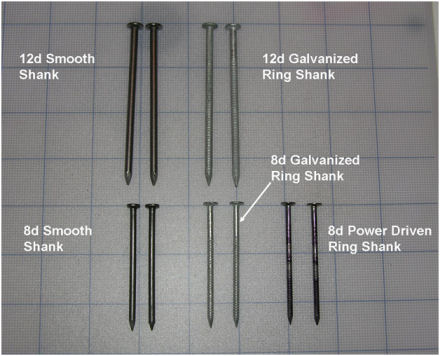
The ideal situation would be to find that you already have 8d (2-3/8� or longer) ring shank nails spaced no farther apart than 6� along the 4� edges of the sheathing as well as along the rafters or trusses in the center portion of the sheathing. Ring shank nails have rings around the shank that make the nails harder to pull out than the more typical smooth shank nails with which you are probably familiar. Unfortunately, it is unlikely that you will find this ideal situation unless your house was recently built to high wind standards. Building code minimum nailing patterns for most of the hurricane prone areas are 8d (2-1/2� long) smooth shank nails spaced every 6� along all roof framing members. This should be the minimum you accept. However, we strongly recommend adding nails according to Table 2 below to upgrade roof sheathing connections.
Table 2: Additional Fasteners at Panel Edges and Intermediate Framing for Roof Deck (Plywood or OSB)
(click image for larger version) |
|

|
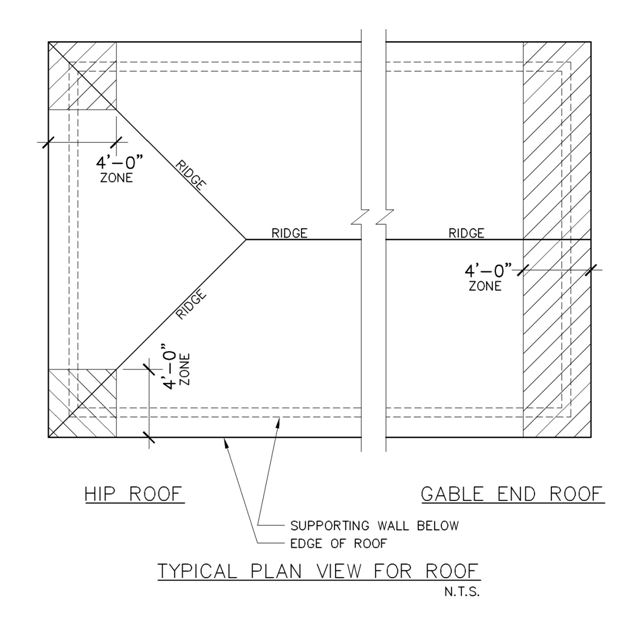
Sketch showing 4-foot zones for enhanced nailing in Table 2
(click image for larger version) |
|
|
Comparison of smooth shank and ring-shank nails
(click image for larger version) |
|
Additional guidance on roof deck sheathing attachment, that is written more from the perspective of building a new home, can be found in the FEMA coastal construction manual and their recovery fact sheets.
(FEMA_hgcc_fact18_roof_sheathing_installation). This fact sheet also addresses the issues of gable overhang vulnerability and the need for blocking along the edges of sheathing at ridge vents. In retrofit applications, any desired blocking should be added before the roofer gets ready to re-roof. While you should be able to get the roofer to re-nail the decking, including adding nails along the edge of the ridge vent, it is extremely unlikely that the roofer would be willing to install the blocking. The addition of blocking along the edges of the ridge vent is most important for roofs with large gable ends (more than about 8-feet tall) in locations where the design wind speeds are greater than about 130 mph.
Installing a Secondary Water Barrier
Too many times when a hurricane strikes, the primary roof cover blows off exposing the layers underneath to the full force of the wind. Damage investigations and tests at Florida International University and at the University of Florida have demonstrated that ASTM Type I underlayment, commonly referred to as 15# felt, will blow off pretty quickly in 110 mph winds even when it is brand new and has not been degraded by heat and exposure. Historically, the roofing industry has referred to the felt paper as a secondary water barrier because it provides a drainage plane for any water that gets behind the roof cover. In the context of this guide, a secondary water barrier is a membrane that is strong enough when attached properly to stay in place if the primary roof cover, the roof�s raincoat if you will, blows off and water tight enough to keep water from pouring into the attic after the primary roof cover is lost.
There are several options that have been considered over the past few years. One of the simplest is the use of an ice and water shield type of product to cover the seams or joints between the sheathing. These products are a self adhering membrane made to put near the eaves of roofs to keep ice dams from pushing water up from the house eaves and into your attic in cold climates. It can be purchased in 4-inch and 6-inch wide rolls and readily adheres to plywood with enough strength to keep from being blown off. If it is used on OSB, the OSB frequently has to be primed along the joints in order for the membrane to stick.
Another method is to use rolls of the ice and water shield products over the entire roof. Many roofing manufacturers make these types of self adhering modified bitumen roll products. However, there are several warnings that need to be raised if one is going to use these products. First, they have the same problem identified above when applied to OSB, so it may be necessary to prime the entire OSB roof surface in order to get the material to stick. Second, most manufacturers warn that attic ventilation must be good if these products are used because moisture in the attic cannot evaporate through these types of membranes. Third, when used with shingles, many shingles tend to melt into the membranes so that it becomes very difficult to remove the shingles if you want to re-roof in say 15 to 30 years. If the self adhered membrane needs to be scraped off with the shingles, the roof sheathing is usually damaged and may need to be replaced which would be very costly. Finally, some jurisdictions such as Miami-Dade and Broward Counties will not allow the membrane to be directly adhered to the roof surface. So, if your jurisdiction allows use of a membrane that is adhered directly to the roof deck and you plan on using shingles, install an extra layer of felt over the top of the self adhered membrane to act as a bond brake between the membrane and the shingles.
A third possibility is to use an ASTM Type II underlayment (Nominal 30# felt � but it must be ASTM Type II) or an approved synthetic alternative with the kind of nailing required in Miami-Dade and Broward Counties and seal the seams between the overlaps using either a compatible tape or adhesive. The best fastening technique specified for these underlayments is to nail them down with ring-shank nails through 1+-inch tin tabs. These fasteners are placed at 6-inches along all seams where the underlayment rolls overlap and no farther than 12-inches apart anywhere else. The minimum horizontal overlap between rolls is 2-inches and the minimum overlap at the ends of rolls (vertical) is 6-inches. Since water can easily blow up under the horizontal seams once the roof cover is lost, the seams need to be sealed as noted above. It is not clear that insurance companies will accept this as a secondary water barrier for insurance premium discounts; but, it is at least the starting point in Miami-Dade and Broward Counties. In those counties, you can apply a self adhering membrane on top of this underlayment or hot mop it and apply a heavy cap sheet over this base membrane.
In tile installations, the tiles are quite porous and it becomes very important to have a good quality membrane under the tile that seals around any fasteners used to connect the membrane or the tile and will not allow water to ne blown up under the membrane. Consequently, it is usual in Miami-Dade and Broward Counties that the underlayment starts with the ASTM Type II underlayment nailed off with ring-shank nails and tin tabs and then capped with another sheet of material.
Make sure the roof is properly flashed
Proper flashing at the intersection of the roof with any walls including chimneys, in valleys, at any location where the roof changes slope, and at drip edges is very important to the performance of your roof. Two of the better guides for flashing details are available from the National Roofing Contractors Association (NRCA)
www.nrca.net and the Florida Roofing, Sheet Metal and Air Conditioning Contractors Association, Inc. (FRSA)
www.floridaroof.com The NRCA maintains a roofing installation manual that goes into a great amount of detail. Unfortunately, it is relatively expensive for a consumer to buy and you have to be a member to review it online.
The FRSA guide Concrete and Clay Roof Tile Installation Manual is relatively inexpensive and provides good graphics on flashing details that are suitable for most roofing systems.
Check all roof vents
Old roof vents are frequently not rated for high wind events and will allow water to enter your attic. You should discuss your roof vents with your roofer and make sure that any acceptable ones are securely attached to the roof and that any that should be replaced are replaced with high wind rated products that are also resistant to water intrusion.
Installing a wind resistant roof cover
There are a variety of roofing products available and each has their own version of wind resistant products. Shingles and tiles are generally considered to be porous systems, which mean that the wind pressures applied to the roof tend to equalize between the top and bottom surfaces. Consequently, the shingles and tiles are designed to resist the forces applied by the wind blowing directly over their surfaces. On the other hand, metal roof covers, membranes and built-up systems have to be designed for the full roof design uplift pressures. If tiles are fully embedded in mortar or in a foam adhesive, they should be designed for the full design uplift pressures on the roof. Finally, you need to consider the weight of the tiles if you are considering replacing shingles with tile. Your roof structure may not have been designed to handle the extra weight, so you should have it checked before you get serious about making that kind of a change.
The main point is to make sure that you insist on a wind resistant roof cover regardless of whatever type roof cover you select. Then make sure that it is installed according to the manufacturer�s recommendations.
Wind Resistant Shingle Roof Installations: If you followed the directions for installing a high quality underlayment, all roof edges should have a metal drip edge installed and the drip edge at the eaves should have adhesive sealant under the edge to keep water from seeping under the drip edge. Complete the seal at the edges by applying a 4-inch wide layer of asphalt adhesive along the roof edges (eaves and rakes) to seal the edge and to adhere the perimeter shingles or starter strip (at the eaves) to the edge of the roof. Similarly, the Florida Building Code requires that shingles overlap the horizontal flange of all flashing and be set in approved flashing cement. This means that the horizontal portion of flashing at wall intersections or around any protrusions through the roof have to be coated with an approved flashing cement that will glue the shingles to the flashing.
Choose shingles that match or exceed the wind rating for the design wind speeds in your area. There have been some dramatic improvements in the wind ratings of shingles in recent years. It wasn�t too long ago that the highest rated product was only rated for about 65 mph. Now, products are being evaluated with a new test method (ASTM D 7158) and rated with letters such as D, F, G, and H. The H rated shingles are rated for 150 mph while the G is rated for 120 mph, F for 110 mph and D for 90 mph.
These rating are established at the time of manufacture based on the resistance of the sealed tab to uplift. The adhesive strip is critical to this rating. The uplift resistance has been correlated with the forces expected on that shingle for the indicated wind speed based on wind load research. It is best seen as a relative rating of the shingle products based on their ability to resist tab uplift at the time of manufacture, not a guarantee that it will not blow off in a storm with those winds after it has been installed on your roof for a number of years. Nevertheless, the ratings do indicate that the tabs of higher rated shingles are more likely to be well adhered to the top of shingles below. The Florida building code requires that shingles be rated for the design wind speed where the home is located up to 110 mph (F-rated). F-rated shingles or those tested using the older Miami-Dade County test protocol that requires testing of shingles by subjecting them to 110 mph winds for one hour are required anywhere the design wind speed is 110 or greater. Since the new higher rated shingles now exist, we recommend that you use one that matches or exceeds the design wind speed for your home�s location. The Asphalt Roofing Manufacturers Association, ARMA, has prepared a document describing the new rating system �
ARMA Discussion of new high wind standards for shingles/" It states:
�When shopping for a new roof ask you roofer to quote a roof that meets the minimum wind requirements for your area and the next two wind speeds higher. You might be pleased at the relatively modest cost increase to get additional protection.�
To maximize the high wind resistance of shingles it is recommended that shingles be attached with nails
(not staples)
and that the nails are installed by hand instead of by a pneumatic nail gun. If a pneumatic nail gun is used, the settings need to be checked frequently to ensure that the nail heads are not being driven incorrectly. Both ARMA and FEMA have prepared documents that illustrate proper nailing of shingles (
ARMA Nail Application of Asphalt Shingles -
FEMA Asphalt Shingle Roofing for High Winds
). The general recommendations for the nails are that they have a minimum head diameter of 3/8-inch and that they penetrate 3/4-inch into a wood deck or completely through plywood or OSB sheathing. In areas with design wind speeds greater than or equal to 120 mph, the recommended fasteners (required in the High Velocity Hurricane Zone) are ring shank nails with a minimum of 20 rings per inch and the penetration of the fasteners is 1-inch into the wood deck and clear through plywood or OSB sheathing. The nails are required to be corrosion resistant. Galvanized steel, stainless steel, aluminum or copper roofing nails are allowed in the Florida Building Code. The FEMA technical guidance recommends the use of stainless steel nails for homes within 3000 feet of salt water. The location of the nails on the shingle is critical and the manufacturer�s recommendations need to be carefully followed. The nails should not be installed in the adhesive strips. Some manufacturers have added lines to show installers where to apply the nails for their particular product. It is extremely important where nails are installed on shingles. If there is one thing you want to check (and check several times during the course of installation, especially at the end of the day when it is hot and the guys are getting tired) it is that the nails are being installed at the proper place on the shingles. You can learn where they should be nailed by looking at the instructions printed on wrappers/packages the shingles come in. Further, you can point to the text to substantiate your argument with the foreman on the job. If the shingles are not nailed at the proper place you should call your building department and should not pay until you are assured that shingles are nailed properly. Roofing experts examining why new shingles failed in recent hurricanes concluded that a primary cause was improper placement of nails.
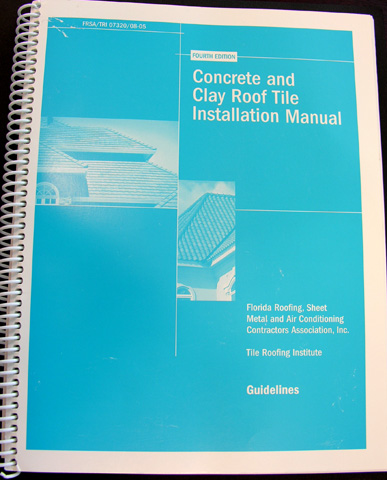
Wind Resistant Tile Roof Installations: If you followed the directions for installing a high quality underlayment, you should have an excellent base upon which to install the roof cover of your choice. For tile roofs, the accepted US reference for proper installation in high wind areas is the Florida Roofing, Sheet Metal and Air Conditioning Contractors Association / Tile Roofing Institute guidelines document, Concrete and Clay Roof Tile Installation Manual Fourth Edition FRSA/TRI 07320/08-05. These guidelines are recognized by the Florida Building Code as the guide for installing tile roofs. The underlayment options described in this guide are consistent with two of the options outlined in the FRSA/TRI Guide.

(click image for larger version) |
|
Generally, tile roof anchorage requirements are based on results of testing and engineering calculation. Uplift coefficients for a particular roof tile shape and thickness are determined for wind tunnel tests and this information is used to determine fastener sizes and numbers of fasteners for mechanically attached tile and paddy size and location for either mortar set or adhesive set tile installations.
You can check specific product approval information for the particular tile product you are considering by going to:
http://www.floridabuilding.org/pr/pr_app_srch.aspx
and looking up the product approval information and the evaluation report for that product.
We do not recommend the mortar set option for attaching field tiles or hip and ridge tiles. A study by tile experts suggested that there were more than 30 ways that the mortar set technique can go wrong. Fortunately, mortar set tile installations represent less than about 1% of new tile installations in Florida. FEMA suggestions for tile installations in high wind areas also do not recommend the use of the mortar set system for attaching tile roof covering. (
FEMA_hgcc_fact_21_Tile_rrofing_for_high_wind_area.pdf).
The keys to good mechanical installations include making sure that the right number and sizes of fasteners are used. The fasteners have to have an adequate head size to keep the tile from working over the head of the fastener during buffeting by winds in a hurricane and the withdrawal capacity of the fastener has to be great enough to keep the fastener from pulling out of the roof deck.
For adhesive tile installations, the key is to make sure that enough adhesive is applied in the right place under each tile (paddy size and paddy location). The requirements for fastener size, number of fasteners, paddy size and paddy location are all dependent on the design wind speed and the particular tile being used. Each manufacturer has installation instructions for their tile for various design wind speeds. These items should be discussed and agreed upon prior to the installation of the tile.
The main changes that have been incorporated in tile installation guidelines coming out of damage assessments following the 2004 and 2005 hurricane seasons are enhanced requirements for attaching ridge and hip tiles (typically barrel shaped tile that are installed over the edges formed where different slopes of the roof intersect to create an edge that sticks out from the rest of the roof. The new guidelines require that a board or metal hat section be securely fastened to the roof along all ridges and hips and that the ridge and hip tiles be securely fastened to these boards or metal hat sections. These revised guidelines for ridge and hip tiles are being incorporated into the Florida Building Code effective the end of 2006.
Because the adhesive contact area is so important you will want to be sure that installers are using the proper amount. If you have any doubts you may find installation instructions on the pallets of tile, the manufacturer�s website, or from the Florida product approval website. Make certain, in a diplomatic way, the roofer knows that you know how much and where adhesives are to be applied. You can do this by asking and then confirming that it was or that it was not and that you consider this important for a secure roof. Confirm that your tile installer has a qualified applicator card, issued by the adhesive manufacturer, for the adhesive system being applied.

|
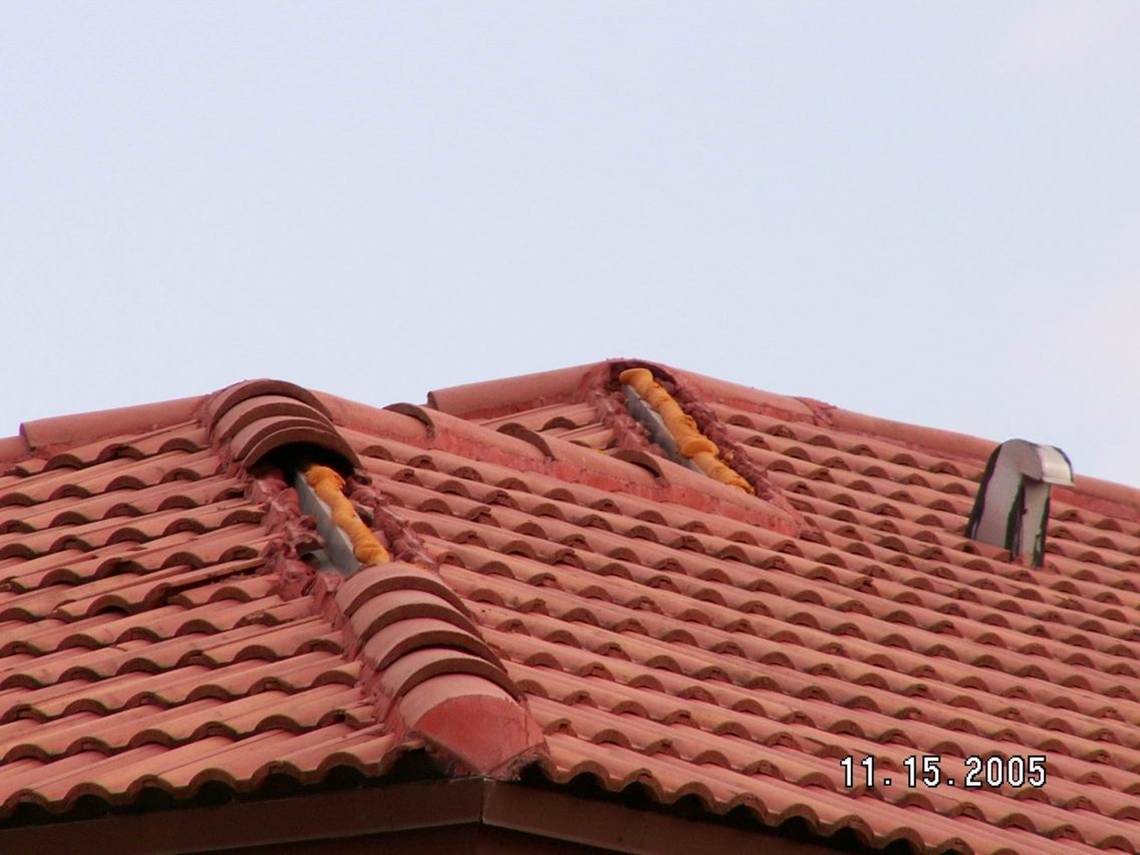
Metal had sections installed on hips and ridges for anchorage of hip and ridge tiles. They provide a more secure fastening of hip and ridge tile than most traditional methods. The metal must be clean and free of any oil residue from the manufacturing process.
(click image for larger version) |
|

|
Note that despite the presence of the metal hat section attached to the hip edge, the tile were not in contact with the adhesive that was supposed to anchor the tile to the hat section. This illustrates the importance of proper installation and the need for a conscientious roofer that has a qualified applicator card indicating they have been properly trained to install the adhesive-set system.
(click image for larger version) |
|
Because the hip and ridge tiles as well as the eave tiles are frequently the first tiles to break loose in high winds, regardless of whether they are impacted by debris or not, it is recommended that these tiles be installed with extra care and attention to detail. One way to help assure better performance of eave tiles is to have the roofer attach them as if the roof were to be installed in a higher wind zone. For example, if the manufacturer�s installation recommendations for your area was to install a single nail, the roofer could go to two nails for the eave tiles, if the tile has holes for the second nail, or to a screw instead of the nail, or add a clip or adhesive at the bottom of the eave tile that anchors it to the fascia board. Similarly, for the hip and ridge tiles, the roofer could use both mechanical fasteners at the top of the tile and adhesive near the bottom of the tile to create a stronger anchorage for these more vulnerable tiles.
Wind Resistant Metal Roof Installations: If you followed the directions for installing a high quality underlayment, you should have an excellent base upon which to install the roof cover of your choice. There is no accepted guide for installing metal roofs. We are not aware of any specific document that outlines guidelines for installing wind resistant metal roofs. This may well be due to the wide variety of products and installation methods. Consequently, if you want to check on installation information, request a copy of the manufacturer�s installation recommendations; or you can check specific product approval information for the particular metal roof product you are considering by going to:
http://www.floridabuilding.org/pr/pr_app_srch.aspx and looking up the product approval information and the evaluation report for that product.
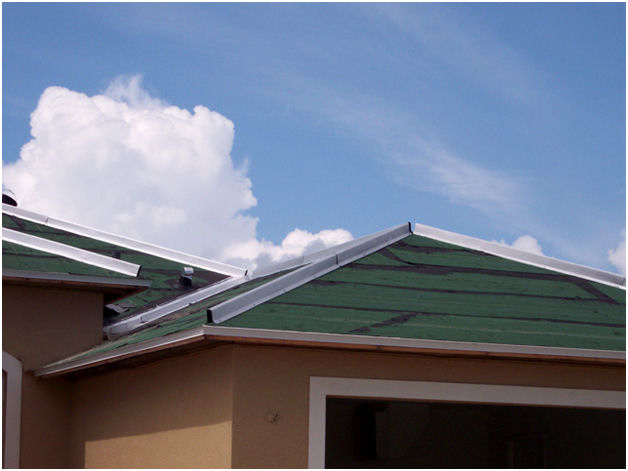
The general keys to getting a wind resistant metal roof installation are to ensure that the lowest fasteners, clips or straps are installed close to the roof eave and that the manufacturer�s recommended spacing of fasteners is followed very carefully so that there are no large gaps or spaces between fasteners. Many of the failures that have been observed have occurred to the panels that cover the hips and ridges. Newer products frequently have screws along the bottom edge of these panels to help avoid the kinds of failures shown below. If a longer cap is installed, it may be prudent to have fasteners installed at a closer spacing than that recommended by the manufacturer.
|
The metal tiles covering the hip ridges did not have adequate anchorage at their bottom edges and many lifted up when the hurricane swept through.
(click image for larger version) |
|

|
Note damage to hip edge metal of the metal roof.
(click image for larger version) |
|
Wind Resistant Membrane or Built-up Roof Installations: The five main keys to a wind resistant flat or low-slope roof are the roof deck, its attachment to the roof structure, the type of membrane used, the method of attaching the membrane to the roof deck, and the anchorage of the flashing around the edge of the roof. Many of the failures of low-sloped roofs in hurricanes start with the detachment of the flashing or edge metal from the edge of the roof. In many cases these failures lead to tears in the roof membrane and/or a peeling back of the roof membrane. The failure of the edge metal can also lead directly to water entry around the edge of the roof. If the structural deck is covered with insulation boards before the membrane is installed, the whole assembly has to be securely fastened to the deck. When this anchorage is done with adhesives, then each layer of adhesive has to be able to resist the entire uplift load from the wind uplift pressures applied to the roof membrane.
You can check specific product approval information for the particular membrane roof product you are considering by going to:
http://www.floridabuilding.org/pr/pr_app_srch.aspx and looking up the product approval information and the evaluation report for that product.

|
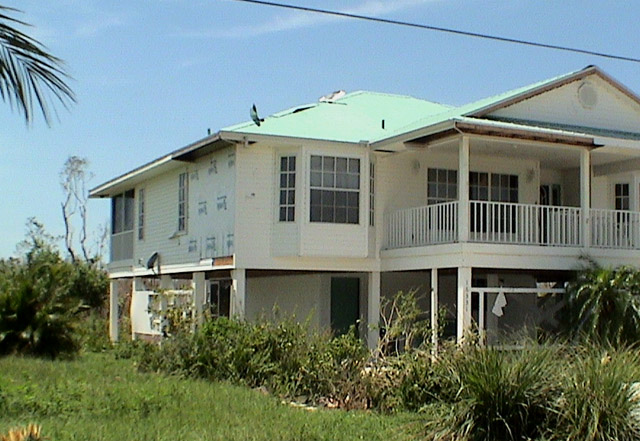
Roof deck failure with ceiling joists remaining in place.
(click image for larger version) |
|
|
Roof flashing damage on windward edge of roof.
(click image for larger version) |
|
Shingle Roofs
Tile Roofs
Metal Roofs
Membrane or Built-up Roofs
Roof & Attic Water Intrusion
Roof Structure
Gable End Overhangs
Gable End Bracing