|
This section provides guidance for use in evaluating your tile roof and it includes suggestions for what you can do based on what you find. As you read through the information on roofs, some of the terms used may not be familiar to you. You can click on Roofing Terms to access a list of definitions that may be helpful.
Information About Tiles
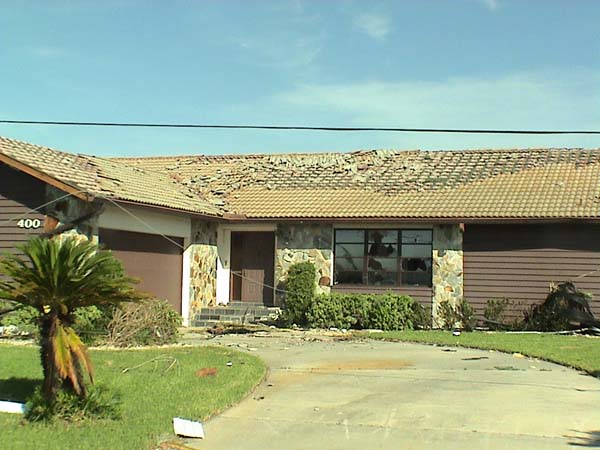
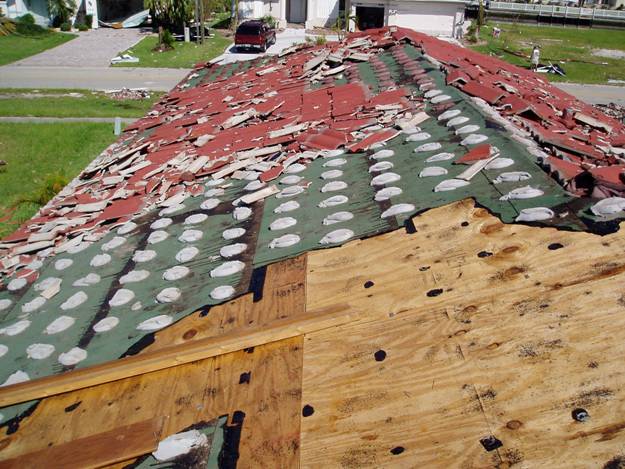
Tiles are brittle, and can easily be chipped or broken by wind-borne debris. In fact, the tiles themselves are likely to become wind-borne at wind speeds starting at 120 to 130 mph. You can have a more secure roof by making sure that all tiles, and particularly those on the ridges and edges, are fastened down tightly and by replacing the ones that are missing or loose.

Tile roof repairs should be done by a professional roofer familiar with tile roofs. Hiring a roofing professional to evaluate your tile roof covering is a good idea for most homeowners.
|
The smartest thing to do is to make sure that you have adequate protection for all your glass window and doors. Tile from your own roof can break your windows, but it is more common that the danger will come from your neighbor's roof. Replacing a tile roof is an expensive proposition, even in the best of times, and costs will skyrocket after a hurricane strike because of shortages in roofers and materials.
|
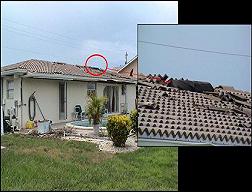
Windows broken by windborne debris
(click image for larger version) |
|
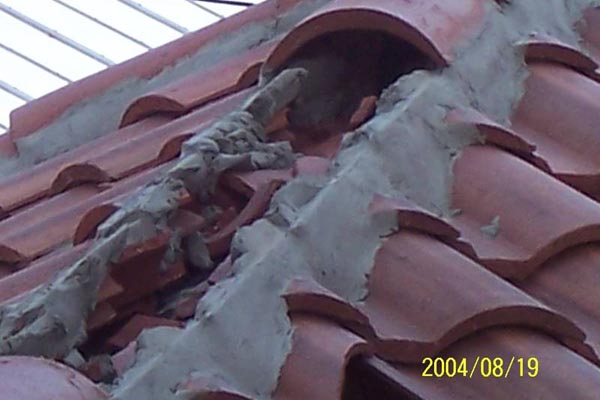
Tiles Most Likely Lifted Off First:
The most vulnerable parts of a tile roof are the hip and ridge tiles located where flat planes of the roof intersect, the gable eaves. Older installations typically used mortar to attach the hip and ridge and eave tiles, and they are the first ones to blow off as wind gusts begin to exceed about 80 to 90 mph. The new building code requirements (at least in Florida) and industry recommendations call for attaching the hip/ridge tiles to a wood or metal hip/ridge board or cap using screws and adhesives, nails and adhesives, adhesives only or nails and possibly clips.
|
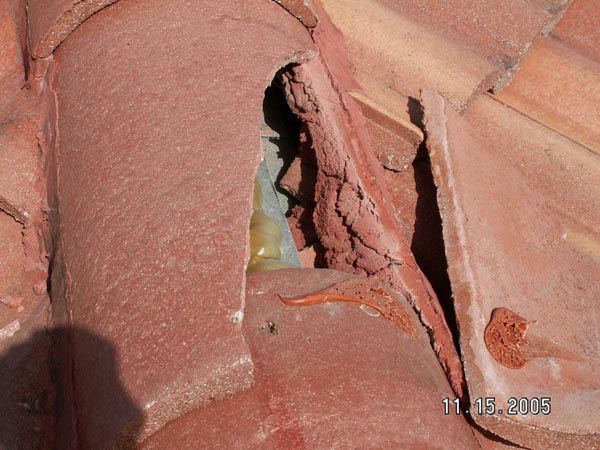
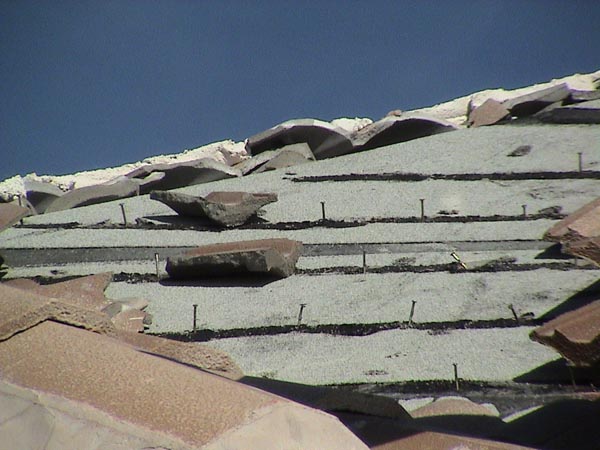
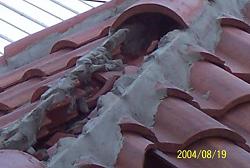
Failure of ridge tiles
(click image for larger version) |
|
|
Close-up of ridge tile showing
anchorage at edges using mortar -
hollow cavity
(click image for larger version) |
|
|
|
If the tiles are mechanically attached, you should be able to tell by looking in your attic. From inside your attic, scan the deck between the trusses or rafters. You will probably see the tips of nails that were used to anchor the underlayment felt (unless it was a self adhesive membrane). These nails will tend to be in straight lines every 3' and more randomly spaced (usually 12" or more spacing between the lines. These nails may be either short roofing nails or short ring-shank nails. If you find a second type of nail (usually slightly larger) or screws in straight lines about every 12", these are probably the mechanical anchors for the tile. You can determine how many nails or screws are used to attach each tile by comparing the horizontal spacing of these fasteners with the width of the tiles. In some older installations, every other tile or every other row of tiles is attached so look for signs that all the tiles are not attached.
If you do not see any signs of mechanical fasteners for the tiles protruding through the deck and you can safely climb a ladder, climb up and look under the tile. If it is mortar set or adhesive set, you should be able to catch a glimpse of the paddies by looking under the edge of the tile. You may also be able to see some indication of mechanical fasteners if they were used to attach the tile. Also, check to see whether any clips were used to hold down the bottom edges of the tiles at the eaves. Note that eave clips are not a requirement, just an indication of an extra measure of resistance. The eave tile anchorage can also be enhanced if there is a second mechanical fastener at the top of this row of tiles or if a larger paddy of foam adhesive was used to set these tiles.
Assessment Observations:
The tile uplift resistance of mortar and adhesive set systems depends on the installer placing a large enough paddy of the mortar or adhesive in the proper position under the tile. It also depends on the bond between the mortar or adhesive and the underlayment along the bottom of the paddy and between the mortar or adhesive and the tile along the top of the paddy. The head size, number of fasteners and type of fasteners tend to be the critical elements for the mechanically attached systems. Investigations of hurricane damage suggest that the mortar set systems perform the worst, while the other systems perform better as long as the manufacturers installation recommendations for high wind installations are followed carefully, the hip/ridge tiles are attached to ridge boards, the bottom edge of tiles at the eaves have enhanced anchorage, and the roofs are not impacted by windborne debris.
Inspect the tiles:
Before you climb up the ladder to the edge of your roof to evaluate your tiles, please read about Ladder Safety Tips. Then read the text below so that you will have a good idea of what to look for when you get on the roof. Print out the Tile Roof Inspection Checklist and have that with you on the roof and in the attic. It will help assure that you remember to check everything on the checklist.
|
If you are not comfortable climbing a ladder to your roof, or your spouse or friends have told you that you have no business on a ladder, you can try binoculars to look over your roof. There are reasons why roofers have extremely high workers compensation rates, so stay off the roof unless you are really comfortable with getting on your roof. If you do climb up read the Ladder Safety Tips. If you are not able to make the inspection yourself, get a reputable roofer or home inspector to evaluate your roof.
|
From the ladder at the edge of your roof: Look for cracks in the tiles, broken tiles, and loose tiles (especially along the ridges, gable edges, and eaves). These signs of damage to the tiles or anchorage are indicators that you are likely to lose tiles during a hurricane. Try to determine how the eave and gable edge and hip/ridge tiles are attached to the roof. Are they attached using mortar along the edges? Are they set in a full bed of mortar? Are they attached to a ridge board? Also inspect the eave tiles noting the distance the tiles extend beyond the fascia board, whether there are clips holding down the edge of the tiles or whether there are adhesive paddies under the eave tiles.
|
Warning: Do not walk on your tile roof. You can break the bond if the tiles are set in mortar, or you can crack or break the tiles themselves.
|
From inside your attic: On a sunny day, go up into your attic and look for signs of leaks or cracks and holes where you can see light. Use a flashlight to inspect for stains caused by leaks. Look at the roof sheathing, rafters or trusses, and drywall. Look especially carefully around chimneys (including triangular diverters mounted above the chimney to divert water away from the chimney - crickets), and wherever the roof changes shape or slope. Also look for evidence of water on the walls and in the insulation around gable end vents. These signs that water probably entered during a thunderstorm is a good hint that water will enter during a hurricane. Sometimes you can see water stains on rafters or trusses. Inspect around all roof penetrations for things like attic vents, exhausts, skylights, light tunnels, and plumbing stacks. Look for water stains and for cracks or holes where you can see light shining through. Attic vents (the ones that exhaust hot air) may well have water strains around them because they are not terribly effective at keeping windblown rain out. If you see water stains around them, look carefully around them and try to decide if water was coming in through the vent or around the vent. Check for rusting nails protruding through the roof sheathing as a sign that the leak was around the vent. Another place to check carefully from within the attic (if possible) is below locations where electric wires from a power pole penetrate the roof. This is a common source of leaks.
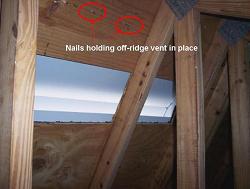
In order to avoid walking on your tile roof, try to check your off-ridge vents from inside your attic. Determine the spacing and size (length - do they go all the way through the roof deck?) of nails or screws used to hold down off-ridge attic vents, turbines, and any kitchen or bathroom vents that protrude through the roof. If long nails were used and they stick far enough through the roof deck, you can improve the anchorage by clinching (bending over) the nails from inside your attic. Do not try to bend screws - they are much more brittle and will likely just break off.
Inside your house: look for cracked paint, discolored gypsum board, and peeling wallpaper as signs of damaged roof areas. However, be aware that another cause of stains on a ceiling can come from air conditioning ducts that sweat, i.e. drops of water from condensation that forms on the ducts in a hot humid attic.
|
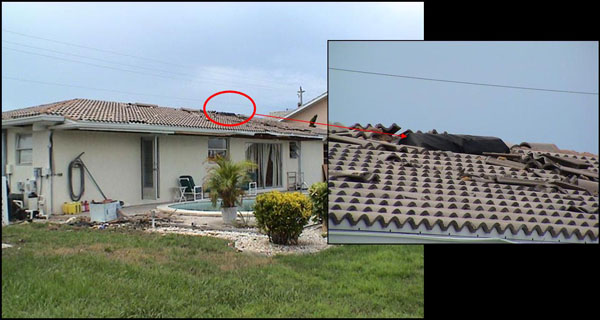
Off-ridge vents on tile roof house.
The covered vent broke loose and
allowed a tremendous amount of
water to enter the house
(click image for larger version) |
|
|
Off-ridge vent viewed from inside
attic. Note the nails used to attach
the vent to the roof deck
(click image for larger version) |
|
|
|
Get an Expert Opinion: If you are not able to make the inspection yourself, get a reputable roofer or home inspector to evaluate your roof. (Check with neighbors and friends for referrals and check with the Better Business Bureau).
Retrofit Options
There is considerable debate about whether retrofitting of tile roofs is practical or cost effective. Due to the uncertainty of the tile staying in place on the roof, the smartest thing to do may be to make sure that you have adequate debris impact protection for all your glass window and doors. Tile from your own roof can break your windows, but frequently the roof tile debris will come from your neighbor’s roof.
You could have a roofer remove the hip/ridge and eave tiles and re-install them using one of the new two part expanding foam adhesives for tile roofs and an appropriate sized 2x? (2", 3", 4" or more?) board along the hip/ridge. In most cases, the foam adhesive will end up bonding the board to the mortar and underlayment running under the hip/ridge and the mortar edge. Do not rely on the attachment of the mortar along the longitudinal edges of the hip/ridge tile. If the tiles are removed without breaking them and if they have appropriate holes in them, they can be mechanically attached to the board and with adhesive at the overlaps of the hip/ridge tile. Otherwise, they can be adhered to the board using the same foam adhesive used to set the board. If the ridge or edge is filled with mortar and the tiles have come loose, they can be re-attached to the mortar using one of the new two part expanding foam adhesive or another type of adhesive approved for use with tiles.
The bottom edge of eave tiles can be held down using clips suitable for a retrofit installation (they connect to the bottom edge of the tile and the fascia board) if they are available for your style of tile. Eave tile can also be anchored more securely by injecting one of the approved two part expanding foam adhesives into the gaps under the eave tiles.
Note: The adhesives need to be approved for tile installations (able to withstand high heat). The typical foam insulation or adhesive available at a home improvement store will not work for this type of application.
Having a roofing professional evaluate your retrofit options and perform the retrofit is a good idea for most homeowners.
If the inspection and evaluation indicate that the roof needs to be replaced, click on What to do if you re-roof to read about what your roofer should do to help ensure that you have a hurricane resistant roof. Guidance is provided on that page for specifications you may want to give to the roofers as you get bids for the re-roofing project. The What to do if you re-roof page also contains a link to a discussion of various roof coverings that may be beneficial if you want to consider different roof cover options. If you are not ready to re-roof, there are still a number of things you can do that will make your roof more hurricane resistant and less prone to water intrusion. Click on What you can do if you don’t re-roof to explore these options. If a hurricane strikes and you do have roof damage, click on After a Hurricane to get ideas for how to keep damage from escalating.
Tile Roof Checklist and Retrofit Suggestions
What to do you if you re-roof
What you can do if you don't re-roof
After a Hurricane
Roofing Terms
|