|
|
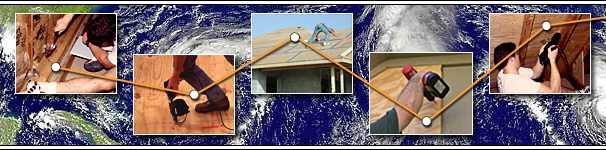
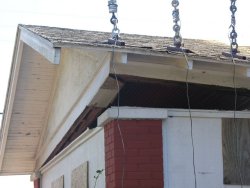
This porch on an older Florida house was closed in to make an extra room. A crane was used to lift up on the roof as part of a research project to study the strength of older homes. Note that the roof was just resting on the brick column with no anchor to hold the roof down.
(click image for larger version) |
|
Understanding the Risks:
Porches and other structures such as entry way canopies and carports that are attached to houses can break loose and tear away from the home. When this happens, a part of the house roof is usually damaged leaving openings where water and wind can enter your home and the debris from the structure can cause serious damage to your house and those of your neighbors. When the roof of this attached structure is solid and one or more of the sides is open, the uplift forces on the roof can be quite large, particularly when the wind is blowing towards the house and pressures build up on the bottom surface of the roof because the wind is blocked by the house’s wall. These pressures on the bottom surface add to the uplift pressures of the wind speeding up over the top of the roof (the kind of uplift created on an airplane’s wing) and the combined loads can easily overcome the uplift resistance unless the roof is properly tied down. Because roofs have a large area and posts are usually no closer than 10’ apart, the uplift forces on posts can accumulate to be in the hundreds of pounds. You can make a rough estimate of the maximum uplift forces on columns or posts by completing the Column Uplift Worksheet. Making this sort of estimate will help you appreciate what posts are asked to do and what you hope they can do to protect your house.

|
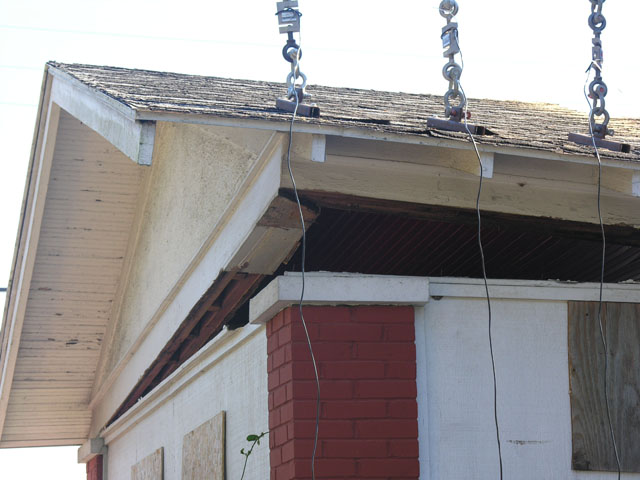
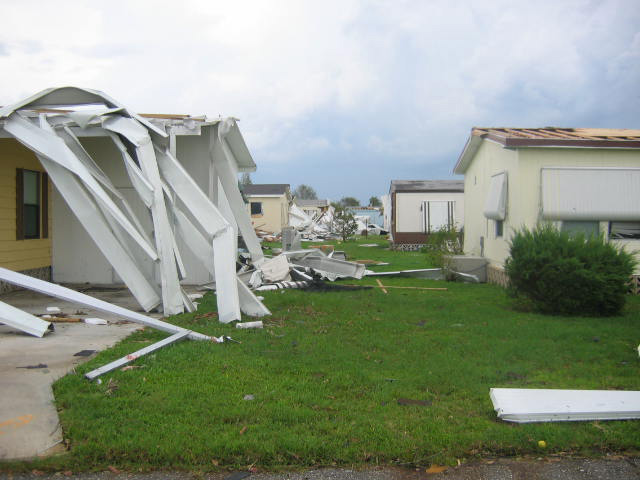
The roof over this porch lifted off and opened up the main roof and the house to the fury of the storm
(click image for larger version) |
|
Posts used to support porches, carports or entryway roofs are made from a variety of materials and come in many of shapes and sizes. They could be aluminum, wood, or steel and can be decorative or simple posts or pipes. Some may bridge the gap between a short wall or railing and the roof. However, in most cases much more attention has been paid to how strong they are for holding up the roof; but little attention is paid to how well it will hold down the roof. Consequently, most are not well connected to either the roof structure or to the foundation below. Don't be deceived by seeing straps or other connectors. They are frequently undersized and should be checked for adequacy. The primary risks are:
1. Connections at the tops of posts that are not strong enough to resist the uplift forces that the wind will apply to the roof.
2. Connections at the bottoms of posts that are not strong enough to anchor the posts to foundations and pass down the uplift forces on the roof.
3. Posts where the bottom ends or connectors at the bottom have deteriorated because of water exposure.
The good news is that many times posts and these connections can be retrofitted so that they are capable of holding down the roof.
Evaluating Column Connections:
The connections between the roof structure and the top of the columns and between the bottoms of the columns and the floor and/or foundation are the areas where you need to focus your attention. To keep a porch or carport roof from being lifted off, the forces trying to lift the roof off have to be resisted by the weight of the roof and forces developed in the columns that that hold the roof down. To be effective, posts must be well connected to the roof or the beam under it and to the foundation (usually concrete), or through a wood porch to the foundation. The weight of the roof is usually 10 pounds per square foot or less while the uplift forces may be 32 to 59 pounds per square foot. Toe-nails through the roof structure into the tops of the columns won't come close to providing enough restraint to resist what will probably be hundreds of pounds of uplift. A pin or small bracket designed to keep the bottom of the column from being knocked loose will not do much to hold down the bottom of the column either. In some cases, you may find a hurricane clip connecting the roof structure to the top of the column and another small strap at the bottom. In a few cases you may find a heavier metal strap or even a threaded rod that runs through the middle of the column. The small straps probably don’t have enough strength unless there are several of them; but, The heavier anchors may provide the strength you really need to hold down the roof in a strong wind.
Evaluating Wood posts:
Wood posts, and particularly cedar ones, that have been exposed to rain are susceptible to water damage that will soften the bottoms of the posts to the point that nails holding the posts in their column base metal connectors are not very effective. Try poking with an ice pick, nail, or sharp screw driver at the bottom of the wood post at a height just below where the fasteners are installed to determine whether the wood is soft. If the wood is found to be soft, the post needs to be replaced. Alternatively, you can replace the connector with one that reaches higher up the post. What happens is that wood and particularly cedar can be so soft that it acts like a sponge to wick water up and eventually cause rot that may not be immediately apparent, but is there nevertheless. The nail holes used to fasten the column base connector to the post are frequently so close to the ends of posts that any water damage compromises the post’s strength. Bottom of post deterioration can take place even where `dry bottoms’, little platforms that raises posts an inch or so off the concrete, are present.
|
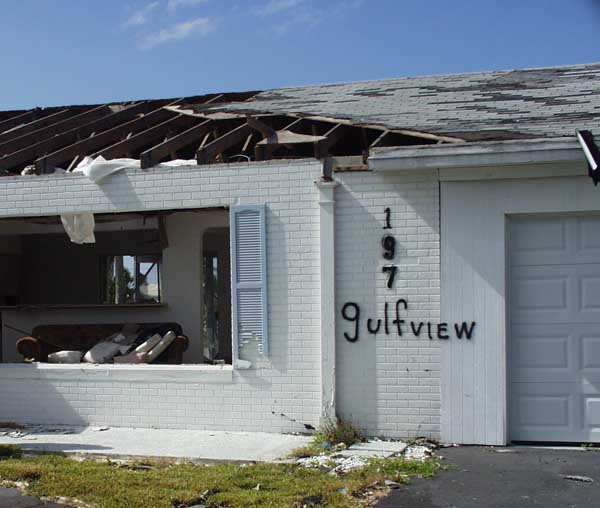
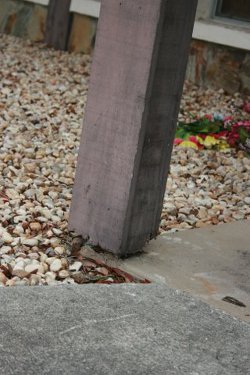
This shows a post with a weakened bottom and no clear indication of any uplift capacity. It is likely that there is a rod sticking up from the concrete that holds the bottom in position.
(click image for larger version) |
|
Evaluating Wood Posts Supporting Roofs |
[ ] There is no visible connection or the only connection is a toe nailed connection attaching the roof structure to the columns. (Discount the strength of this connection and plan to retrofit.)
|
[ ] There is no visible connection or the only connection is a toe nailed connection attaching the columns to the floor system or foundation. (Discount the strength of this connection and plan to retrofit.)
|
[ ] The bottom of the post is soft in areas within 2-inches of the fasteners connecting the column to the floor system or foundation. Test for softness with an ice pick, small sharp screw driver, or nail. (Discount the strength of this connection and plan to retrofit.)
|
[ ] Thin metal straps with 4 to 5 nails on each side are used to connect the roof structure to the column. (Estimate the strength of his connection at 400 pound per strap and compare with the required strength from the Column Uplift Checklist.)
|
[ ] Thin metal straps with 4 to 5 nails on each side are used to connect the column to the floor system or foundation. (Estimate the strength of his connection at 400 pound per strap and compare with the required strength from the Column Uplift Checklist.)
|
[ ] There is a heavy metal strap at least 1" wide and 1/8" thick connecting the column to the floor system or foundation. The strap is either embedded in the foundation or floor slab or connects to a wood floor system with at least 4 nails or screws. (Estimate the strength at between 800 to 900 pounds and compare with the required strength from the Column Uplift Checklist.)
|
[ ] There is a threaded rod going up through the column with a steel plate and large nut that is holding down the roof structure and the rod is anchored into the foundation or floor slab. (This is probably adequate unless you have a very large porch roof or carport with few posts or columns)
|
[ ] Is the column base connector at the foundation deteriorated or damaged? If so get it checked and replace if necessary.
|
|
|
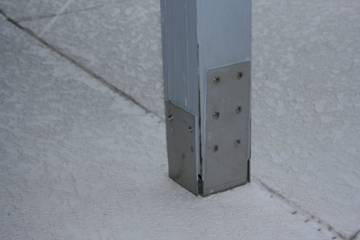
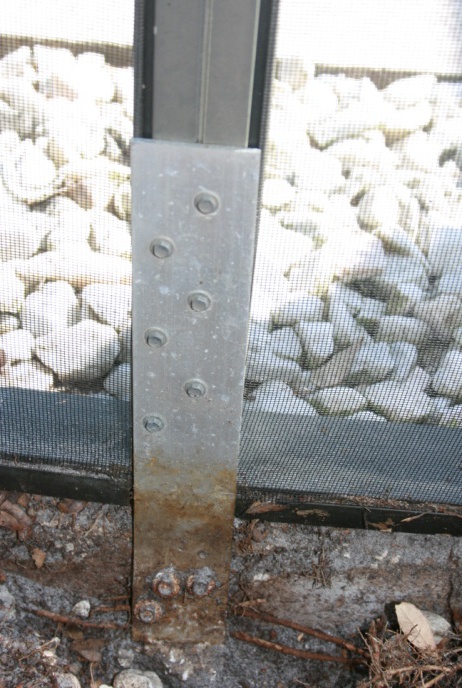
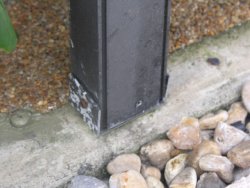
This column is held down by two rusty tech screws. The white is aluminum oxide, the rust of aluminum, which indicates a deteriorated connection.
(click image for larger version) |
|
Retrofit Measures for Wood Posts:
If you do find metal straps or rods connecting the roof to the columns and the columns (column base and column caps) to the foundations you can look them up at the Simpson StrongTie website or the USP website. The small straps are generally able to carry about 400 pounds each, the larger straps 800 to 900 pounds, and the threaded rods several thousand pounds if they are adequately anchored. The tables for these column connectors may list strength capacities for three species of wood, southern yellow pine (SYP or SP), Douglas fir (DF) or Douglas fir-larch (DF-L), or spruce-pine-fir (SPF or S-P-F). Cedar is considerably weaker than any of these. In fact, cedar in good condition has only two thirds the strength of SP or DF-L. Water damaged cedar will be even weaker, probably substantially weaker.
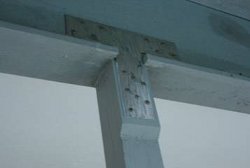
Tops of posts: One solution to the problem of assuring a good connection at the top of post is to add a strap from a post to the structure above. In many cases that structure above will be a beam. Existing column caps or other connectors may be hidden from view. There are a variety of connectors that can be used including column caps, flat straps, and tee connectors. The photo below shows a nice solution where the column cap connector was inadequate so a hefty tee strap was fastened to the face of the post with the strap extending up to the face of the beam where it was fastened. Because the face of the post did not align with the face of the beam a spacer board was added to make a flush connection. The lengths of the screws into the post were selected to be especially long to compensate for the ineffectiveness of the spacer board. Stainless steel straps and screws were used because the posts were just a few feet away from a swimming pool.
|
Connector added at the top of post where a spacer board was needed
so that the faces of the post and the beam would be aligned.
Connectors need to be installed straight to maintain their strength.
(click image for larger version) |
|
Bottoms of posts: Replacing column base connectors can be a challenge because it is difficult to install a new connector under the post. In most situations although beams may appear to run continuously and without interruption over the post, they actually probably are spliced together end-to-end over the post or if a beam is made of multiple pieces of lumber, one maybe spliced at the post where work is being done and anther beam runs continuously to the next post where it is end spliced. This means one cannot simply remove a post without supporting the beam above it by using shore posts. Two are required, one on each side of the existing post. The shores can be shimmed up so the original post can be moved aside enough to remove the original connector. Although this will lift the whole roof a little, it usually causes no damage. Next drill a hole for a hefty concrete screw and set the replacement column base connector in place with its dry bottom. Replace the column that was moved to allow the installation of the new base and tack it in place with a couple of nails driven a little ways into the post if it is loose. Finally, the shores can be removed and then permanent fasteners installed to connect the post to the connector.
For a connection to concrete, the concrete has to be at least 6'' deep. When using large, say 3/8'' to ˝'' diameter concrete screws, try not to drill the hole through the bottom of the concrete because that may chip the underside of the concrete and weaken it a bit. Manufacturers of concrete screws include Simpson and Powers. Before using these screws one is well advised to consult the catalogs that describe how much embedment into concrete is necessary and how far screws need to be from the edge of concrete as well as several other factors. You may want to consult a contractor or professional engineer about these rather technical issues to assure that your efforts are not wasted.

|
This shows a replacement connector with its dry bottom hidden. Here the distance from the concrete screw to the edge of the slab was an important consideration.
(click image for larger version) |
|
Another method of making good connections at the bottom of posts that has more limited application because it is may not be aesthetically acceptable is to place a column hold down beside the post instead of replacing the weak or deteriorated connector or post. A hold down connector will project out to the side of the column so it might become a trip hazard. In some instances the post could be wrapped with decorative boards that would hide the column hold down connector making it less objectionable.
|
Metal panels on carport roofs frequently break loose in strong winds
(click image for larger version) |
|
Risks Associated with Attached Aluminum Structures:
Carports and other aluminum structures that are frequently attached to homes are usually designed for 23% lower loads than your house because the building code does not consider them critical from a life safety point of view. In other words, no one expects people to try to ride out a hurricane in a carport. Furthermore, connections and anchorage of the roof panels as well as the supporting columns is frequently poor and bracing may be non-existent. Post storm damage investigations do suggest that there are a couple of retrofits that may make a difference in keeping a typical carport intact; at least up to a point. To be really wind resistant, you would probably have to rebuild most of the carport.
Some carports are anchored to the fascia board at the eaves of houses. Unless this board has been well connected to the roof structure (by being well connected to a 2 by sub-fascia board that is more than just end nailed to rafter tails) it will probably pull loose if the carport roof applies much in the way of forces to the fascia board. If the carport is free standing and some distance from the house, the wind will tend to blow through it and the uplift loads on the roof will be lower than if one side is blocked by a wall or the house. Ironically, connecting the carport to the house can significantly increase the uplift forces on the roof of the carport for winds blowing towards the side of the house where the carport is attached. Most carports maintain a very open look with relatively slender columns and almost no diagonal bracing to keep the columns from bending over as the wind pushes on the edge of the roof. If the carport has a low profile, these forces will usually be relatively small and lateral forces on the roof are not a big design factor. However, all of that can change dramatically if the roof deck begins to lift up and catches the wind.
|
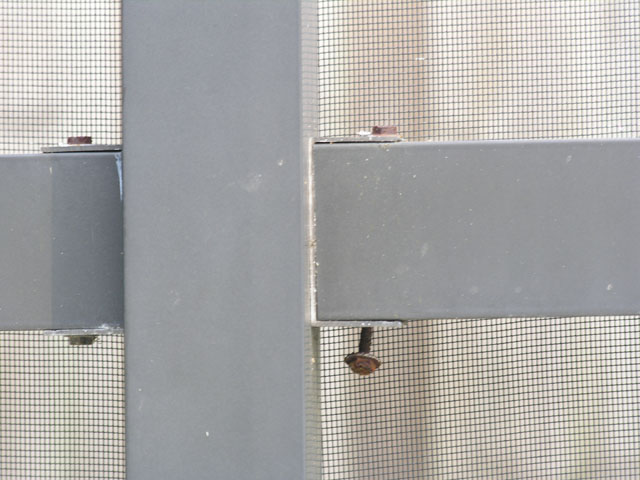
This cast aluminum insert once held a carport column in place - Imagine trying to hold down hundreds of pounds of uplift with the one tech screw on the left side
(click image for larger version) |
|
Probably the most important thing is to try and keep the roof decking attached to the frame of the carport. This will minimize the lateral forces on the roof. Improving the anchorage of the roof deck can be as simple as adding additional fasteners to anchor the deck to the framing. This is easy to do if the roof deck is made up of metal panels or insulated metal panels; just install another set of the same fasteners in between the existing fasteners. If you have a wood roof deck, check out the options for strengthening the roof deck attachment when you re-roof in What To Do When Re-Roofing.
Second, check out the anchorage of the columns supporting the roof of the carport. This has frequently been a weak link in the system. You can use the Column Uplift Worksheet to get an idea of how high the forces may be on the columns. You may be able to add angle brackets that will help anchor the columns to the concrete slab and the columns to roof beams.
Risks Associated with Steel Decorative Posts:
These decorative posts should be recognized for they are `decorative’ posts. In short steel decorative posts are almost assuredly a disaster waiting to happen because they have very little capacity to hold a roof down. In terms of hurricanes these decorative posts should barely be called posts. `Decorative supports’ would be more accurate because though they may hold a roof up, they are not effective at holding roofs down. The weakest parts of these decorative posts are the right angle hold down brackets at the tops and bottoms. The brackets are welded on and are frequently subject to deterioration by rust at the weld joints. The fasteners, usually 2'' or so long screws that are only about 3/8'' in diameter, used to anchor the brackets to the structure above and to foundation are almost always too small. Furthermore, the anchors to the concrete are likely to have deteriorated because of rust and age.
Evaluation:
Unless decorative posts are unusually well installed and maintained, it can be said they simply are not reliable in hurricanes...except to let the roof down and you too.
Retrofit Measures:
These decorative posts do not lend themselves to being retrofitted. They should be replaced with an effective post that is well connected at the top and anchored at the bottom.
Aluminum Screen Enclosures

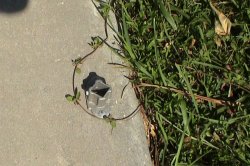
|
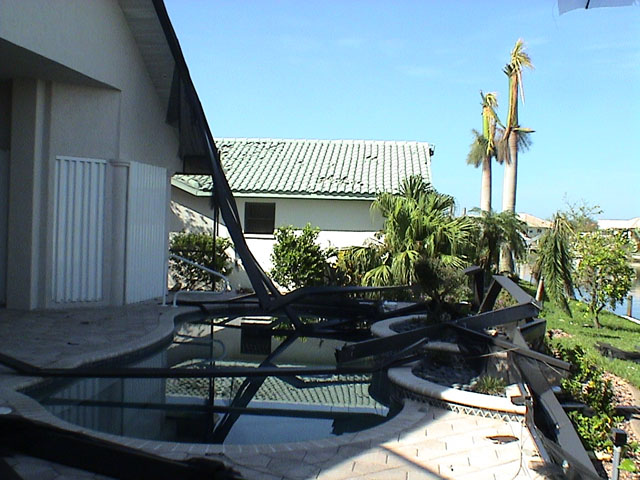
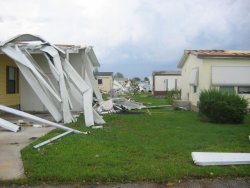
This used to be a nice screen pool enclosure before the hurricane blew through
(click image for larger version) |
|
The Risks:
Aluminum screen pool enclosures are quite popular in Florida. Unfortunately, they are often poorly designed to resist wind loads, and inadequately anchored, braced and connected. This is true even for many of the ones built in recent years. They are often the first structures to be blown down and then blow into your house and possibly your neighbor's. While it would take almost rebuilding these structures to make them really wind resistant, there are some things that can be done at relatively low expense that will make a difference; up to a point. Unfortunately, when winds get high enough the inadequately designed long slender members will buckle and the structure will crumple.
|
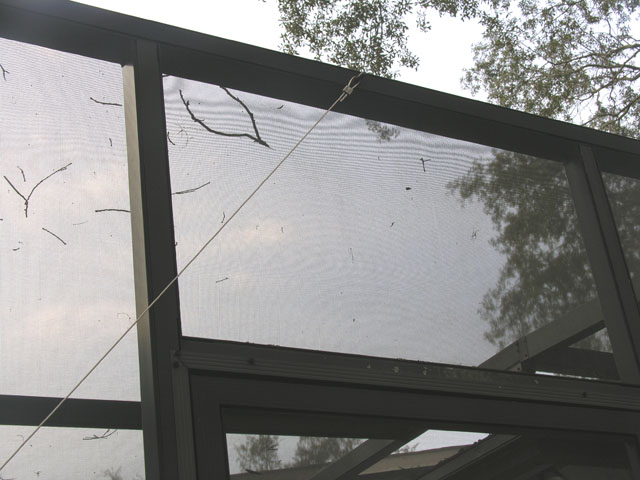
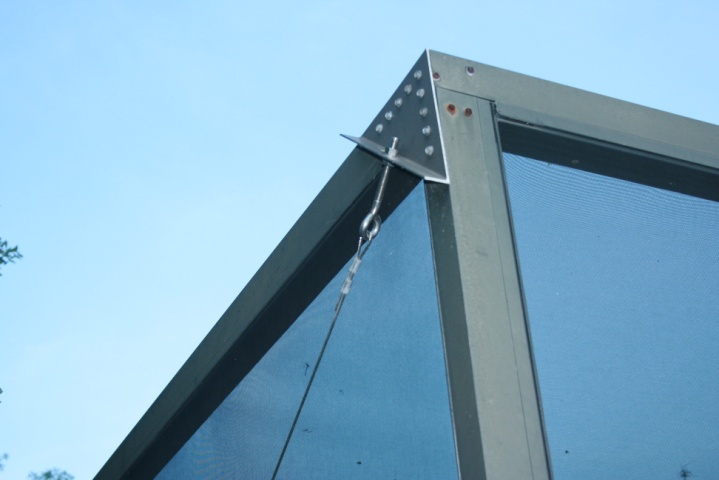
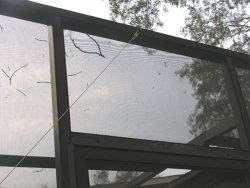
Diagonal wire cable braces should be installed as close as possible to the columns to avoid buckling the members. Bear in mind that these diagonals only work in one direction, the tension direction. Note that only a single bolt connects the cable to the frame.
(click image for larger version) |
|
|
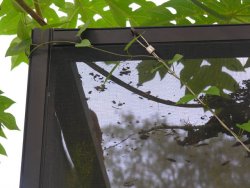
When the wind blows from right to left, this cable will be pulled tight trying to keep the screen enclosure from blowing over. It will pull down on the top member. At the same time, the wind forces on the screen face to the right will apply a lot of compressive forces to the top member and it will likely buckle from a combination of the compression and the bending caused by the pull of the cable. Some manufacturers make triangular brackets that are screwed onto the corner and allow the cable to be attached directly in line with the corner.
(click image for larger version) |
|
|