|
Is a Do-It-Yourself Installation for You?

|
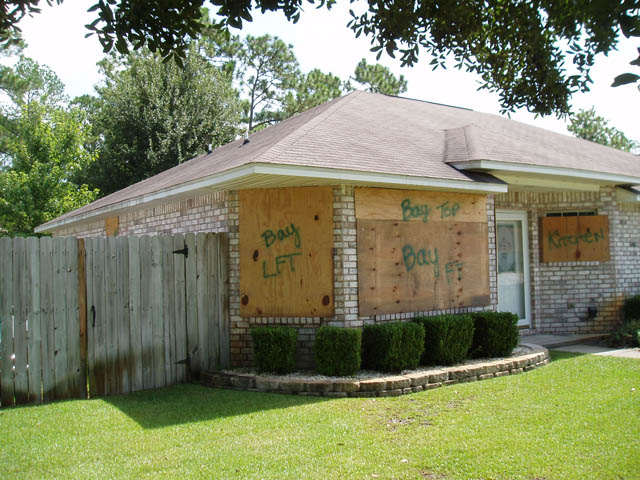
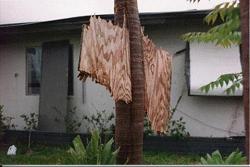
DIY plywood shutters
(click image for larger version) |
|
If you take on a shutter installation project as a do-it-yourself task, you need to be sure that you have enough information to get the shutter installed properly. We recommend permanent installation of fasteners for attaching shutters. Repeatedly installing shutters with nails or screws can damage your walls and weaken the connection when you really need it to work. Permanently installed fasteners make installation of shutters so much easier and faster than fumbling with screws and nails, plus this helps assure a more effective installation. The first things you need to know are:
- What types of shutters you want to consider [see
HRG_Shutter_Matrix.pdf
for ideas].
- How your walls are constructed including what types of finishes are installed over the structural part of the wall.
- Any special features such as a window sill that sticks out from the wall.
- Whether you want your shutters to qualify for insurance premium discounts.
With the types of shutters in mind and good information about different types of fasteners and anchors, you can decide what shutter solutions are best suited for your house and budget and pick the type of anchor to use for your house.
A table giving anchor size and spacing, using a one-size-fits-all philosophy, is included a little further down on this page. If you follow that spacing guidance, you can achieve a solid permanent anchor system for your shutters.
Next you will need to have or develop skill at installing fasteners into the walls of your house. This will likely involve skills at which you may not be practiced. This is especially true for concrete and concrete block installations that, in many situations and with most anchors and fasteners, require installation experience to ensure that the connections can withstand the vibrations created by hurricane winds. Special, though not exotic, tools may be required, such as a hammer drill, metal cutting blade for a skill saw, tools for setting anchors, ladders, etc. If you have these skills and have or can borrow or rent tools, then you may well want to consider installing shutters yourself. Bear in mind that to feel safe and be safe, shutter systems must be designed properly and installed properly.
Cost will likely be an important consideration when deciding whether to do it yourself or not. So bear in mind that though some panels may seem relatively inexpensive based on the square foot price of raw materials (such as plywood, or polycarbonates, etc.) you need to carefully lay out your panels and consider how much wasted material there will be that will raise the overall cost. Unfortunately cutting shutters from 4'x8' pieces of plywood or polycarbonate product will frequently result in a lot of scraps you can't use. Unless windows are small, you should figure that each window will require one 4 by 8 sheet of panel material. A typical bedroom window that is 3� by less than 6� will consume a full sheet, leaving scraps so small that they are practically worthless.
Professional installation relieves you of the burden of designing the shutter system and the physical task of installing them. It does not relieve you of the burden of selecting a reputable and competent installation company that is capable of designing shutter systems and then getting them installed. The design aspect may be made less risky if your building department requires a building permit and the building department is knowledgeable and able to review the shutter plans. Building departments cannot usually have the knowledge or time to make effective inspections of all installations. This is a weak link without an easy answer. One of the problems is that some shutter installation companies subcontract out the installation and do not have the incentive, knowledge, or will to inspect the installations themselves.
At times, the largest problems with hurricane shutter systems are the lead time for orders and installation backlog. For this reason, you will want to arrange for professionally installed shutters well in advance of the hurricane season. It is likely that having shutters made and installed during the off-season will save you money as well. Alternatively, you may choose the Do-It-Yourself (DIY) option, which can offer equal protection, reduced costs, and faster installation with minimal tools and average tools skills. There are several things to consider prior to selecting a DIY system.
- Whatever the system is, it should have as a minimum for homes in Florida, a Florida Building Code Approval. Approved systems are independently tested and reviewed for compliance with the building codes. In some jurisdictions with strict permitting and inspection requirements, it may be difficult to obtain code approved products for DIY installations because they are trying to assure that appropriate systems are being properly installed.
- Most cities and counties in Florida will require permits for shutter or impact window and door installation. Check with your building department for local requirements.
-
|
Video: Anchor Pull-Out Test
(click image to view video) |
|
Attachment to the structure is critical to ensure the system performs as tested. Defective or inadequate attachment of shutters can give a false sense of security and mean that all your investment in shutters is wasted when the shutters come off during a storm and do not protect your house. For these reasons be sure to follow the manufacturer�s engineering specifications in determining size, type, and spacing, embedment, and edge distances for fasteners. Substitutions of fastening and anchoring systems are strongly discouraged and may compromise the systems strength and performance. On the other hand some installations are peculiar enough that the manufacturer's recommendations simply cannot be implemented, yet alternative methods if engineered will work. Fastening is more critical than you may think because pressures applied to shutters can push in or pull out. In addition the vibration forces cause by hurricanes are much larger than you might think. Hurricanes are NOT winds that develop smoothly and then gradually recede. Instead hurricane winds are very gusty, so much so that they tear buildings apart. If you think about TV footage of hurricane winds you might recall how unsteady and how gusty they are. Fluctuating forces can tear fasteners and anchors of storm panels apart or vibrate them loose.
- Depending on the complexities of various installations, you might want to consider installing some shutters and letting a professional install others.
Do-It-Yourself Options for Protecting Windows and Doors:
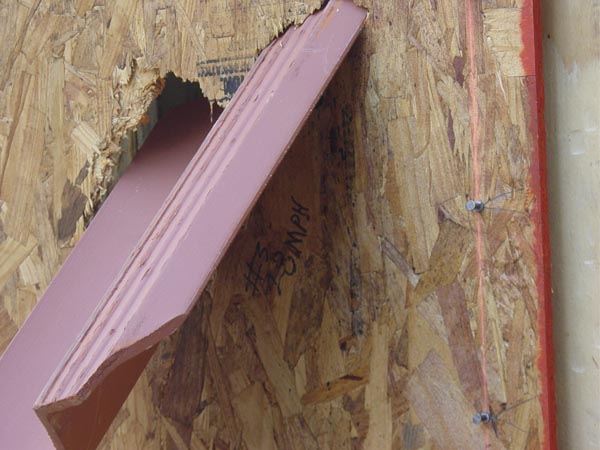
The least expensive option for protecting your windows and doors is to cover them with structural wood panels (plywood or OSB). Most building codes outside of Miami-Dade and Broward Counties allow you to cover windows with 1/2" (actually 15/32�) thick plywood or 7/16" Oriented Strand Board (OSB). We recommend plywood over OSB because the OSB must be about 1/3 thicker (or 5/8" thick) to provide the same impact resistance as 1/2" thick plywood. Even the 1/2" plywood can be easily penetrated by the 9-pound 2"x4" lumber test missile at impact speeds less than 27 mph (note the large missile tests for certifying products are conducted at 34 mph). However, the hole produced by the missile impact does not get bigger when the panel is subjected to wind pressures that would be expected in hurricanes with gust wind speeds of 130 to 140 mph. If fastened properly, the panels will stay in place during the storm. Consequently, the window behind the panel may get broken by the impact of large windborne debris and water may stream into the room. However, it is unlikely that your home will get pressurized to the extent that it starts to come apart due to the damaged window. If your home is poorly connected, the house may still come apart; but, at least window failures will not lead to premature failures at lower wind speeds.
If you install thicker (than 1/2") plywood, you can substantially increase the protection of your windows from flying debris but the panels will be heavier and consequently harder to store, handle and install. It is worth noting that it takes almost a �" thick sheet of plywood to provide the same level of protection as Miami-Dade County approved factory made shutters. If you want to provide more protection without having to handle heavy panels, testing has shown that you can use two layers of thinner plywood and achieve about the same resistance as a single sheet of plywood with the same total thickness. For example, two layers of 3/8-inch thick plywood will provide about the same resistance to windborne debris impacts as a single layer of �-inch thick plywood. Another consideration if you are considering using OSB is that it tends to swell around the edges when it gets wet and some types will tends to deteriorate when they repeatedly get wet. This could mean that you would have to replace OSB shutters from time to time and that would be costly. A problem with plywood is that it tends to warp when it is exposed to sun or rain. That warping may make subsequent deployments more difficult and they may end up requiring much more space when you store them � taking perhaps several more inches of space per shutter than their �� thickness.
Insurance companies probably will not give insurance premium discounts for plywood or OSB shutters even when permanently installed fasteners are in place. If you are interested in getting insurance discounts, you should check with your insurer to make sure that the products you select are eligible for any available discount.
Polycarbonate flat sheets are another type of do-it-yourself panel that is much more resistant to debris impacts than plywood. It is about as easy to cut and drill as plywood, and it is not subject to degradation because of rain and does not warp. By being thinner than plywood it does not take as much storage space. One quarter inch thick panels have resisted impacts of 9-pound 2"x4" lumber missiles at speeds over 60 miles per hour. The polycarbonate panel material is substantially more expensive than plywood (about 6 to 8 times as expensive) but allows light to enter the house and is becoming more popular for protection of windows in areas where daylight will help illuminate key rooms or portions of the house. We hear complaints that when people board up their house with plywood, they feel like they are living in a cave. Some homeowners with polycarbonate sheets are leaving them up for extended periods of time. While there are some coatings that will protect polycarbonate panels to reduce UV damage, most will discolor and loose strength with time, particularly if they are exposed to the sun for extended periods of time. These panels are frequently installed over fixed (non-operating) windows and are particularly common over curved or non-rectangular windows.
There are some product approvals for polycarbonate panels. However, they have to be installed according to the instructions associated with those specific product approvals in order to qualify for possible insurance premium discounts for flat sheet polycarbonate shutters. In addition, there are some opaque polycarbonate based panel systems available at some home improvement stores that have building code approval and should qualify if permanent anchors are installed according to the manufacturer�s instructions.
 Warning! Because of the potential danger of being trapped in a fire, you should not leave any externally mounted shutter that you can't open quickly from the inside installed on egress windows and door unless you have two exits from the rooms.
|
General Notes on Anchoring Shutters:
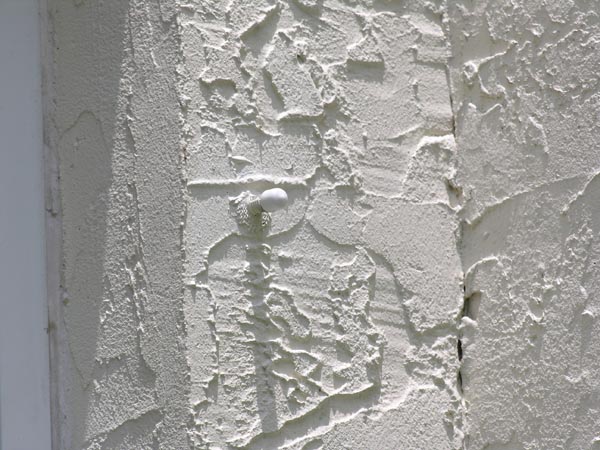
|
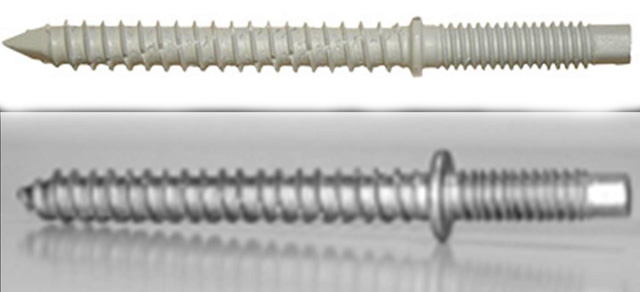
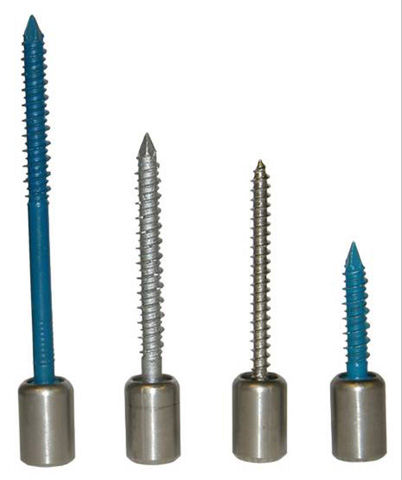
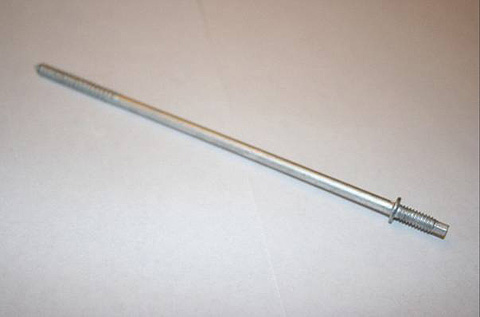
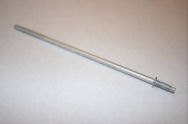
(6) Stainless Steel Threaded Rod Epoxy Grouted Permanent Anchor with cosmetic safety Cap
(click image for larger version) |
|
Regardless of what type of panel is used to protect your windows or doors, you need to make sure that it is well anchored to the structure of your house. Repeated nailing of panels to the same holes in the building framing can reduce the strength of the attachment by 50 percent or more and eventually facilitate rot. Similarly, fastening of masonry screws into the same hole more than twice reduces the capacity of the connections by more than 50 percent. Consequently, it is recommended that you install permanent anchors for all your panels. Besides, having permanently installed anchors makes it a lot easier (we mean a whole lot easier) to install and remove the panels each time you are threatened by a hurricane. Being able to more easily install and remove panels should encourage you to deploy them, even when you think the risk of potential damage is marginal. Table 1 provides guidance on the size and spacing of permanent anchors for do-it-yourself debris protection using plywood panels. The permanent connectors should be stainless-steel or other corrosion protected hardware. You can purchase end caps to cover protruding bolts from the same suppliers where you buy the bolts. Note that if you use 1/4-inch and 3/8-inch diameter hardware, you can use the end caps from popular metal closet shelving systems to cap the end of any studs that you may have sticking out of the walls (these caps may discolor or otherwise not withstand sunlight very well). Not all the fasteners you may want are readily available in Stainless Steel from your local home improvement store. You may need to order them from one of the major supply houses such as
Grainger,
MSC,
McMaster Carr, or
All Points. All Points tends to specialize in selling hurricane shutter fasteners, anchors, and specialized tools. Though they specialize in these parts, they do not offer any advice about spacings or connectors. They simply sell them. You can also sometimes find a larger variety and supply of stainless steel fasteners at home improvement stores located near the coast or by ordering online.
Table 1. Anchor Size and Spacing for Do-It-Yourself Shutters1,2
|
Fastener Type (with 2" embedment length)
|
Fastener Spacing for Wood Frame Structures3 (inches)
|
|
Panel Length less than 2'
|
Panel Length 2' to 4'
|
Panel Length 4' to 6'
|
Panel Length 6' to 8'
|
|
#8 Wood Screw based anchor
|
16 | 16 | 10 | 8 |
|
#10 Wood Screw based anchor
|
16 | 16 | 12 | 9 |
|
1/4~ inch Lag Screw based
|
16 | 16 | 16 | 16 |
1 This table is based on 140 mph design wind speeds a 45-ft average roof height and an open exposure.
2 Fasteners are to be installed at opposing ends or opposing sides of the shutter panels.
3 When anchors are installed in concrete, masonry, or masonry/stucco, you can use the same spacing if the anchors are vibration resistant and have a listed typical ultimate capacity (usually what is listed on the package) of 1500 pounds. Note that some anchors and especially
lead screw or lead split screw anchors are not considered vibration resistant in concrete and masonry installations.
|
Hollow Masonry Block Walls and Brick Veneer:
Typically the most difficult permanent anchor installations to get right are on hollow masonry walls or walls with brick veneer.
Hollow masonry wall installations are difficult and can be tricky because you have to keep the anchors at least a minimum of two inches away from the window or door edges, to keep from breaking out of the edge of the block when a missile impacts, and that usually means that you are installing the anchor into the thin part of the block. For commercial storm panel installations, the exact distance is specified by the storm panel manufacturer. Consequently, the anchors cannot be very long as they are usually embedded in the wall about an inch and a quarter, maximum. Good options for permanent installations in hollow masonry block include short stainless steel wedge anchors and short masonry screw based anchors provided the back of the block is not damaged during drilling of the hole and the screw type anchors are screwed in only once. If the back of the block wall is damaged during the drilling, installation of epoxy grouted threaded stainless steel rods is your best bet. More details about masonry anchor installations are given towards the end of the page.
You have to be particularly careful with wedge or expansion type anchors in hollow masonry walls. These anchors have to be properly set so that the wedge or expanding part of the anchor compresses against the concrete. Unfortunately, if you later bang on that anchor (a male type that stick out of the wall) or push too hard when you are trying to install or remove a screw from the anchor (female type anchors), you may break the anchor loose and it may fall into the cavity in the block. If you use a male type wedge or compression anchor, we recommend that you install a nut on the outside to keep you from knocking the anchor into the wall when you are trying to install the shutter. In most cases, you can just drill a larger hole in the shutter panel so that it fits over the nut and then fasten the shutter in place with a washered wingnut or use a fender washer with a second nut to attach the panel.
Brick veneer is just that, a veneer, and not a structural part of the house. In fact, most brick does not directly touch the house structure; instead brick is spaced about an inch away from the structural wall and is held in place by straps that are spaced about 2� apart. One brick rests on top of another with thin layer of mortar that should be considered a spacer, not providing a structural bond. For these reasons, the anchor has to go through the brick (the brick does not provide any holding strength), through the air space behind the brick, through wall sheathing and into the wall framing (2x4s or block) around the window or door. This means, for a wood frame house, that you have to drill a clearance hole through the brick in a location where you can solidly anchor into the wood framing. In addition, this type of installation requires a very long anchor as you will typically have to go through 3 1/2 inches of brick, 1 inch of air space, 1/2 inch of sheathing and then 2 inches into the wood frame. This means that the anchor length, separate from any portion that sticks out from the wall to attach the shutter, has to be about 7 to 8 inches long. Long bolts (PanelMates made by Textron, Elco) are specifically made for brick applications.
Plywood Shutter Designs: (Note: These systems may not qualify for insurance discounts. Check with your insurer.)
Additional suggestions and plans for plywood shutters are available from the APA (The Engineered Wood Association). They have prepared a series of do-it-yourself Hurricane Shutter Designs. They include:
|
Design 1:
|
Shutters for Wood-Frame Buildings
|
|
Design 2:
|
Shutters for Masonry Block Structures, Barrel Bolt Latch Supports
|
|
Design 3:
|
Shutters for Masonry Block Structures, Steel or Aluminum Angle and Screw Supports
|
|
Design 4:
|
Shutters for Masonry Block Structures, Shutters Attached to Outside Wall with Permanently Mounted Brackets
|
|
Design 5:
|
Shutters for Masonry Block Structures, For Openings Wider than 8 Feet
|
The detail illustrations show how you can install shutters on a wood-frame home (APA Design 1). Each design is available for free download from the
APA website. Click on publications and then enter hurricane shutters in the search box and click on search. A PDF file with all 5 of the APA guides is available by clicking on
APA Shutter Designs.
The Federal Emergency Management Agency (FEMA) also has produced a shutter design and installation guide and a PDF copy is available by clicking on
FEMA Shutter Designs. Our recommendation is that if you use the added 2x4 stiffeners shown in the FEMA designs that you put them on the outside of the plywood and attach them using an AFG-01 rated wood adhesive and screw through the plywood into the stiffener to hold it tight while the adhesive sets. Putting the 2x4s on the inside as shown in the FEMA drawings reduces the clearance between the shutter and the window glass and in our impact tests, we often broke wood members behind plywood. The broken end of the 2x4 could easily break the window.
Commercial Shutter Systems for DIY Installations
In hurricane prone areas you can find various kinds of shutter system kits at some home improvement stores. These include corrugated aluminum, steel and polycarbonate panels, flat sheets of cellular type polycarbonate, and fabric systems. These systems frequently include metal channels and tracks that are typically permanently installed above and below your windows. They are similar to units that you can have installed by shutter installation firms. However, they do not carry the full variety of aluminum extrusion profiles that you may need to deal with construction details on your house. Some extrusions (those more readily available to professional shutter installers) project farther from the face of the main part of the house so that shutters can be spaced away from house details that would otherwise be in the way of the shutters. Other extrusions available to professionals can make it much easier to deploy the shutters. If you elect to go the kit route, make sure that they are a product that has been tested, passed and approved using one of the large missile (9 lb 2x4 at 34 mph) impact tests and that you clearly understand how to securely mount them to your house. And make sure they are suitable for the particular windows and doors you want to protect. The instructions in some kits are not adequate to assure a secure installation.
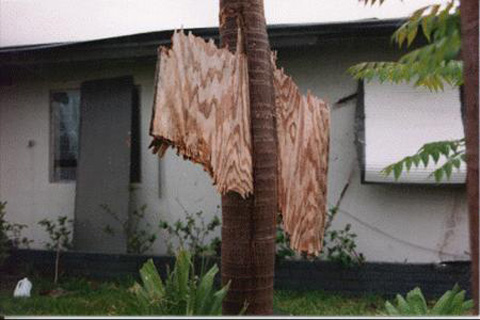
|
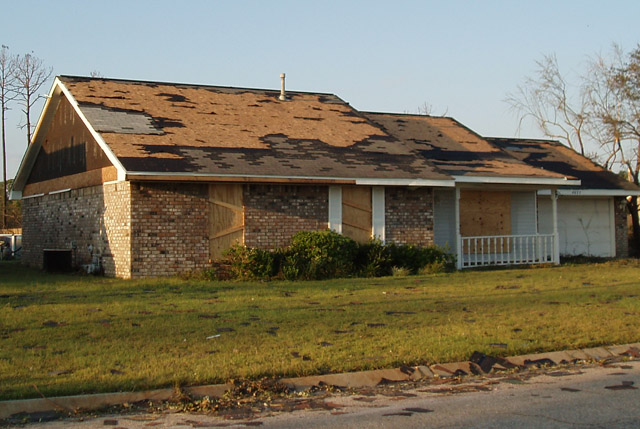
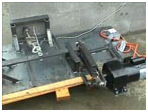
This picture shows the destructive nature of panels that come loose during a hurricane. If you are installing DIY panels, be sure to securely anchor the system to your framing. (Photo courtesy NOAA Photo Library.)
(click image for larger version) |
|
Make sure your shutters are labeled for each window and door, stored and ready to use before a storm threatens. It is too easy to forget between installation times what shutters go where. Installing permanent anchors will reduce your preparation time when a storm threatens and will give you more time to attend to other preparations. Building supply stores generally sell out of shutter materials quickly during a hurricane warning, so be prepared ahead of time.
If you do get caught having to make last minute preparations, you can find directions for emergency shutter construction and installation along with some animations that may help you visualize the installation process at
www.FLASH.org.
Don't Do This: Read the box below for what does not work and as of this writing do not meet the requirements of the Florida Product Approval system for opening protection.
|
CAUTION: Using spring clips, Velcro, barrel bolts, or wedging techniques will not provide a tested and reliable attachment system. These types of fastening techniques remain untested and can fail providing additional debris hazard for surrounding structures.
|
Specific Directions for Installing Anchors in Certain Types of "Problem" Walls:
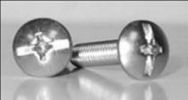
Hollow Block and Concrete Anchors: Direct Mount Systems: For direct-mount systems there are two basic different types of anchoring systems, Male and Female. Female anchors have a removable machine screw (sidewalk bolt) while Male anchors have a threaded end that receives a washered wingnut.

|
Stainless steel 1/4"-20 machine screw with a large flat head commonly called a "sidewalk bolt". They are available in a variety of lengths from �� to 6�.
(click image for larger version) |
|
|
|
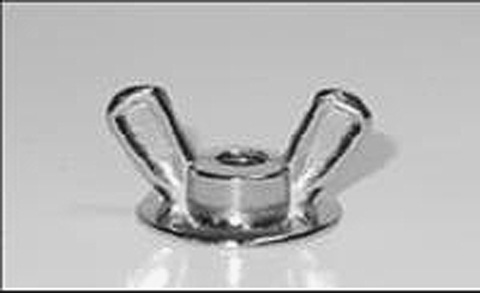
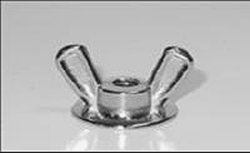
Nickel-plated zinc 1/4"-20 washered wingnut. Wingnuts should be stored, even if they are stainless steel, and not left in the weather where they can corrode or seize up.
(click image for larger version) |
|
|
|
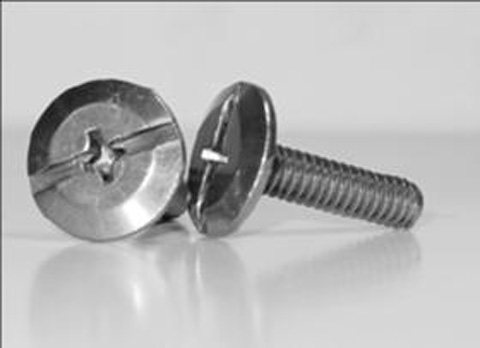
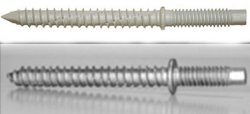
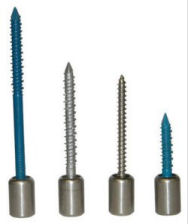
These are two different types of a typical Male system; the machine screw on the right end of these anchors receives the 1/4"-20 Washered Wingnut shown above. These should only be screwed once into the hole in a masonry wall. Otherwise they will have reduced anchoring capacity and may pull out when wind blows on other faces of the house and creates negative pressure at this opening.
(click image for larger version) |
|
|
|
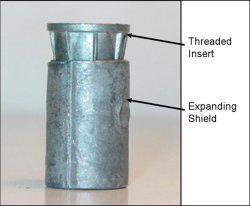
This is a lead expansion anchor (female) that can be used in hollow block or concrete and receives the Sidewalk Bolt pictured above. A number of companies use these anchors. However, these can be difficult to make work and we recommend that you avoid them for DIY applications. They have to be set very carefully with the proper tool or they may spin and never get properly set in the wall. In addition, you need to be careful when screwing in the sidewalk bolt that you don't push too hard and knock the anchor loose. We have gone back to professional installations that used them and found a number of the anchors to be loose and totally ineffective for holding on a shutter. We strongly recommend that do-it-yourselfers NOT use them.
(click image for larger version) |
|
Installing the Female Anchors: Bits, Drivers, and Setting Tools: Properly installing the female anchor system requires the right bits, setting tools, and care to make sure that a sound and secure installation is achieved.
- Be sure to drill the hole to the proper depth, the anchor must be set into the hollow block, not the stucco or finish. This requires checking the depth to make sure you are firmly in the block wall and the hole is deep enough to allow a solid embedment.
- Make sure to clean the dust out of the hole before inserting the anchor, the hole should be blown out with forced air to eliminate excess dust. Otherwise, the anchor may not achieve its full strength and may be prevented from being able to fully embed in the block.
- Be sure to put the anchor in the right way. The insert is flared and should be put into the hole first, otherwise the machine screw will pull it out of the lead shield when tightened.

|
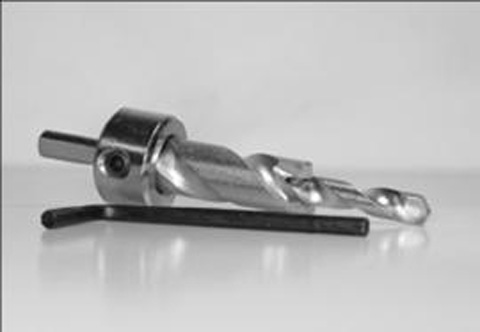
This is a combination bit used to drill the hole for the female lead anchor system. We strongly recommend that do-it-yourselfers NOT use them.
(click image for larger version) |
|
|

|
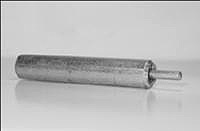
This is the setting tool used for concrete, you simply drill the hole, drop in the anchor, and using a hammer with the setting tool you drive the lead shield around the threaded insert to expand it. We strongly recommend that do-it-yourselfers NOT use them.
(click image for larger version) |
|
|
|
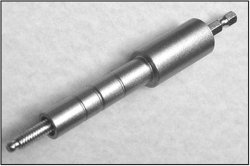
This is a specialty tool also used to set the lead anchor but this one fits in your drill. When setting these anchors in hollow block it is not possible to use the hammer since the anchor has nothing to seat to. For this application you used the drill powered setting tool, it threads into the anchor then you insert it into the hole, when you activate the drill it pulls the shield around the insert to expand the anchor. We strongly recommend that do-it-yourselfers NOT use them.
(click image for larger version) |
|
|
Installing the Male Anchors: Bits and Drivers: Installing the male anchors is not only easier; the male stud allows you to deploy a panel system much faster than with the female system because you can hang the panels on the connectors and then take your time about putting on the wing nuts. If you use female connectors you will end up holding the panel in place over the hole while trying to thread in the mounting bolt. In order to create a strong and secure installation, it is important to:
- Use the correct drill bit, hollow block requires a 3/16" masonry bit while concrete because it is much harder will require a slightly larger 7/32" bit.
- Make sure that you only install the anchor once; removing them and putting them back in will significantly decrease their holding power, you need to get it right the first time,
- Drill the hole once and don�t run the bit in and out repeatedly. Running the bit in and out will ream out the hole and create a loose weak connection.
- Be sure to clean out the hole, excess dust must be blown out of the hole before driving the anchor in,
- Snug up the anchor but don�t over tighten it. Over tightening will actually reduce the strength of the anchor or strip it out,
|
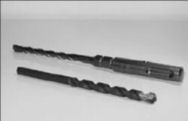
Both the 3/16" and 7/32" masonry bits are available for Hammer Drills or SDS Rotary Impact Drills. The SDS Rotary Hammer is a better drill for concrete; the Hammer Drill is suitable for softer masonry like hollow block.
(click image for larger version) |
|
|
|
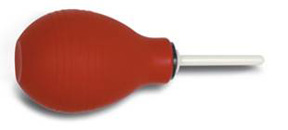
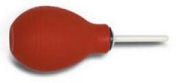
This is a Blow Out Bulb used to blow the excess dust out of a hole after drilling. You can also use straws, Slpicing a few straws together will keep dust out of your face.
(click image for larger version) |
|
|

|
The male anchors typically have a small hex end that uses a driver like the one above, be sure to purchase the right driver for you anchors, manufacturers typically have a slightly different hex size requiring the correct driver to fit it or to keep from stripping it while driving it into the hole.
(click image for larger version) |
|
|
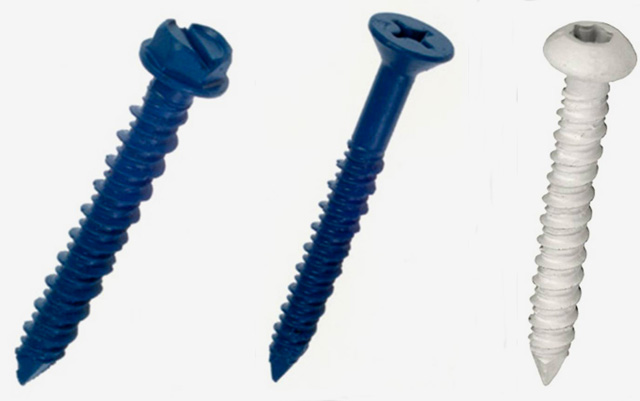
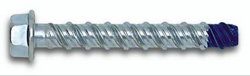
Hollow Block and Concrete Anchors: Anchoring Track Systems: The most common anchor used for anchoring track systems is a masonry screw anchor commonly referred to as a Tapcon. The installation issues to be careful about with this anchor system are the same as the male anchors discussed in the previous section. Masonry screw anchors come in all sizes and use a variety of different heads for different applications. Most masonry screw anchors can also be used for wood framed structures.
|
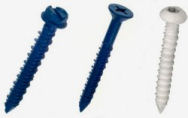
Common types of 1/4 inch masonry screw anchors include Hex head (left), Phillips flat head (center), and pan head (right).
(click image for larger version) |
|
|

|
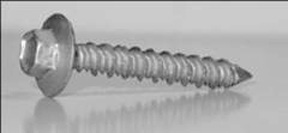
This is a washer-head masonry screw anchor.
(click image for larger version) |
|
|
|
(9) Another type of masonry screw anchor has a female head to receive machine screws (e.g. sidewalk bolt, truss head screw, or hex bolt). These are called Sammy Super Screws and feature a stainless steel head with a carbon steel masonry screw attached to the bottom. They are available from 1-1/2 inches long to 6 inches long.
(click image for larger version) |
|
|
|
Truss head screw (top) and hex bolt (bottom).
(click image for larger version) |
|
|
Typical applications for the Sammy Super Screw are those situations where you need a removable track or anchor; you can also use a lead expansion anchor. The advantage of the Sammy is it will work where you may have deeper veneers or trims, or where you need to seal the fastener into the wall to prevent moisture penetration. Once installed Sammy's should have a bolt screwed into them so dust does not clog the threads and insects don�t make a home out the cave. For aesthetic reasons you may prefer to use �� long sidewalk bolts because regular length ones will protrude so much. The advantage of using regular length screws is that they won�t get lost as easily.
|
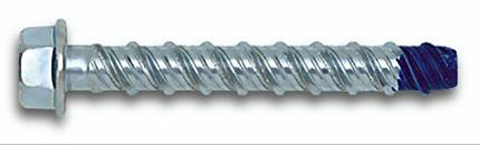
The Wedge-Bolt� anchor is a one piece heavy duty anchor with a finished hex head. It is easy to identify, removable and vibration-resistant.
(click image for larger version) |
|
For applications that require even greater strength you can increase the screw diameter to 5/16 or move to an even heavier anchor like the Wedge Bolt pictured below. The Wedge-Bolt incorporates a more aggressive thread design that allows it to be removed and replaced 3 times before losing holding power (concrete only). While its primary use is for concrete there are models available for hollow block as well. Wedge bolts are not yet being widely utilized by hurricane shutter manufacturers; but, do offer a very strong alternative. They are also available in stainless steel and come in 3/8 inch or larger diameters.
|
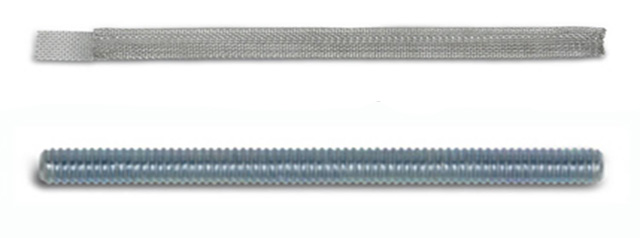
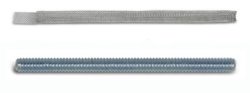
Stainless steel screen (top) and threaded rod (bottom) are used when anchoring to hollow block.
(click image for larger version) |
|
Alternative Anchors for Hollow Block: Epoxy Anchors: The strongest anchors for hollow block are the Epoxy Anchoring Systems. These are a little more difficult to use due to the additional accessories needed, the expense, and the fast cure time. Epoxy anchors are very strong when properly used and much more reliable than the mechanical anchor systems for hollow block shown in the previous section.
|
 IMPORTANT: These instructions (courtesy Powers Fasteners, Inc) are provided as an example of how the system is used and do not replace the specific manufacturer�s written instructions when using these systems.
|

|
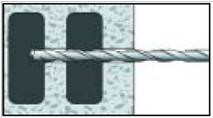
STEP 1: Drill hole using the appropriate drill bit as specified in the written instructions. Use compressed air to blow out the hole, a blow out bulb will not produce enough pressure to properly clean the hole.
|
|
STEP 2: Fill the stainless steel screen provided by the manufacturer with epoxy. Temperature will affect the flow of material from the tubes, be sure to run epoxy through the mixing tip when starting a fresh tube before using for anchoring.
|
|
STEP 3: Insert the stainless steel screen into the pre-cleaned hole; in some cases it is easier to put the screen into the wall first and then fill it with epoxy. If the hollow block is filled solid with concrete a screen may not be required.
|

|
STEP 4: Insert the threaded rod twisting it to insure good contact on all sides. Follow the manufacturer�s written instructions for full cure time before applying any load to the anchor.
|
Anchoring into Wood Framing:
|
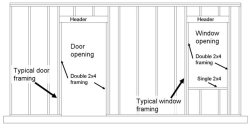
Typical wood framing components
(click image for larger version) |
|
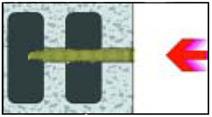
One of the most difficult framing systems to anchor to is wood framing. The reason is that wood framing is only found right at the opening and can be rather narrow, for this reason you need to be sure where the framing is located to insure your anchors penetrate the framing correctly, This requires a certain precision especially when the exterior finish is brick veneer or stucco with decorative bands. One way to determine the framing location is to use a stud finder from the inside to locate the vertical and horizontal members. The diagram below shows how a wood framed structure is typically framed. Fasteners only have the strength the manufacturer assumes when they penetrate fully into wood. If they penetrate only plywood or board sheathing instead of the framing members, they cannot provide the strength you need.
As you can see in the above diagram there are generally only two 2x4's on each side of a door or window opening. The top has a large header which is fairly easy to hit (unless the builder pushed it up to the top of the wall and framed in around the window as shown below the window) but under the window there is only one 2x4. The preference for most shutter systems is to attach side-to-side since the vertical 2x4's are easier to find and penetrate. The problem is that many shutter systems like accordions, plywood, sheet products and other systems that require attachment on all four sides are left without a place to attach at the bottom because brick sills, foam bands, or wood sills, block access to the single 2x4 at the bottom.
In addition the variety of decorative finishes and brick designs being used today means anchors must be long enough to pass through the finish and details to penetrate the framing with the required embedment depth (we and the shutter panel manufacturers recommend 2-inches embedment into the wood frame).
|
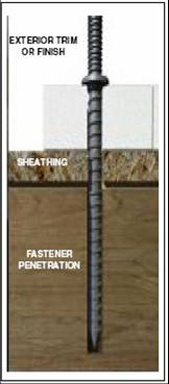
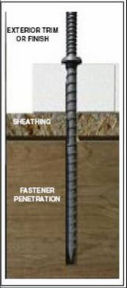
Determining the Length of Fastener Needed
(click image for larger version) |
|
The picture at left is a cutaway of a wall; you can see the finish, the sheathing, and the framing. Determining the proper length means you add the finish thickness to the sheathing thickness and then add the required embedment.
Example: Brick veneer is generally about 3-1/2 inches thick and has a 1 inch air space behind it so, if the embedment depth from the Anchor Chart in the engineering calls for 2 inches, the formula is: 3-1/2" brick + 1" air space + 1/2" sheathing + 2" embedment = 7 inches. If you are using a male system then the overall length of the anchor will need to be about an inch longer or 8 inches.
|
Where thick wood trim surrounds windows or doors there may be a problem finding a fastener that is long enough to pass through the trim and adequately penetrate the wall framing member (stud) without being so long that it penetrates the interior wall. By using a little ingenuity the issue can be solved. One possible solution would be to use a spacer washer with a fastener that is too long. The spacer could be a little board with a hole drilled in it. The disadvantage of this method is that one could lose the spacers between deployments.
Installation: Wood Frame with Brick Veneer: As noted above, for these applications you will need very long anchors to reach the framing behind the brick, these are available from specialty suppliers. In most cases attachment at the bottom of the window is difficult if not impossible without the use of a beam that can be attached to either side of the opening. The beam can be placed above or below the sill. If it is installed below the sill, it may create a porous system because of the large gap (1 to 2 inches) formed at the sides of the shutter system when it is built away from the wall. To fill the gap you need to put in additional closure strips made from aluminum angle or tube.
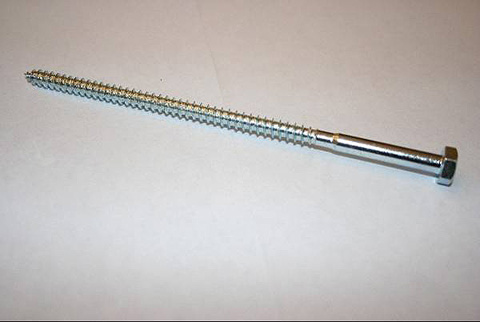
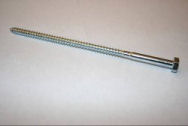
Fasteners for brick veneer on wood framing:
|
1/4-inch hex lag screw available in 6" and 8" lengths installed with a 7/16 inch nut driver or socket. This is not a permanent installation but could be used in a pinch with a followup permanent installation in the holes made by the lag screw.
(click image for larger version) |
|
|
|
ELCO TVAS (Through Veneer Anchor System) can be used for removable tracks or direct-mount panel systems; the machine screw end is designed to receive either the serrated flange nut or the washered wingnut.
(click image for larger version) |
|
|
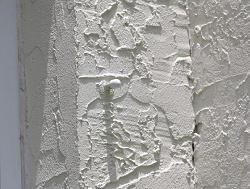
Installation: Wood Frame with EIFS, or EIFS Trim (Synthetic Stucco) with Traditional Stucco Systems (Hard-Coat): EIFS stands for Exterior Insulating Finish System and is commonly referred to as "synthetic stucco". It uses expanded polystyrene sheathing, (looks like white Styrofoam coffee cups and is called EPS) usually about 1-1/2 inch thick, underneath and is popular for use in decorative bands and architectural accents. EIFS systems use a thin scratch coat or primer and then a colored finish coat while traditional stucco (hard-coat) uses a cementitious scratch coat on metal lath generally about 3/8 inch thick with a colored finish coat.
Both systems require special attention since penetrating them with anchors may introduce water leaks that can cause water damage to the underlying sheathing and even the framing of the structure. Fastener penetrations should be sealed using a one part urethane or structural silicone sealant. Caulk used for the interior or, other types of exterior sealants are not suitable since they may fail to bond or even worse can dissolve the underlying EPS system. Sonnalastic 150 One part Urethane or Dow Corning 795 Structural Silicone are both excellent sealants and are safe when used with EIFS-EPS systems.
Since both traditional and EIFS stucco systems may have the foam band accents around the windows installation of shutters takes special care and preparation. Class Action lawsuits and water damage associated with EIFS systems have caused insurance companies to forbid contractors from working on the systems. This means they accept all liability if they install shutters on them. As a result it may be difficult to find a contractor that will agree to install shutters on traditional stucco with EIFS decorative bands or EIFS systems. The biggest problem is that the hurricane shutter system, regardless of the type, will transfer load to the foam bands and wallow them out or crush them. In the process this will create slack at the anchor points that could cause failure when the shutter is subjected to hurricane winds.
The best product for EIFS or EIFS Decorative bands is Impact Resistant Windows and/or Doors.
If the decorative bands are a traditional (hard-coat) system any shutter system can be applied as long as the fastener penetrations are properly sealed.
Professionally Installed Shutters
Back to Main Openings Page
|