|
Evaluating the Roof-to-Wall Connection:
The connection between your roof structure and the walls is one of the most important structural connections in your house. It is also one of the things that you may be able to strengthen without too much disruption to the interior of the house. If it is possible to gain access to the connection along the eave either because there is no soffit (and consequently access is easy) or through your soffit area (the flat bottom surface at the eaves that forms a sort of ceiling where the roof overhangs the exterior wall) it may be possible to install straps or clips that will anchor the roof structure to the top of the wall and preferably directly to the wall studs. Another excellent opportunity to strengthen the roof-to-wall connection is when the house is being re-roofed. At that time, removal or partial removal of roof deck sheathing at the eaves, that exposes the roof to wall connection, will allow the installation of brackets, clips or straps that will reinforce the connection.
The first thing you need to do is determine how well your roof structure is attached to the walls. In older wood frame construction, the connection of roof trusses or rafters to walls is 2 or 3 sixteen penny (16d) nails driven at angles (toe nailed) through the rafter or truss into the top plate of the wall. In newer construction, metal straps or metal hurricane ties were added that anchor the trusses or rafters to the top plate and sometimes to the studs in the walls below. In early applications of straps, it was considered sufficient to use straps on every other truss or rafter. Today, every truss or rafter is anchored with a strap if one is following high wind construction guidelines. In your attic or in an unfinished garage, use a flashlight to look at the connection between the trusses or rafters and the outside walls of the house. Try to determine whether you can see any indication of metal straps. If you see straps, check to see whether they are on every connection or every other connection. If you have difficulty determining what kinds of connections exist, there are now a couple of devices where a small camera and light is mounted at the end of a semi-flexible/semi-rigid (you can bend it to a particular shape and it will hold it) roughly �'' diameter tube that transmits the image back to a small screen. At least one of these devices allows you to record the image. This type of device can be used through a hole in the soffit or with an extension will allow viewing of a roof-to-wall connection from some distance back from the eaves. Print out the checklist available by clicking on Wood Frame Wall Checklist and use it to record information about the roof-to-wall connection. Assessment suggestions and some idea of the implications of what you find are included on the checklist.
Since most of the straps used on older homes connect the roof framing to the double top plate of wood frame walls, the second thing you need to know is how forces applied to the top plate are transferred into the wall studs or to the floor or foundation below. If you are counting on exterior wall sheathing to transfer the loads from the top plate to the wall studs, you will want the roof straps to be installed on the outside of the wall. When you are counting on the exterior wall sheathing to transfer the loads from the double top plate to the wall studs and the existing straps are installed on the inside surface of the wall, you should discount these existing straps unless there are corresponding metal brackets connecting the top plate to the tops of the wall studs below or a threaded rod or cable is used to connect the top plate to the floor or foundation below. If the connections are not lined up on the same side of the wall, the double top plate will tend to rotate when the roof tries to lift up and the connection is much weaker than one where they are lined up on the same side. The checklist will help you assess this condition.
Retrofitting Roof-to-Wall Connections
Areas where the roof framing meets the top of outside walls are normally hidden by drywall on the inside, by wall cladding and soffit panels on the outside, and by roof sheathing and the roof covering above. The following paragraphs outline some ideas for how you may be able to strengthen the roof to wall connection.
Wind uplift forces on your roof tend to be highest at the ends and outside corners of your roof and are higher for gable ends than for hip roof ends. Consequently, the most important areas for retrofitting roof-to-wall connections are the 6-feet to 8-feet of nearest outside corners, where the trusses or rafters actually connect with the exterior wall. Similarly, retrofitting roof-to-wall connections at gable ends are more important than retrofitting roof-to-wall connections where you have a hip roof end. This isn�t to say that you do not need to retrofit roof to wall connections in hip roofs or to add straps along the entire length of the exterior walls that are supporting the roof trusses or rafters. It is merely a suggestion for setting priorities when access and costs are factors that limit your ability to get the entire job done at one time.
|
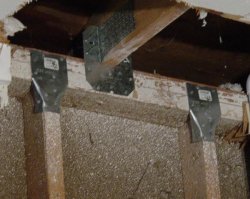
You can use a combination of straps to transfer uplift from the trusses or rafters through the double top plate and into the wall studs. The more structure you can engage in resisting the uplift, the better. This photograph shows two sets of connectors. The top one connects a truss or rafter to the top of the double top plate at the top of the wall and the other connectors connect the double top plate to the studs.
The lower connectors shown, Simpson SP2s or a UPS SPT22s, were used because the retrofit was being done from the inside of the house and the H10 was installed on the inside surface of the double top plate. Consequently, a connection between the double top plate and the wall studs had to be made on the inside surface of the wall as well, regardless of what the wall sheathing was used or how well it was connected.
(click image for larger version) |
|
Retrofitting from the Inside of the House:
There are really no easy ways to install hurricane straps from the inside of your house, unless it is done when remodeling, because drywall will have to be removed and replaced. You can use the following tricks to help make this process easier and less disruptive. Note that you only need to remove a strip of drywall along the top of the wall and ceiling on the exterior walls where trusses or rafters are supported. The basic steps include:
1. Remove a Strips of Drywall: To limit the amount of drywall that has to be replaced use a ruler and pencil or a chalk line to mark a straight uniformly wide strip of dry wall that you can cut and remove from the wall and the ceiling. This will make it easier to repair the drywall after you finish installing the straps.
2. Move Attic Insulation: If you choose, you can use a small rake in the attic to pull any insulation back from the edge of the ceiling so that it doesn't fall into the room when you remove the ceiling drywall.
3. Install Connectors: When the strengthening is being done from the inside, the ideal connector to use is one that connects rafters or trusses directly to wall studs. This can only be done where the rafter or trusses are immediately above or immediately to the side of studs below. In that case a twist strap connector can be used. A disadvantage of this connector is that to install a sufficient number of fasteners through the bottom end of strap and into the stud, the strap would need to extend down about 4-1/2'' on the stud. Where studs are not aligned with rafters or trusses; or, when you choose not to use a twist strap connector, you can use two sets of connectors as shown in the photo above. One set connects the rafters or trusses to the top plates and the other set connects the top plates to the studs. Since many rafters or trusses are spaced at 24-inces on center and most wall studs are spaced at 16-inches on center, there may be some locations where the rafters or trusses line up with the wall studs and some where they do not. It is perfectly acceptable to use a combination of straps that connect the rafters or trusses to the wall studs and sets of straps that transfer the forces from the rafters or trusses through the double to plate and into the wall studs.
4. Fix Holes in the Drywall: You may be able to cover the drywall openings with a large crown molding, covered strip lighting along the wall, or you could replace the drywall in such a way that it adds a beveled or tray ceiling look to the room. All of these options probably sound easier than they actually are and may not produce an acceptable look for the room. Simply replacing the drywall and having a professional drywall finisher complete the job may be the easiest solution if you are undertaking a retrofit from the interior. However, one of the two exterior access options will likely be more cost effective.
|
Installing Connections in Existing Homes
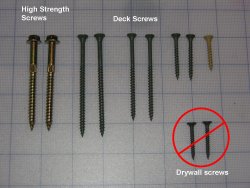
Suitable fasteners: You can use 10d nails that are 1-1/2'' long or you can use #8 screws 1-1/4'' or longer. Do NOT use drywall screws because they are too brittle to use for these structural connections.
Installing fasteners: The impact of a hammer to drive nails for fastening connectors to wall studs and roof framing members where ceilings and walls are still partially covered with drywall, plaster, or other brittle finishes can cause cosmetic damage to the finishes.
Pneumatic palm nailers, designed to drive 10d 1-1/2'' nails into connectors are very handy and install nails quickly while rarely damaging most wall finishes. Alternatively, one can use screws instead. Where the straps to be installed fall on top of plates on the sides of trusses, it is acceptable to drill a small hole through the plate so that the screw can be started. You will not weaken the plate.
|
Retrofitting from the Outside through the Soffit Area:
It is frequently possible to get access to the connection between the rafters or trusses and the top of the wall from the outside either because the connection is exposed or by removing soffit panels. This is a fair amount of work but it isn�t too difficult. Plywood or board like soffit panels can be carefully pried off and usually they can be re-installed. Sometimes vinyl soffit panels can be removed by deflecting them sufficiently to pull one end out of its support channel; but, if the vinyl is old or it is cold they may crack. Generally, aluminum panels will have to slid down to the corners of the eave because they cannot be deflected enough without creating permanent unsightly creases. The trick is to number the soffit panels so that it is possible to put each of them back where they started. This could be important if they were cut to fit the length of the overhang that might well change even along the face of the wall. Removing vinyl or aluminum soffit panels gives a great opportunity to better secure the soffit system to the house. See Roof and Attic Water Intrusion for more details about this. Once a couple of the soffit panels have been removed take a close look at the top of the wall and the existing connection of the trusses or rafters. Look to see whether there is plywood or OSB sheathing on the outside of the wall studs and whether the sheathing goes all the way to the top of the top plate.
If there is plywood or OSB on the wall, your wall is much stronger than if this were not there. However, you should check the nailing at the top of the wall sheathing and add 10d nails so that the overall nail spacing of existing and added nails is about 4'' on center, but no closer than 3'' on center. This will improve the wall sheathing connection to the top plate. Nails closer together than 3'' tend to split wood instead of improving the connection. With properly nailed sheathing, the wall is stronger because the top of the wall is better connected to the bottom of the wall and when the roof is connected to the wall there will be a good connection all the way to the bottom of the wall. You can install straps that connect to the rafters or trusses right over the top of the wall sheathing. Make sure that the nails hit the double top plate behind the sheathing.
If you find fiber board or foam sheathing it will provide almost no connection between the double top plate and the wall below. In these cases, it will be necessary to apply combinations of straps, similar to that described above for retrofitting from the inside of the house, to provide a path to transfer forces from the roof structure to the wall framing.
If there is brick on the outside of the wall, it is only a veneer that is not well attached to the house and the bricks are not well attached to each other. So strapping to the brick is ineffective and a waste of effort. However, the brick veneer frequently stops short of the top of the wall and it may be possible to gain enough access to strap the trusses or rafters to the wall framing behind the brick. Whether you can use connectors from the rafters or trusses that fasten just to the double top plate or have to complete the connection to the wall studs will depend on the type of sheathing installed behind the brick. The logic is the same as discussed above for plywood or OSB sheathing versus fiber board or foam sheathing.
Although connector manufacturer�s catalogs show some connectors installed on the inside face of walls, they can be installed on the outside face. The biggest issue is maintaining the connections at the top on the same side of the wall so that there isn�t a tendency for the double top plate to roll up.
Retrofitting from above (through the Roof):
When your home is being re-roofed, there is a great opportunity to gain access to the roof-to-wall connection by removing roof sheathing at the eaves of the house and installing straps, clips or right angle brackets to reinforce the connection between the roof structure and the walls. The following specific guidelines were developed for the Florida Building Commission to support a mandate by the State Legislature that requires houses valued at more than $300,000 to include some roof-to-wall retrofits as part of a re-roofing project. The legislation limited the required expenditure to 15% of the cost of the re-roofing. Consequently, the lengths of wall where retrofits were prescribed were limited to the areas where uplift loads are expected to be highest. Use of larger capacity straps such as H10s and retrofitting more of the wall length is encouraged and recommended, especially for larger homes.
Prescriptive method for gable roofs on a wood frame wall:
Unless it is possible to verify through non-destructive inspection or from plans prepared by a design professional that the roof structure is anchored at least as well as outlined below, access shall be provided to a minimum of 6-feet of framing members, measured from the corner, along the exterior wall on each side of each gable end. Wherever a strap is missing or an existing strap has fewer than four fasteners on each end, approved straps, ties or right angle brackets with a minimum uplift capacity of 500 lbs shall be installed that connect each rafter or truss to the top plate below. Adding fasteners to existing straps shall be allowed in lieu of adding a new strap provided the strap is manufactured to accommodate at least 4 fasteners at each end. Wherever access makes it possible (without damage of the wall finishes below the soffit), both top plate members shall be connected to the stud below using a stud to plate connector with a minimum uplift capacity of 500 lbs. Use of straps that connect directly from the rafter or truss to the wall stud below shall be allowed as an alternate provided the two members align with no more than 1-1/2'' offset.
Prescriptive method for hip roofs on a wood frame wall:
Unless it is possible to verify through non-destructive inspection or from plans prepared by a design professional that the roof structure is anchored at least as well as outlined below, access shall be provided at a minimum to the hip rafter, to the hip girder and to one rafter/truss on each side of the hip girder at each corner of the hip roof. The hip rafter, the hip girder and the rafters/trusses adjacent to the hip girder that are not anchored with a strap having at least four fasteners on each end, shall be connected to the top plate below using a strap or a right angle gusset bracket having a minimum uplift capacity of 500 lbs. Adding fasteners to existing straps shall be allowed in lieu of adding a new strap provided the strap is manufactured to accommodate at least 4 fasteners at each end. Wherever access makes it possible (without damage of the wall finishes below the soffit), both top plate members shall be connected to the stud below using a stud to plate connector with a minimum uplift capacity of 500 lbs. Use of straps that connect directly from the hip rafter, hip girder or adjacent rafters/trusses to the wall stud below shall be allowed as an alternate provided the two members align with no more than 1-1/2� offset.
|
In any of the structural retrofits, we recommend screws as opposed to nails to avoid nail pops from existing wallboard - never use drywall screws, they are very brittle and will snap off - use the more ductile deck screws or specialty high strength screws.
(click image for larger version) |
|
The Proper Roof-to-Wall Retrofit Depends on the Wall Construction:
If you find plywood or OSB sheathing on the outside of the wall studs, you are in pretty good shape for improving the anchorage of the roof to the walls. If you have trusses, a Simpson H10 bracket or a USP RT16 bracket would be a good choice. You can slightly bend the flanges where you attach to the truss so that the H10 or RT16 will stay in place. Because of the possibility of drywall nails showing (nail pops) it would be best not to use a hammer since hammer blows can all too easily cause nail pops. Instead, install the straps with #8 deck screws (not drywall screws - they break too easily). As an alternative, you could drive nails into as many holes as possible using a palm nailer. Use 1-1/2'' long #8 deck screws or 8d nails to attach the straps to the truss but use 2-1/2'' long #8 deck screws or 8d nails to connect through the sheathing and into the top plate members. If you find a double truss, you can use a Simpson H10-2 or USP RT16-2 bracket to go around both trusses. Note that you will use 3'' long #10 screws or 3'' long 10d nails in an H10-2 or RT16-2 bracket. If you have rafters with ceiling joists connected to their sides, check to see if a Simpson H10-2 bracket or USP RT16-2 bracket will work by determining how close the top nail hole for the rafter comes to the top of the rafter. If that top hole is within about 1-inch of the top of the rafter, the H10-2 or RT16-2 is probably a reasonable choice. If not, we have seen lots of rafters split along their length when the strap is only connected near the bottom of the rafter. If you need more length up the side of the rafter, or if you can squeeze the end of a strap over the top of the rafter between the rafter and the sheathing and put one nail into the far side of the rafter, Simpson�s MTS12 or LTS12 straps or USP�s MTW12 or LTW12 straps are good options. Usually, one can wedge a strap between the top of the rafter or truss and the roof sheathing. Try to position these straps to get as many nails into the double top plate (top three inches of the wall) as possible. In addition to installing connectors, nailing the plywood or OSB sheathing to the top plates will be beneficial. Add 10d nails so that the overall nail spacing of existing and added nails is about 4'' on center, but no closer than 3'' on center. This will improve the wall sheathing connection to the top plate. Nails closer together than 3'' tend to split wood instead of improving the connection.
If you do not find plywood or OSB sheathing on the outside of the wall framing, it is very important to make a better connection between the rafters or trusses and the wall studs because most other materials simply do not provide much of a connection between the double top plate and the wall studs. The key in this case is to transfer the uplift forces into the wall studs. The fiberboard or foam sheathing is useless for this. Consequently, you need to strap the trusses and rafters directly to the tops of the wall studs whenever they line up close enough. Otherwise, you will need to strap the trusses or rafters to the top plate and the top plate to the wall studs. The MTS12 and LTS12 straps are good choices for connecting the trusses or rafters to the wall studs or top plates. The Simpson H2.5A (a conventional hurricane tie) and H8 (a twist strap) connectors or the UPS RT7A (a conventional hurricane tie) and RT8A connectors are good choices for connecting the top plates to the wall studs if you have access to the sides of the wall studs. The Simpson SP2 or UPS brackets are a good choice when access to the sides of the studs is difficult. Note that you will probably have to remove some of the fiberboard or foam sheathing at the tops of the walls in order to connect any of these straps. A razor knife might be a handy tool to cut away material. If you only end up connecting the rafters or trusses to the top plate, you may not improve the strength of the connection very much as the wind may just lift the roof off along with that top plate.
Another approach that can be used when rafter tails are exposed and there are no soffits to hide brackets is to add a frieze board on the outside wall to hide the straps. In some circumstances, one might consider using pre-finished boards like synthetic trim boards. Alternatively one could paint frieze boards a trim color (i.e. a contrasting color to the walls) in order to eliminate having to paint an entire wall. Painting the frieze board to match the existing trim will not typically result in a perfect match, but usually it not will be unobjectionable because in most circumstances old trim and the new frieze boards will not be right next to each other. Also, bear in mind that as paint ages it loses some of its sheen thus making the new paint a better match to the existing paint within a year or so.
Back to Wood Frame Walls
Back to Main Wall Page
|